background image

11

English

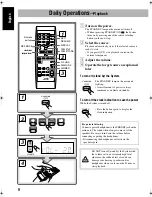
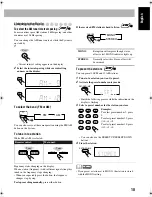
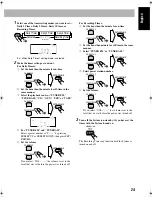
To tune in to a preset station

1

Select a band (FM or AM).

2

Select a preset number for the station you store.

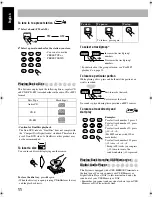
Playing Back a Disc

This System can play back the following discs—regular CD 
and CD-R/CD-RW (recorded either in the audio CD or MP3 
format).

• Caution for DualDisc playback

The Non-DVD side of a “DualDisc” does not comply with 
the “Compact Disc Digital Audio” standard. Therefore, the 
use of Non-DVD side of a DualDisc on this product may 
not be recommended.

To insert a disc

You can insert discs while playing another source.

To close the disc tray,

 press 

0

 again.

• When the disc tray is open, pressing CD 

6

 closes the tray 

and the playback starts.

To select a track/group

*

* For details about the group selection, see “For MP3 

playback” on page 12.

To locate a particular portion

While playing a disc, press and hold until the portion you 
want is reached.

No sound is played during this operation on MP3 sources.

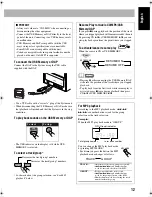
To locate a track directly and 
start play

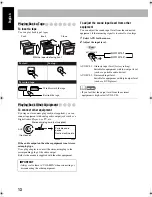
Playing Back from the USB Memory or


Digital Audio Player

This System is equipped with a USB MEMORY terminal on 
the front panel. You can connect your USB Memory or 
Digital Audio Player (DAP) to this terminal and enjoy the 
sound out of your USB Memory or DAP.
• Remember you cannot send any signal or data to your USB 

Memory or DAP from this System.

• You can also use the 

PRESET UP or 
PRESET DOWN.

Disc Type

Mark (logo)

Audio CD

CD-R

CD-RW

Remote
ONLY

FM

AM

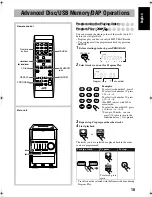
1

4

7

0

2

5

8

3

6

9

10

Main Unit

ONLY

To start:

To pause:

To stop:

To release, press again.

Examples:

To select track number 5, press 5.
To select track number 15, press 

10 

 1 

 5.

To select track number 30, press 

10 

 3 

 0.

(For MP3 sources with 100 or 
more tracks)
To select track number 125, press 

10 twice 

 1 

 2 

 5.

* For up to 99 tracks, you can press 

10 twice to turn to the 

condition before  10 is pressed.

Decreases the track/group* 
numbers.

Increases the track/group* 
numbers.

Fast-forwards the track.

Fast-reverses the track.

Remote
ONLY

1

4

7

0

2

5

8

3

6

9

10

UX-G45[UW].BOOK  Page 11  Tuesday, May 30, 2006  2:07 AM

Содержание CA-UXG45

Страница 1: ...UX G45 Consists of CA UXG45 and SP UXG45 CA UXG45 SP UXG45 LVT1520 005B US UB MICRO COMPONENT SYSTEM INSTRUCTIONS English 中 文 ...

Страница 2: ...l shocks fire etc 1 Do not remove screws covers or cabinet 2 Do not expose this appliance to rain or moisture CAUTION Do not block the ventilation openings or holes If the ventilation openings or holes are blocked by a newspaper or cloth etc the heat may not be able to get out Do not place any naked flame sources such as lighted candles on the apparatus When discarding batteries environmental prob...

Страница 3: ...e Maintain an adequate air path for ventilation by placing on a stand with a height of 10 cm or more About the cooling fan A cooling fan is mounted on the rear panel of the unit to prevent abnormal temperature inside the unit thus assuming normal operation of the unit The cooling fan automaically starts rotating to intake external cool air when the volume is increased up to more than a certain lev...

Страница 4: ...There are no user serviceable parts inside the Unit leave all servicing to qualified service personnel 3 CAUTION VISIBLE AND OR INVISIBLE CLASS 1M LASER RADIATION WHEN OPEN DO NOT STARE INTO BEAM OR VIEW DIRECTLY WITH OPTICAL INSTRUMENTS 4 REPRODUCTION OF LABEL CAUTION LABEL PLACED INSIDE UNIT ...

Страница 5: ...erations Sound Other Adjustments 15 Adjusting the Volume 15 Adjusting the Sound 15 Changing the Display Brightness DIMMER 16 Setting the Clock 16 Turning Off the Power Automatically 17 Advanced Disc USB Memory DAP Operations 18 Programming the Playing Order Program Play 18 Playing at Random Random Play 19 Playing Repeatedly Repeat Play 20 Prohibiting Disc Ejection Child Lock 20 Advanced Tape Opera...

Страница 6: ...brought directly from a cold to a warm place Should this occur the System may malfunction In this case leave the System turned on for a few hours until the moisture evaporates unplug the AC power cord then plug it in again Internal heat A cooling fan is mounted on the rear panel to prevent heat buildup inside the main unit see page G 2 Others Should any metallic object or liquid fall into the Syst...

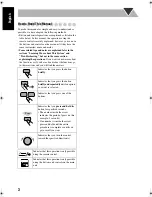
Страница 7: ...f you have a doubt about the functions go to these sections and you will find the answers Indicates that you press the button briefly Indicates that you press the button briefly and repeatedly until an option you want is selected Indicates that you press one of the buttons Indicates that you press and hold the button for specified seconds The number inside the arrow indicates the period of press i...

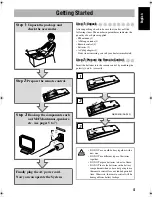
Страница 8: ...polarity and correctly AM EXT GND AM LOOP Step 1 Unpack the package and check the accessories Step 2 Prepare the remote control Step 3 Hook up the components such as AM FM antennas speakers etc see pages 5 to 7 Finally plug the AC power cord Now you can operate the System DO NOT use an old battery together with a new one DO NOT use different types of batteries together DO NOT expose batteries to h...

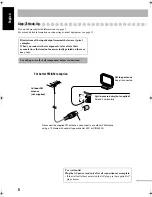
Страница 9: ...ally printed on the rear may vary Turn the power off to all components before connections To a wall outlet Plug the AC power cord only after all connections are complete If the wall outlet does not match the AC plug use the supplied AC plug adapter Disconnect the supplied FM antenna and connect to an outdoor FM antenna using a 75 Ω wire with coaxial type connector IEC or DIN45325 Vynile covered wi...

Страница 10: ...GND AM LOOP 220V 240V AC VOLTAGE SELECTOR 110V 127V FM antenna supplied Extend it so that you can obtain the best reception AM loop antenna supplied Turn it until the best reception is obtained Non striped Black striped ...

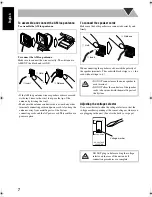
Страница 11: ...aker cords Make sure the both speakers are connected correctly and firmly When connecting the speaker cords match the polarity of the speaker terminals The cord with black stripe to the cord without stripe to Adjusting the voltage selector Use a screwdriver to slide the voltage selector so that the voltage marker is pointing at the same voltage as where you are plugging in the unit See also the ba...

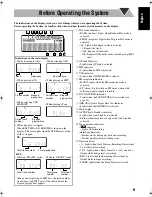
Страница 12: ... when disc playback stops with Auto Standby activated p Tape operation indicators indicator Lights while recording 23 tape direction Flashes slowly during playback and recording Flashes quickly while rewinding a tape q Timer indicators Lights when Daily Timer or Recording Timer stands by flashes while working 1 2 3 Lights when a Daily Timer 1 2 or 3 stands by flashes while being preset or working ...

Страница 13: ...ON 3 4 4 1 7 Á SET RESUME PRESET UP PRESET DOWN QP LINK FM MODE Numeric buttons MP3 MODE DISPLAY DIMMER The STANDBY lamp on the main unit lights up A small amount of power is always consumed even while on standby Press the button again to display the clock indication For private listening Connect a pair of headphones to the PHONES jack on the main unit The sound will no longer come out of the spea...

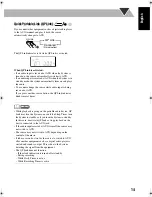
Страница 14: ...arching manually press either button If the received FM station is hard to listen To preset the stations You can preset 30 FM and 15 AM stations 1 Tune in to a station you want to preset 2 Activate the preset number entry mode Finish the following process while the indication on the display is flashing 3 Select a preset number for the station you store You can also use the PRESET UP PRESET DOWN bu...

Страница 15: ...layed during this operation on MP3 sources To locate a track directly and start play Playing Back from the USB Memory or Digital Audio Player This System is equipped with a USB MEMORY terminal on the front panel You can connect your USB Memory or Digital Audio Player DAP to this terminal and enjoy the sound out of your USB Memory or DAP Remember you cannot send any signal or data to your USB Memor...

Страница 16: ...o CD MP3 USB Memory DAP If you press 7 during playback the position of the track whereyou stopped playbackwill be memorizedbythe unit By pressing CD 6 or USB MEMORY 6 you can start playback again from the point where you stopped it To activate cancel resume play When the source is CD or USB MEMORY memo Pressing 0 or disconnecting the USB Memory DAP will erase the position of the track where you st...

Страница 17: ... level from the connected equipment if the incoming signal is too small or too large 1 Select AUX for the source 2 Adjust the input level AUX LVL 1 Ordinary input level factory setting Suitable for equipment with low output level such as a portable audio device AUX LVL 2 Decreased input level Suitable for equipment with high output level such as a DVD player memo If you feel that the output level ...

Страница 18: ...l times memo While playback is going on the portable audio device QP Link may turn the System on even if the Sleep Timer turn the System to standby or if you turn the System to standby In this case deactivate QP Link or stop playback on the device connected to the AUX jack If the audio input received at AUX is small the source may not switch to AUX The source may not switch to AUX depending on the...

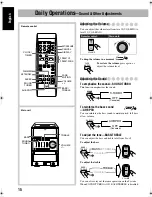
Страница 19: ... treble level from 0 to 5 To adjust the bass To adjust the treble You can also carry out the same operation on the System When SOUND TURBO is ON BASS TREBLE is disabled Remote control Main unit SOUND TURBO VOLUME CLOCK TIMER DIMMER A STANDBY SLEEP SOUND TURBO AHB PRO SET RESUME CANCEL DISPLAY PRESET UP PRESET DOWN FADE MUTING VOLUME BASS TREBLE BASS TREBLE Remote control Main unit To restore the v...

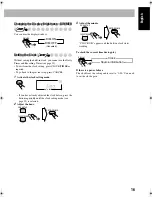
Страница 20: ...de If you have already adjusted the clock before press the button repeatedly until the clock setting mode see page 23 is selected 2 Adjust the hour 3 Adjust the minute CLOCK OK appears and the built in clock starts working To check the current time during play If there is a power failure The clock loses the setting and is reset to 0 00 You need to set the clock again Remote ONLY DIMMER DIM ON DIM ...

Страница 21: ...arts flashing If no disc or tape operation is done for about 3 minutes while the indicator is flashing the System turns off stands by automatically To turn off the System after a certain period of time Sleep Timer 1 Specify the time in minutes 2 Wait until the set time goes off To check the time remaining until the shut off time If you press the button repeatedly you can change the shut off time R...

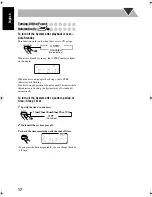
Страница 22: ...layed back in the order you have programmed Tracks cannot be selected with the Numeric buttons during Program Play Remote control Main unit 4 1 7 Á Numeric buttons PROGRAM CANCEL RANDOM REPEAT CD 6 0 7 USB MEMORY 6 Examples To select track number 5 press 5 To select track number 15 press 10 1 5 To select track number 30 press 10 3 0 For MP3 sources with 100 or more tracks To select track number 12...

Страница 23: ...Random Random Play You can play back all the tracks on the selected disc USB Memory or DAP at random You can repeat All tracks PALL by pressing REPEAT Press RANDOM Playback starts in random order If GROUP mode is selected for the MP3 It will be canceled Random Play ends when all tracks are played Tracks cannot be selected with the Numeric buttons during Random Play To exit from Random Play While t...

Страница 24: ...standby While the disc trays are closed To cancel the prohibition repeat the same procedure UNLOCKED appears on the display Repeats the current track Repeats the program Repeats all the tracks in the current group for MP3 playback mode in GROUP Repeats all the tracks Selectable in Normal play and Random play Remote ONLY REPEAT ALL 1 Canceled No indication REPEAT ALL 1 Canceled No indication REPEAT...

Страница 25: ... disc you can also use Synchronized Disc Recording see page 22 3 Start recording Remote control Main unit 7 AUX CD 6 FM AM TAPE REC CD 8 TAPE FM AM 4 7 USB MEMORY 6 USB MEMORY 8 IMPORTANT It may be unlawful to record or play back copyrighted material without the consent of the copyright owner To stop recording Push Insert Close With the tape side facing front On the main unit Advanced Tape Operati...

Страница 26: ... will show RESUME Press REC after flipping the cassette tape to the opposite side to resume recording from the beginning of the current track When the disk has finished playing back all the tracks both the tape and the disk will stop If the beat is heard while recoding an AM broadcast Select BEAT 1 or BEAT 2 to reduce the beat On the main unit To record Program Play or Random Play 1 Select Program...

Страница 27: ...imer is activated When the on time comes The System turns on tunes in to the selected station or starts playing the specified source If P is selected the last tuned station will be selected for Daily Timer If VOL is selected the last specified value is selected While Daily Timer is working the timer and timer number indicators 1 2 or 3 flash on the display The timer setting remains in memory until...

Страница 28: ...hour then the minute for on time 2 Set the hour then minute for off time in the same manner 3 Select TUNER FM or TUNER AM 4 Select preset station number 5 Set the volume If you select VOL the volume is set to the level that was set before the power was turned off 3 Turn off the System on standby if you have set the timer with the System turned on The Recording Timer can function both the System is...

Страница 29: ...s 1 Select the Timer you want to cancel 2 Turn off the selected Timer The indicator corresponding to the Timer is turned off To turn on the Timer again repeat the above steps and press in step 2 The indicator corresponding to the Timer lights CLOCK TIMER Clock setting see page 16 Canceled Daily 1 Timer Daily 2 Timer Daily 3 Timer Recording Timer CANCEL SET RESUME ...

Страница 30: ...cted or removed The source remains at AUX when you stop the other equipment such as a digital audio player Daily Operations Sound Other Adjustments see pages 15 to 17 Adjusting the Volume Be sure to turn down the volume before connecting or putting the headphones Adjusting the Sound This function also affects the sound through the headphones SOUND TURBO and AHB PRO cannot be used at the same time ...

Страница 31: ...o operate the System from the remote control The path between the remote control and the remote sensor on the System is blocked Point it at the remote sensor on the front panel Signals cannot reach the remote sensor Move closer to the System The batteries are exhausted No sound is heard from the speakers Speaker connections are incorrect or loose see page 7 Headphones are connected see page 9 Syst...

Страница 32: ...d neutral detergent and wrung well then wipe clean with a dry cloth Since the System may deteriorate in quality it become damaged or get its paint peeled off be careful about the following DO NOT wipe it with a hard cloth DO NOT wipe it strongly DO NOT wipe it with thinner or benzine DO NOT apply any volatile substance such as insecticides to it DO NOT allow any rubber or plastic to remain in cont...

Страница 33: ...6 11 12 18 19 18 19 9 16 15 17 10 15 15 17 20 10 16 24 10 12 18 19 9 24 16 23 25 10 12 18 19 10 16 24 19 23 25 SET RESUME CANCEL SLEEP A STANDBY AHB PRO BASS TREBLE SOUND TURBO CLOCK TIMER FADE MUTING DISPLAY PRESET UP VOLUME 1 4 7 0 2 5 8 3 6 9 10 REMOTE CONTROL PRESET DOWN DIMMER PROGRAM REPEAT RANDOM STANDBY ON QP LINK FM MODE MP3 MODE USB MEMORY IIV ...

Страница 34: ...30 English Main unit 27 11 20 10 12 18 19 20 9 24 11 12 9 13 18 19 9 9 15 16 8 13 9 15 ...

Страница 35: ... Australia and U K ANTENNA AM EXT GND AM LOOP PU SH OP EN CAUTION for mains AC line BEFORE PLUGGING IN do check that your mains AC line voltage corresponds with the position of the voltage selector switch provided on the outside of this equipment and if different reset the voltage selector switch to prevent from a damage or risk of fire electric shock ...

Страница 36: ...TES SISTEMA DE MICRO COMPONENTES English INSTRUCTIONS MANUAL DE INSTRUCCIONES INSTRUCOES Português ATENCION Antes de operar su equipo lea cuidadosamente este instructivo Consists of CA UXG45 and SP UXG45 Consta de CA UXG45 y SP UXG45 Consiste em CA UXG45 e SP UXG45 Español ...

Страница 37: ...da unidade de controlo remoto PRECAUÇÃO Para reduzir riscos de choques elétricos incêndio etc 1 Não remova parafusos e tampas ou desmonte a caixa 2 Não exponha este aparelho à chuva nem à umidade CAUTION Do not block the ventilation openings or holes If the ventilation openings or holes are blocked by a newspaper or cloth etc the heat may not be able to get out Do not place any naked flame sources...

Страница 38: ... colocada entre as áreas cujas dimensões são indicadas abaixo 3 Parte inferior Instale o sobre uma superfície plana Deverá ser mantido espaço suficiente para a ventilação se este for instalado numa posição que tenha uma altura de 10 cm ou mais About the cooling fan A cooling fan is mounted on the rear panel of the unit to prevent abnormal temperature inside the unit thus assuring normal operation ...

Страница 39: ...alificado 3 PRECAUCIÓN Radiación láser visible e invisible en caso de apertura o con interbloqueo averiado o defectuoso Evite la exposición directa a los haces 4 REPRODUCCIÓLN DE LA ETIQUETA ETIQUETA DE PRECAUCIÓN COLOCADA EN EL INTERIOR DE LA UNIDAD PARA PRODUTOS LASER IMPORTANTE 1 PRODUTO LASER DE CLASSE 1 2 PRECAUÇÃO não abrir a cobertura superior Dentro da unidade não existem partes cuja manut...

Страница 40: ...erations Sound Other Adjustments 15 Adjusting the Volume 15 Adjusting the Sound 15 Changing the Display Brightness DIMMER 16 Setting the Clock 16 Turning Off the Power Automatically 17 Advanced Disc USB Memory DAP Operations 18 Programming the Playing Order Program Play 18 Playing at Random Random Play 19 Playing Repeatedly Repeat Play 20 Prohibiting Disc Ejection Child Lock 20 Advanced Tape Opera...

Страница 41: ...brought directly from a cold to a warm place Should this occur the System may malfunction In this case leave the System turned on for a few hours until the moisture evaporates unplug the AC power cord then plug it in again Internal heat A cooling fan is mounted on the rear panel to prevent heat buildup inside the main unit see page G 2 Others Should any metallic object or liquid fall into the Syst...

Страница 42: ...f you have a doubt about the functions go to these sections and you will find the answers Indicates that you press the button briefly Indicates that you press the button briefly and repeatedly until an option you want is selected Indicates that you press one of the buttons Indicates that you press and hold the button for specified seconds The number inside the arrow indicates the period of press i...

Страница 43: ...d correctly AM EXT GND AM LOOP Step 1 Unpack the package and check the accessories Step 2 Prepare the remote control Step 3 Hook up the components such as AM FM antennas speakers etc see pages 5 to 7 Finally plug the AC power cord Now you can operate the System DO NOT use an old battery together with a new one DO NOT use different types of batteries together DO NOT expose batteries to heat or flam...

Страница 44: ...ally printed on the rear may vary Turn the power off to all components before connections To a wall outlet Plug the AC power cord only after all connections are complete If the wall outlet does not match the AC plug use the supplied AC plug adapter Disconnect the supplied FM antenna and connect to an outdoor FM antenna using a 75 Ω wire with coaxial type connector IEC or DIN45325 Vynile covered wi...

Страница 45: ...GND AM LOOP 220V 240V AC VOLTAGE SELECTOR 110V 127V FM antenna supplied Extend it so that you can obtain the best reception AM loop antenna supplied Turn it until the best reception is obtained Non striped Black striped ...

Страница 46: ...aker cords Make sure the both speakers are connected correctly and firmly When connecting the speaker cords match the polarity of the speaker terminals The cord with black stripe to the cord without stripe to Adjusting the voltage selector Use a screwdriver to slide the voltage selector so that the voltage marker is pointing at the same voltage as where you are plugging in the unit See also the ba...

Страница 47: ... when disc playback stops with Auto Standby activated p Tape operation indicators indicator Lights while recording 23 tape direction Flashes slowly during playback and recording Flashes quickly while rewinding a tape q Timer indicators Lights when Daily Timer or Recording Timer stands by flashes while working 1 2 3 Lights when a Daily Timer 1 2 or 3 stands by flashes while being preset or working ...

Страница 48: ... ON 3 4 4 1 7 SET RESUME PRESET UP PRESET DOWN QP LINK FM MODE Numeric buttons MP3 MODE DISPLAY DIMMER The STANDBY lamp on the main unit lights up A small amount of power is always consumed even while on standby Press the button again to display the clock indication For private listening Connect a pair of headphones to the PHONES jack on the main unit The sound will no longer come out of the speak...

Страница 49: ...arching manually press either button If the received FM station is hard to listen To preset the stations You can preset 30 FM and 15 AM stations 1 Tune in to a station you want to preset 2 Activate the preset number entry mode Finish the following process while the indication on the display is flashing 3 Select a preset number for the station you store You can also use the PRESET UP PRESET DOWN bu...

Страница 50: ...layed during this operation on MP3 sources To locate a track directly and start play Playing Back from the USB Memory or Digital Audio Player This System is equipped with a USB MEMORY terminal on the front panel You can connect your USB Memory or Digital Audio Player DAP to this terminal and enjoy the sound out of your USB Memory or DAP Remember you cannot send any signal or data to your USB Memor...

Страница 51: ...udio CD MP3 USB Memory DAP If you press 7 during playback the position of the track whereyou stopped playbackwill be memorizedbythe unit By pressing CD 6 or USB MEMORY 6 you can start playback again from the point where you stopped it To activate cancel resume play When the source is CD or USB MEMORY memo Pressing 0 or disconnecting the USB Memory DAP will erase the position of the track where you...

Страница 52: ... level from the connected equipment if the incoming signal is too small or too large 1 Select AUX for the source 2 Adjust the input level AUX LVL 1 Ordinary input level factory setting Suitable for equipment with low output level such as a portable audio device AUX LVL 2 Decreased input level Suitable for equipment with high output level such as a DVD player memo If you feel that the output level ...

Страница 53: ...l times memo While playback is going on the portable audio device QP Link may turn the System on even if the Sleep Timer turn the System to standby or if you turn the System to standby In this case deactivate QP Link or stop playback on the device connected to the AUX jack If the audio input received at AUX is small the source may not switch to AUX The source may not switch to AUX depending on the...

Страница 54: ... treble level from 0 to 5 To adjust the bass To adjust the treble You can also carry out the same operation on the System When SOUND TURBO is ON BASS TREBLE is disabled Remote control Main unit SOUND TURBO VOLUME CLOCK TIMER DIMMER A STANDBY SLEEP SOUND TURBO AHB PRO SET RESUME CANCEL DISPLAY PRESET UP PRESET DOWN FADE MUTING VOLUME BASS TREBLE BASS TREBLE Remote control Main unit To restore the v...

Страница 55: ...de If you have already adjusted the clock before press the button repeatedly until the clock setting mode see page 23 is selected 2 Adjust the hour 3 Adjust the minute CLOCK OK appears and the built in clock starts working To check the current time during play If there is a power failure The clock loses the setting and is reset to 0 00 You need to set the clock again Remote ONLY DIMMER DIM ON DIM ...

Страница 56: ...arts flashing If no disc or tape operation is done for about 3 minutes while the indicator is flashing the System turns off stands by automatically To turn off the System after a certain period of time Sleep Timer 1 Specify the time in minutes 2 Wait until the set time goes off To check the time remaining until the shut off time If you press the button repeatedly you can change the shut off time R...

Страница 57: ...played back in the order you have programmed Tracks cannot be selected with the Numeric buttons during Program Play Remote control Main unit 4 1 7 Numeric buttons PROGRAM CANCEL RANDOM REPEAT CD 6 0 7 USB MEMORY 6 Examples To select track number 5 press 5 To select track number 15 press 10 1 5 To select track number 30 press 10 3 0 For MP3 sources with 100 or more tracks To select track number 125...

Страница 58: ...Random Random Play You can play back all the tracks on the selected disc USB Memory or DAP at random You can repeat All tracks PALL by pressing REPEAT Press RANDOM Playback starts in random order If GROUP mode is selected for the MP3 It will be canceled Random Play ends when all tracks are played Tracks cannot be selected with the Numeric buttons during Random Play To exit from Random Play While t...

Страница 59: ...standby While the disc trays are closed To cancel the prohibition repeat the same procedure UNLOCKED appears on the display Repeats the current track Repeats the program Repeats all the tracks in the current group for MP3 playback mode in GROUP Repeats all the tracks Selectable in Normal play and Random play Remote ONLY REPEAT ALL 1 Canceled No indication REPEAT ALL 1 Canceled No indication REPEAT...

Страница 60: ... disc you can also use Synchronized Disc Recording see page 22 3 Start recording Remote control Main unit 7 AUX CD 6 FM AM TAPE REC CD 8 TAPE FM AM 4 7 USB MEMORY 6 USB MEMORY 8 IMPORTANT It may be unlawful to record or play back copyrighted material without the consent of the copyright owner To stop recording Push Insert Close With the tape side facing front On the main unit Advanced Tape Operati...

Страница 61: ... will show RESUME Press REC after flipping the cassette tape to the opposite side to resume recording from the beginning of the current track When the disk has finished playing back all the tracks both the tape and the disk will stop If the beat is heard while recoding an AM broadcast Select BEAT 1 or BEAT 2 to reduce the beat On the main unit To record Program Play or Random Play 1 Select Program...

Страница 62: ...imer is activated When the on time comes The System turns on tunes in to the selected station or starts playing the specified source If P is selected the last tuned station will be selected for Daily Timer If VOL is selected the last specified value is selected While Daily Timer is working the timer and timer number indicators 1 2 or 3 flash on the display The timer setting remains in memory until...

Страница 63: ...hour then the minute for on time 2 Set the hour then minute for off time in the same manner 3 Select TUNER FM or TUNER AM 4 Select preset station number 5 Set the volume If you select VOL the volume is set to the level that was set before the power was turned off 3 Turn off the System on standby if you have set the timer with the System turned on The Recording Timer can function both the System is...

Страница 64: ...s 1 Select the Timer you want to cancel 2 Turn off the selected Timer The indicator corresponding to the Timer is turned off To turn on the Timer again repeat the above steps and press in step 2 The indicator corresponding to the Timer lights CLOCK TIMER Clock setting see page 16 Canceled Daily 1 Timer Daily 2 Timer Daily 3 Timer Recording Timer CANCEL SET RESUME ...

Страница 65: ...cted or removed The source remains at AUX when you stop the other equipment such as a digital audio player Daily Operations Sound Other Adjustments see pages 15 to 17 Adjusting the Volume Be sure to turn down the volume before connecting or putting the headphones Adjusting the Sound This function also affects the sound through the headphones SOUND TURBO and AHB PRO cannot be used at the same time ...

Страница 66: ...o operate the System from the remote control The path between the remote control and the remote sensor on the System is blocked Point it at the remote sensor on the front panel Signals cannot reach the remote sensor Move closer to the System The batteries are exhausted No sound is heard from the speakers Speaker connections are incorrect or loose see page 7 Headphones are connected see page 9 Syst...

Страница 67: ...d neutral detergent and wrung well then wipe clean with a dry cloth Since the System may deteriorate in quality it become damaged or get its paint peeled off be careful about the following DO NOT wipe it with a hard cloth DO NOT wipe it strongly DO NOT wipe it with thinner or benzine DO NOT apply any volatile substance such as insecticides to it DO NOT allow any rubber or plastic to remain in cont...

Страница 68: ...6 11 12 18 19 18 19 9 16 15 17 10 15 15 17 20 10 16 24 10 12 18 19 9 24 16 23 25 10 12 18 19 10 16 24 19 23 25 SET RESUME CANCEL SLEEP A STANDBY AHB PRO BASS TREBLE SOUND TURBO CLOCK TIMER FADE MUTING DISPLAY PRESET UP VOLUME 1 4 7 0 2 5 8 3 6 9 10 REMOTE CONTROL PRESET DOWN DIMMER PROGRAM REPEAT RANDOM STANDBY ON QP LINK FM MODE MP3 MODE USB MEMORY IIV ...

Страница 69: ...30 English Main unit 27 11 20 10 12 18 19 20 9 24 11 12 9 13 18 19 9 9 15 16 8 13 9 15 ...

Страница 70: ...e corresponds with the position of the voltage selector switch provided on the outside of this equipment and if different reset the voltage selector switch to prevent from a damage or risk of fire electric shock IMPORTANTE para la línea de la red CA ANTES DE ENCHUFAR EL EQUIPO compruebe si la tensión de la línea de la red CA corresponde con la posición del selector de tensión situado en la parte e...

Отзывы: