background image


6


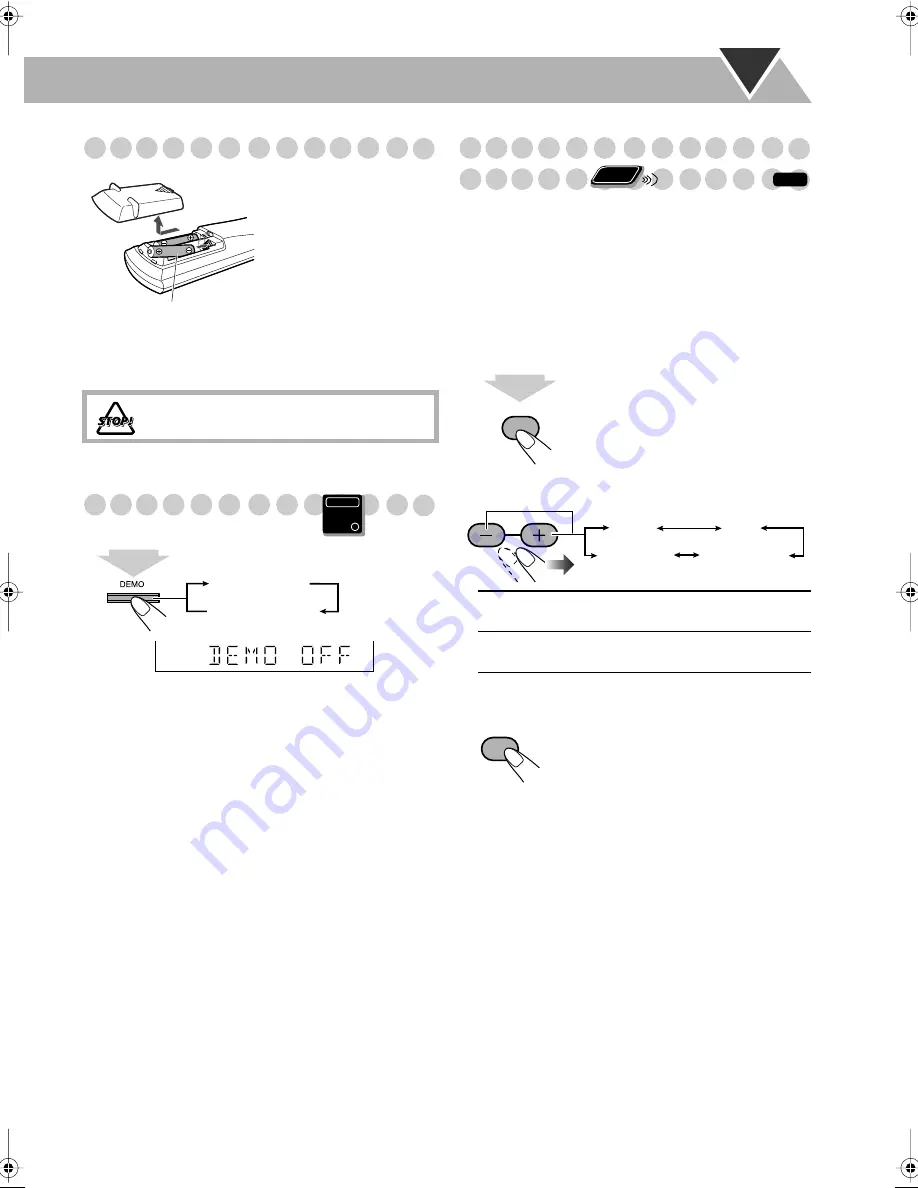
Preparing the remote control


• Dispose of batteries in the proper manner, according to 

federal, state, and local regulations.


Canceling the Demonstration


To start the demonstration, 


select DEMO START.


Changing the Color System and


Scanning Mode


You can select the video output to match it to the color 
system of your TV (NTSC or PAL).
• If you connect a progressive TV through the 

COMPONENT jacks, you can enjoy a high quality picture 
from the built-in DVD player by selecting progressive 
scanning mode.

• You can change the setting only while the disc playback is 

stopped.


1


Enter the color system setting mode.


2


Select the color system and scanning mode.


3


Store the setting.

When using the remote 
control,


 point the top of the 

remote control toward the 
remote sensor as directly as 
possible. If you operate it 
from a diagonal position, 
the operating range (approx. 
5 m) may be shorter.

DO NOT recharge, short, disassemble, heat 
the battery or dispose of it in a fire.

R6(SUM-3)/AA(15F)

Main Unit

ONLY

2

 sec.

DEMO OFF

DEMO START


NTSC / PAL


NTSC or PAL Interlaced scanning. 
For a conventional PAL or NTSC TV.


NTSC / PAL 
PROG


NTSC or PAL Progressive scanning. 
For a progressive NTSC or PAL TV.

Remote
ONLY

INFO

SCAN MODE

VFP

2

 sec.

PAL

PAL PROG

NTSC PROG

NTSC

SET

DX-T99[A].book Page 6 Friday, March 17, 2006 11:14 AM

Содержание CA-DXT99

Страница 1: ...COMPACT COMPONENT SYSTEM CA DXT99 INSTRUCTIONS GVT0166 005A A SUPER VIDEO ...

Страница 2: ...RODUCT 2 CAUTION Do not open the top cover There are no user serviceable parts inside the unit leave all servicing to qualified service personnel 3 CAUTION Visible and or invisible class 1M laser radiation when open Do not view directly with optical instruments CAUTION Do not block the ventilation openings or holes If the ventilation openings or holes are blocked by a newspaper or cloth etc the he...

Страница 3: ...spacing 2 Sides Top Back No obstructions should be placed in the areas shown by the dimensions below 3 Bottom Place on the level surface Maintain an adequate air path for ventilation by placing on a stand with a height of 10 cm or more European Union only 15 cm 10 cm 15 cm 15 cm CA DXT99 CA DXT99 Front view Wall or obstructions Side view Wall or obstructions ...

Страница 4: ...n the Audio CD Video CD and SVCD formats MP3 WMA JPEG MPEG 1 MPEG 2 ASF and DivX files written in accordance with the ISO 9660 format can also be played DVD R RW ROM R RW Recorded in the DVD Video or Video Recording VR format MP3 WMA JPEG MPEG 1 MPEG 2 ASF and DivX files written in the UDF format can also be played Caution for DualDisc playback The Non DVD side of a DualDisc does not comply with t...

Страница 5: ...Playing Back a Disc 10 Playing Back a Tape 12 Daily Operations Sound Other Adjustments 13 Adjusting the Speaker Output Level 13 Reinforcing the Bass Sound 13 Selecting the Sound Modes 14 Creating Your Own Sound Modes User Mode 14 Selecting the Surround Modes 14 Presetting Automatic DVD Video Sound Increase Level 15 Changing a Playback Picture 15 Changing the Display Brightness 16 Setting the Clock...

Страница 6: ...na x1 AM loop antenna x1 Composite video cord x1 Remote control x1 Batteries x2 If any item is missing consult your dealer immediately From AM FM antenna See page 4 Ÿ From the digital input of digital audio component such as CD recorder See page 4 From the video input of TV monitor See page 4 From the speakers See page 5 Voltage selector Before plugging in confirm the position the voltage selector...

Страница 7: ...n Disconnect the supplied FM antenna and connect to an outdoor FM antenna using a 75 Ω wire with coaxial type connector IEC or DIN45325 Make sure the antenna conductors do not touch any other terminals connecting cords or the power cord Also keep the antennas away from metallic parts of the System connecting cords and the AC power cord This could cause poor reception Green Blue Red S Video cord no...

Страница 8: ...ed the above instruction If this happens move the speakers away from the TV To adjust the voltage selector DO NOT connect more than one speaker to each terminal DO NOT push or pull the speakers as this will damage the foot spacers at the bottom of the speakers From right front speaker blue black From left front speaker blue black From left surround speaker white black From right surround speaker w...

Страница 9: ... setting only while the disc playback is stopped 1 Enter the color system setting mode 2 Select the color system and scanning mode 3 Store the setting When using the remote control point the top of the remote control toward the remote sensor as directly as possible If you operate it from a diagonal position theoperatingrange approx 5 m may be shorter DO NOT recharge short disassemble heat the batt...

Страница 10: ... either deck A or B Reverse Mode lights to indicate the current Reverse Mode A lights when a tape is in deck A B lights when a tape is in deck B 2 3 tape direction Lights to indicate the current tape running direction Flashes slowly during playback and recording Flashes quickly while rewinding a tape REC lights while recording p Disc operation indicators PROGRAM lights when Program Play is activat...

Страница 11: ... unit if they have the same or similar name and marks 3 1 2 AUDIO AUDIOVOL AUX DVD CD TAPE A TAPE B FM AM 1 2 3 4 5 6 7 8 9 10 0 10 DISC 1 DISC 5 TOP MENU PG MENU PL FM MODE ENTER RETURN REVERSE MODE GROUP TITLE SET CANCEL 3 1 2 AUDIO TV Number buttons The STANDBY lamp on the main unit lights in red A small amount of power is always consumed even while on standby For private listening Connect a pa...

Страница 12: ...ndication on the display is flashing 3 Select a preset number 4 Store the station To tune in to a preset station 1 Select the band FM or AM 2 Select a preset number You can also use 4 buttons on the remote control or on the main unit The MONO indicator lights on the display Reception will improve though stereo effect is lost monaural reception mode To restore the stereo effect press the button aga...

Страница 13: ...you stop playback To stop completely while Resume is activated press 7 twice To cancel Resume see RESUME on page 37 To select a disc To select a title group While playing a disc To select a chapter track While playing a disc To start To pause To stop Playback of the current disc starts To release it press DVD CD 3 INFO DVD CD FM MODE On screen guide icons During disc playback the following icons m...

Страница 14: ...tem on the disc menu On some discs you can also select items by entering the number using the number buttons 7 For SVCD VCD with PBC While playing a disc with PBC PBC appears on the display instead of the playing time When disc menu appears on the TV screen select an item on the menu Playback of the selected item starts To cancel PBC You can also cancel PBC by pressing the number buttons to start ...

Страница 15: ...tinuously Relay Play When the cassettes are inserted in both decks You can start playback of either deck A or B To start To stop To rewind or fast forward tape Push Insert Close TAPE A TAPE B Tape is reversed and playback repeats until you stop it Tape is not reversed When the current side of the tape reaches its end playback stops Tape is reversed once TAPE A TAPE B 3 forward 2 reverse REVERSE MO...

Страница 16: ...from level 0 minimum to level 4 maximum To emphasize rhythmical feeling RHYTHM AX This function emphasizes the bass attack feeling VOLUME RHYTHM AX SUB WOOFER LEVEL SURROUND MODE DVD LEVEL Main unit 1 2 3 4 5 6 7 8 9 10 0 10 DVD LEVEL RHYTHM AX EFFECT SOUND MODE AUDIO VOL CHANNEL LEVEL SUB WFR LEVEL SET CLOCK TIMER SLEEP DIMMER VFP SCAN MODE SURROUND MODE AUDIO TV ENTER Remote Control Remote contr...

Страница 17: ...c initial setting POP Good for vocal music CLASSIC Good for classical music User Modes USER1 2 3 Your individual mode stored in memory See the next column Creating Your Own Sound Modes User Mode Remote ONLY SOUND MODE POP CLASSIC FLAT USER1 3 ROCK SEA Modes INFO Remote ONLY SET SET SET DSP Modes ALL CH ST All Channel Stereo Creates larger stereo sound field using all the connected speakers initial...

Страница 18: ...steps 1 and 2 above 2 Select a parameter you want to adjust 3 Adjust the parameter 4 Repeat steps 2 to 3 to adjust other parameters To erase the VFP screen press VFP again Remote control Main unit Remote ONLY EFFECT EFFECT 1 EFFECT 2 EFFECT 3 DVD LEVEL DVD LEVEL1 DVD LEVEL2 DVD LEVEL3 DVD LEVEL DVD LEVEL1 DVD LEVEL2 DVD LEVEL3 Remote ONLY SCAN MODE VFP NORMAL GAMMA BRIGHTNESS CONTRAST SATURATION T...

Страница 19: ...ing 2 Adjust the hour then minute Now the built in clock starts working Turning Off the Power Automatically With Sleep Timer you can fall asleep while listening to music 1 Specify the time in minutes 2 Wait until the set time goes off To check the time remaining until the shut off time If you press the button repeatedly you can change the shut off time DIMMER 1 Dims the display and the illuminatio...

Страница 20: ...While playing DVD Video While playing a DVD Audio DivX While playing a DVD VR SVCD or VCD SVCD can have 4 audio channels SVCD usually uses these 4 channels to record two 2 channel recordings ST1 ST2 Remote Control 1 2 3 4 5 6 7 8 9 10 0 10 ENTER AUDIO MPX BACK GLANCE DVD CD 3 ZOOM PAGE SUB TITLE ANGLE AUDIO TV Number buttons ST1 ST2 ST To listen to normal stereo 2 channel playback L1 L2 L To liste...

Страница 21: ... angle using the on screen bar see page 24 While playing back Reviewing the Playback Quickly For DVD Video DVD VR only You can move the playback position to 10 seconds before the current position only within the same title Glance Back While playing back Selecting Browsable Still Pictures For DVD Audio only While playing back a track linked to browsable still pictures B S P you can select the still...

Страница 22: ... Playback Pause playback While playing To resume normal playback press DVD CD 3 Frame by frame playback 1 While playing 2 Advance the still picture frame by frame To resume normal playback press DVD CD 3 Slow motion playback This does not function for MPEG 1 MPEG 2 ASF DivX discs 1 While playing 2 Select slow motion speed Not available for DVD VR SVCD VCD To resume normal playback press DVD CD 3 Z...

Страница 23: ...ou want to program 4 Start playback DISC 1 0 DVD CD Main unit 1 2 3 4 5 6 7 8 9 10 0 10 DVD CD 3 REPEAT PLAY MODE CANCEL AUDIO TV Number buttons Remote Control To enter the numbers Examples To select number 5 press 5 To select number 10 press 10 To select number 15 press 10 1 then 5 To select number 30 press 10 3 then 0 To select number 110 press 10 10 1 1 then 0 Playback starts in the order you h...

Страница 24: ...ter playback To skip a track To pause To stop Torelease press DVD CD 3 To erase the last step To erase the entire program To add steps in the program Repeat step 2 on page 20 FM MODE Remote ONLY in the programmed order in the reverse order CANCEL PLAY MODE PROGRAM RANDOM Canceled Playback of the current disc starts in a random order When all chapters tracks on the current disc are played playback ...

Страница 25: ...hibiting Disc Ejection Child Lock You can lock the disc trays so that no one can eject the loaded discs This operation is possible only when the source is the disc player While on standby To cancel the prohibition repeat the same procedure UNLOCKED appears on the display Remote ONLY REPEAT REPEAT 1 REPEAT REPEAT ALL DISC Canceled REPEAT REPEAT 1 REPEAT REPEAT ALL DISC Canceled REPEAT REPEAT 1 REPE...

Страница 26: ...P3 WMA MPEG 1 MPEG 2 ASF DivX 3 DVD VIDEO TITLE 2 DISC 1 TIME OFF CHAP 1 3 1 3 1 1 TOTAL 1 01 58 CHAP 3 Dolby D 3 2 1ch 1 2 4 OFF TRACK DVD AUDIO GROUP 14 DISC 2 TIME 0 15 58 TRACK 23 PAGE 3 1 2 4 1 3 1 3 LPCM 3 2 1ch TIME 3 DVD VR PG 2 DISC 1 TIME OFF CHAP ST ON TOTAL 0 01 58 CHAP 3 Dolby D 2 0 0ch 1 2 4 3 SVCD TIME OFF ST1 TIME 0 04 58 TRACK 3 1 2 4 4 DISC 3 3 VCD TIME OFF ST TIME 0 04 58 TRACK ...

Страница 27: ...wn menu Indication Meanings Select to change the time indication see also page 25 Select to repeat playback see also pages 22 and 25 Select for time search see also page 26 Select for chapter search see also page 26 Select for track search see also page 26 Select to change the audio language or channel see also page 17 Select to change subtitle language see also page 18 Select to change view angle...

Страница 28: ...time TIME Elapsed playing time of the current chapter track REM Remaining time of the current chapter track OFF 1 3 1 3 1 3 TIME TITLE 14 TOTAL1 25 58 CHAP 23 DVD VIDEO TITLE 2 TIME OFF CHAP 1 3 1 3 1 1 TOTAL 1 01 58 CHAP 3 DISC 1 Dolby D 3 2 1ch TIME ENTER OFF 1 3 1 3 1 3 TIME TITLE 14 TOTAL1 25 58 CHAP 23 DVD VIDEO TITLE 2 TIME OFF CHAP 1 3 1 3 1 1 TOTAL 1 01 58 CHAP 3 OFF DISC 1 Dolby D 3 2 1ch...

Страница 29: ...n screen bar with the pull down menu 2 Select or 3 Display the pop up window 4 Enter the desired chapter track number To correct a misentry press the number buttons until the desired number is shown in the pop up window 5 Finish the setting A B Repeat starts The selected portion plays repeatedly Examples To move to a point of 1 hours 02 minutes 00 seconds press 1 0 2 0 then 0 To move to a point of...

Страница 30: ... 1 25 04 06 4ch 19 00 JVC DVD World 2004 2 17 05 06 8ch 10 30 3 22 05 06 8ch 17 00 Music Festival 4 26 05 06 L 1 13 19 children 001 5 20 06 06 4ch 22 00 6 25 06 06 L 1 8 23 children 002 T T 6 1 2 3 4 5 PLAY LIST No Date Chap Length Title 1 25 05 06 001 1 03 16 My JVC World 2 17 06 06 005 1 35 25 3 20 06 06 003 0 10 23 Favorite music 4 25 06 06 001 0 07 19 children001 002 5 6 1 7 8 9 Ex When the MP...

Страница 31: ...layed until you change it Slide show playback starts Each track still picture is shown on the screen for a few seconds then changes one after another For the other files Playback starts with the selected chapter track Pressing DVD CD 3 also starts playback REPEAT 1 Repeats the current chapter REPEAT Repeats the current title play list REPEAT 1 DISC Repeats all titles on the current disc REPEAT ALL...

Страница 32: ... 3 REC START STOP REVERSE MODE DUBBING DVD CD FM AM Main unit Deck B Deck A IMPORTANT It may be unlawful to record or play back copyrighted material without the consent of the copyright owner Before manual recording select the Stereo Mode STEREO see page 14 for DVD Video to downmix its multichannel sound into 2 channels otherwise you can only record the front left right sound onto a tape Push Inse...

Страница 33: ...ode settings on the display See step 2 of Recording on a Tape on page 29 3 Select the disc number you want to start recording from For recording desired tracks from discs You can program tracks to record in your preferred order Select Program Play and make a program see page 20 without starting playback 4 Start recording When either disc play or recording ends both disc player and the cassette dec...

Страница 34: ... Activate the Mic Mixing Mode 4 Start playing a source FM AM DVD CD TAPE or AUX For Karaoke SVCD VCD Select a desired audio channel See Selecting the Sound Track on page 17 5 Sing into the microphone 6 Adjust the MIC LEVEL and VOLUME To cancel the Mic Mixing Mode select MIC OFF in step 3 To use microphone only select DVD CD in step 4 but do not start playback VOLUME MIC LEVEL MIC 2 MIC 1 KARAOKE S...

Страница 35: ...e last adjustment for echo See also steps 1 to 3 and 6 on page 31 Adjust echo level and key if you want see the left column After the song ends playback stops and the score board appears on the TV screen with fanfare If you start playback another track start scoring function again To stop the playback in the middle of the song press 7 The scoring function is not canceled and your singing along is ...

Страница 36: ...ore board appears Press DVD CD 3 to start playback of the next track To check the programmed contents The Karaoke reserve screen appears You cannot display the Karaoke reserve screen while the scoring function is in use To modify the program While the Karaoke reserve screen is shown on the TV PRO The scoring level is strict AMATEUR The scoring level is lenient Remote ONLY SETTING SET FANFARE LEVEL...

Страница 37: ...ng until finished 1 Set the hour then minute for on time 2 Set the hour then minute for off time 3 For Recording Timer Select the playback source TUNER FM or TUNER AM For Daily Timer Select the playback source TUNER FM TUNER AM DISC TAPE A TAPE B or AUX IN 4 Select a preset station for TUNER FM and TUNER AM or select a disc group and then track number for DISC 5 Select the volume level You can sel...

Страница 38: ...he same time everyday until the timer is turned off manually see the next column Daily Timer starts working only when the System is turned off on standby When the on time comes The System turns on tunes in to the specified station or starts playing the specified source and sets the volume level gradually to the preset level after about 30 seconds When the off time comes The System stops playback a...

Страница 39: ...television screen For a wide screen 16 9 TV 4 3 LB 4 3 MULTI LB Letter Box conversion For a conventional 4 3 TV Displays a wide screen picture to fit the width of the TV screen keeping the aspect ratio 4 3 PS 4 3 MULTI PS Pan Scan conversion For a conventional 4 3 TV The picture is zoomed in to fill the screen vertically and the left and right sides of the picture are cut off By selecting MULTI mo...

Страница 40: ...OVIE see page 14 to adjust the output level for all speakers with the test tone DELAY Select this item then press ENTER to show the DELAY submenu for adjusting the speaker delay time FRONT LEFT RIGHT SPEAKER CENTER SPEAKER SURROUND RIGHT LEFT SPEAKER Select the speaker then adjust the delay time 0 ms to 15 ms in 1 ms steps Set one speaker to 0 ms then set other speakers so that the sound from all ...

Страница 41: ... 5 6 7 8 9 10 0 10 TV VOL TV TV VIDEO CHANNEL ENTER AUDIO TV Remote control Manufacturer s code Manufacturer Code number JVC 01 Hitachi 10 Magnavox 02 Mitsubishi 03 Panasonic 04 11 Philips 15 RCA 05 Samsung 12 Sanyo 13 14 Sharp 06 Sony 07 Toshiba 08 Zenith 09 Number buttons To turn on or off the TV To select the input mode either TV or VIDEO To adjust TV volume To select the TV channel AUDIO TV TV...

Страница 42: ...alfunction of this System When playing back a DVD Audio disc recorded in MLP Meridian Lossless Packing a lossless audio compression system that can completely recreate the PCM signal the signals are recognized as the linear PCM signals however no indicator lights up on the display For MP3 WMA playback MP3 WMA discs require a longer readout time than regular CDs It depends on the complexity of the ...

Страница 43: ...ck the left front and right front signals when you have selected STEREO for the Surround Mode or when you use the headphones LR ONLY appears on the display Dolby PLII MUSIC MOVIE is ineffective when an MPEG 1 MPEG 2 ASF DivX disc is the source though MUSIC and MOVIE are selectable on the unit Dolby PLII MUSIC MOVIE indicator does not appear after selecting MUSIC MOVIE Setting the Clock 0 00 will f...

Страница 44: ...f surround speaker decreases While recording on a tape Key control ECHO sound and Vocal Masking will be recorded Reducing the Lead Vocal Vocal Masking The Vocal Masking Mode setting is not applied to the optical digital output signals through the OPTICAL DIGITAL OUTPUT terminal When playing a Karaoke disc in the Vocal Masking Mode the vocal may not be reduced or the volume may be lower On some mus...

Страница 45: ...eme temperatures and moisture To clean the disc Wipe the disc with a soft cloth in a straight line from center to edge Handling cassette tapes If the tape is loose in its cassette take up the slack by inserting a pencil in one of the reels and rotate it If the tape is loose it may get stretched cut or caught in the cassette Be careful not to touch the tape surface Avoid the following places to sto...

Страница 46: ...X files are not played back The inserted disc may include different types of files MP3 WMA JPEG MPEG 1 MPEG 2 ASF DivX files In this case you can only play back the files selected by the FILE TYPE setting see page 36 You have changed the FILE TYPE setting after you inserted a disc In this case reload the disc The disc sound is discontinuous The disc is scratched or dirty The disc playback sounds s...

Страница 47: ... Afan Oromo SV Swedish AB Abkhazian FI Finnish KN Kannada OR Oriya SW Swahili AF Afrikaans FJ Fiji KO Korean KOR PA Panjabi TA Tamil AM Ameharic FO Faroese KS Kashmiri PL Polish TE Telugu AR Arabic FY Frisian KU Kurdish PS Pashto Pushto TG Tajik AS Assamese GA Irish KY Kirghiz PT Portuguese TH Thai AY Aymara GD Scots Gaelic LA Latin QU Quechua TI Tigrinya AZ Azerbaijani GL Galician LN Lingala RM R...

Страница 48: ...al Power requirement AC 110 V AC 127 V AC 220 V AC 230 V AC 240 V adjustable with the voltage selector 50 Hz 60 Hz Power consumption 335 W at operation 29 W on standby Dimensions W H D approx 185 mm x 460 mm x 361 mm Mass approx 11 4 kg Supplied Accessories See page 3 Design and specifications are subject to change without notice Manufactured under license from Dolby Laboratories Dolby Pro Logic M...

Страница 49: ...0 TAPE A 2 2 2 2 3 3 3 3 3 8 12 DVD LEVEL o 15 TAPE B 2 2 2 2 3 3 3 3 n 8 12 DVD CD 3 3 3 3 4 8 10 TOP MENU PG q 11 27 ECHO s 32 EFFECT h 15 TV VOL 6 38 FM MODE P 9 TV VIDEO c 38 FM AM b 8 9 V MASKING a 32 GLANCE BACK p 18 VFP U 15 ZOOM u 19 28 GROUP TITLE e 10 Button Page Button Page 2 8 DVD CD 0 8 10 Display 8 7 DVD LEVEL 15 7 7 7 7 9 12 21 22 FM AM 9 8 9 1 1 1 1 9 11 12 19 KARAOKE SCORING 32 4 ...

Страница 50: ...CAUTION for mains AC line BEFORE PLUGGING IN do check that your mains AC line voltage corresponds with the position of the voltage selector switch provided on the outside of this equipment and if different reset the voltage selector switch to prevent from a damage or risk of fire electric shock CA DXT99 COMPACT COMPONENT SYSTEM ...

Отзывы: