background image

7

Connections

CAUTION

• If you connect speakers other than the supplied ones, use speakers of the same speaker impedance (SPEAKER IMPEDANCE) 

indicated on the rear of the center unit.

• DO NOT connect more than one speaker to one speaker terminal.
• When installing the satellite speakers on the wall;

– Be sure to have them installed on the wall by qualified personnel. 

DO NOT install the satellite speakers on the wall by yourself to avoid unexpected damage from falling off the wall due to 
incorrect installation or weakness in wall structure.

– Care must be taken in selecting a location for speaker installation on a wall. Injury to personnel or damage to equipment may 

result if the speakers installed interfere with daily activities.

Precautions for daily use

• When moving the speakers, do not pull the speaker cords; otherwise, the speakers may fall over, causing damage or injury.
• Do not reproduce sounds at so high a volume that the sound is distorted; otherwise, the speakers may be damaged by 

internal heat buildup.

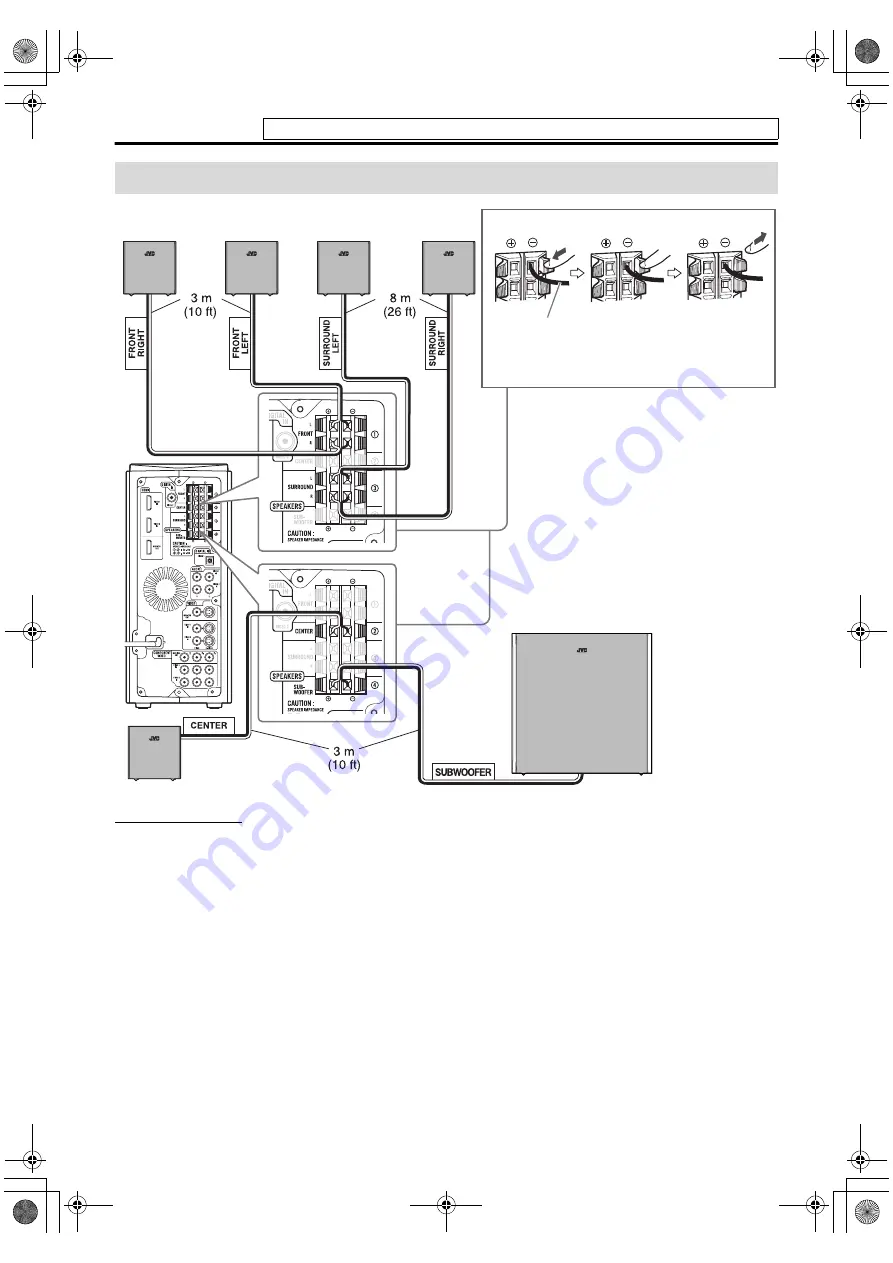
Connecting the speakers and subwoofer

• Connect the black cords to the black (–) terminals.
• Connect the white cords to the red (+) terminals.

Speaker cord

SP-THL1S

Surround speakers

SP-THL1F

Front speakers

SP-THL1W

Subwoofer

SP-THL1C

Center speaker

Do not connect the power cord until all other connections have been made.

TH-L1[JC].book  Page 7  Friday, March 16, 2007  10:22 AM

Содержание AX-THL1

Страница 1: ... SP THL1W SP THL1F SP THL1C and SP THL1S For Customer Use Enter below the Model No and Serial No which are located either on the rear bottom or side of the cabinet Retain this information for future reference Model No Serial No TH L1 JC book Page i Friday March 16 2007 10 22 AM ...

Страница 2: ...La touche dans n importe quelle position ne déconnecte pas le système du secteur Quand le système est en attente le témoin STANDBY est allumé en rouge Quand le système est sous tension le témoin STANDBY s éteint L alimentation peut être télécommandée CAUTION To reduce the risk of electrical shocks fire etc 1 Do not remove screws covers or cabinet 2 Do not expose this appliance to rain or moisture ...

Страница 3: ... IN THE INTERFERENCE CAUSING EQUIPMENT STANDARD ENTITLED DIGITAL APPARATUS ICES 003 OF THE DEPARTMENT OF COMMUNICATIONS CET APPAREIL NUMERIQUE RESPECTE LES LIMITES DE BRUITS RADIOELECTRIQUES APPLICABLES AUX APPAREILS NUMIRIQUES DE CLASSE B PRESCRITES DANS LA NORME SUR LE MATERIEL BROUILLEUR APPAREILS NUMERIQUES NMB 003 EDICTEE PAR LE MINISTRE DES COMMUNICATIONS CAUTION Do not block the ventilation...

Страница 4: ... poser l appareil sur une surface plate Le dégagement minimum est indiqué ci dessous 15 cm 5 15 16 Wall or obstructions Mur ou obstruction AX THL1 Front view Face 15 cm 5 15 16 15 cm 5 15 16 15 cm 5 15 16 AX THL1 Front Avant No obstructions Aucune obstruction Wall or obstructions Mur ou obstruction Side view Côté 15 cm 5 15 16 Warnings Cautions and Others Mises en garde précautions et indications ...

Страница 5: ...ng the TV 14 Operating the DVD player 15 Basic operations 16 Turning the system on off 16 Selecting the source to play 16 Adjusting the volume VOLUME 17 Listening with headphones not supplied 17 Turning off the sound temporarily MUTING 17 Adjusting the brightness of the indications DIMMER 17 Sleep Timer SLEEP 17 Adjusting the output level of the speakers and subwoofer 18 Changing the scanning mode...

Страница 6: ...DO NOT wipe it forcefully DO NOT wipe it with thinner benzine or other organic solvents including disinfectants DO NOT apply any volatile substance such as insecticides to it DO NOT allow any rubber or plastic to remain in contact with it for a long time If water gets inside the system Turn the system off and disconnect the power cord plug from the wall outlet then call the store where you made yo...

Страница 7: ...een See page 24 It is recommended that you make each MP3 WMA WAV files at the following conditions MP3 WMA At a sample rate of 44 1 kHz and bit rate of 128 kbps WAV 44 1 kHz 16 bit Linear PCM For JPEG files It is recommended that you record a file at 640 x 480 resolution If a file has been recorded at a resolution of more than 640 x 480 it will take a longer time to be displayed This system can on...

Страница 8: ...es indicate the pages where the details of the parts are described Front panel center unit Display window 27 17 22 28 18 13 12 12 26 19 12 12 Remote sensor 6 13 17 16 16 16 17 16 20 22 25 20 23 22 20 23 16 TH L1 JC book Page 4 Friday March 16 2007 10 22 AM ...

Страница 9: ...5 Index of parts and controls Rear panel center unit 11 7 13 9 10 11 9 10 11 10 11 10 9 10 11 TH L1 JC book Page 5 Friday March 16 2007 10 22 AM ...

Страница 10: ...im the remote control directly to the remote sensor of the center unit If you operate it from a diagonal position the operating range approx 5 m 16 ft may be shorter Do not block the remote sensor Remote control Number buttons 14 15 23 16 15 16 15 29 16 20 15 20 23 24 15 22 26 16 22 25 14 15 18 15 14 17 31 24 28 15 20 22 25 15 25 15 17 18 25 17 14 18 14 15 23 14 15 18 24 25 29 31 23 15 14 17 14 R6...

Страница 11: ...peaker installation on a wall Injury to personnel or damage to equipment may result if the speakers installed interfere with daily activities Precautions for daily use When moving the speakers do not pull the speaker cords otherwise the speakers may fall over causing damage or injury Do not reproduce sounds at so high a volume that the sound is distorted otherwise the speakers may be damaged by in...

Страница 12: ...lling the speakers When placing the speakers near a TV set turn off the TV s main power switch or unplug it before installing the speakers Then wait at least 30 minutes before turning on the TV s main power switch again Some TVs may still be affected even though you have followed the above If this happens move the speakers away from the TV The surround speakers are not magnetically shielded If the...

Страница 13: ...OUT terminal passes through the signal from the S VIDEO input terminal VIDEO 1 VIDEO 2 and VIDEO 3 selected as the source VIDEO MONITOR OUT terminal passes through the signal from the VIDEO input terminal VIDEO 1 VIDEO 2 and VIDEO 3 selected as the source Use an HDMI cable shorter than 5 m 15 ft When you are playing HDCP High Bandwidth Digital Content Protection content the sound and picture may n...

Страница 14: ...ugs to BNC plugs When shipped from the factory the source of VIDEO 1 have been set for use with the AUDIO VIDEO 1 IN terminal for the audio connection If you connect the components with digital optical audio cord change the audio input VIDEO 1 setting to Digital See page 31 Before connecting a digital optical cable unplug the protective plug from DIGITAL IN VIDEO 1 terminal If you connect a sound ...

Страница 15: ...e a plug adapter not supplied to convert the pin plugs to BNC plugs When shipped from the factory the source of VIDEO 2 have been set for use with the AUDIO VIDEO 2 IN terminal for the audio connection If you connect the components with digital coaxial audio cord change the audio input VIDEO 2 setting to Digital See page 31 If you connect a sound enhancing device such as a graphic equalizer betwee...

Страница 16: ...m the sound output through this system may be distorted When shipped from the factory the source of VIDEO 3 have been set for use with the VIDEO 3 AUDIO L R audio terminal for the audio connection If you connect the components with digital optical audio cord change the audio input VIDEO 3 setting to Digital See page 31 Connecting the video components for the source of VIDEO 3 Center unit game cons...

Страница 17: ...evice is charged while USB MEMORY is selected as the source You cannot connect a computer to the USB MEMORY terminal of the system When connecting a USB mass storage device refer also to its manual An iPod does not play on the USB MEMORY terminal CAUTION Be sure to reduce the volume on the system to the minimum level before connecting an iPod Adjust the volume after playback has started DO NOT con...

Страница 18: ...ufacturers TV and DVD player Refer also to the manuals supplied for the TV and DVD player To operate the equipment aim the remote control directly at the remote sensor on the target equipment The buttons described below are used on pages 14 to 15 Operating the TV Number buttons JVC 01 PHILIPS 29 AKAI 02 17 PIONEER 42 DAEWOO 08 09 29 SABA 35 36 37 62 63 64 FISHER 17 SAMSUNG 29 51 52 71 72 73 74 HIT...

Страница 19: ...rating the DVD player JVC 01 PIONEER 11 KENWOOD 03 04 PROSCAN 12 MAGNAVOX 05 RCA 12 MARANTZ 06 SAMSUNG 13 MITSUBISHI 07 SONY 14 ONKYO 08 09 TOSHIBA 05 PANASONIC 10 YAMAHA 15 PHILIPS 06 ZENITH 05 16 DVD Turn on or off the DVD player DVD 3 Play back a disc DVD 8 Pause playback To release it press DVD 3 1 9 0 while pressing SHIFT Select a desired chapter number TOP MENU Display a DVD top menu MENU Di...

Страница 20: ...e source selecting buttons VIDEO1 3 USB MEMORY 6 or iPod 6 USB MEMORY 6 To play back a file in a USB mass storage class device See page 21 iPod 6 To start play back a connected iPod See page 19 VIDEO1 3 To select the external components connected to the VIDEO 1 3 terminals on the center unit See page 10 to 12 On the center unit Press INPUT SELECTOR 9 8 repeatedly until the source name you want app...

Страница 21: ...e come out from the headphones Multi channel signals are downmixed and come out from the headphones Press MUTING To restore the sound Perform one of the following Press MUTING again Press AUDIO VOLUME Press VOLUME on the center unit Press DIMMER Each time you press the button you can change the brightness level in 3 steps The system turns off automatically when the specified period of time has pas...

Страница 22: ... mode only PROGRESS Select when your TV equipped with component jacks terminal supports the progressive scanning mode You can get better picture quality in PROGRESS mode than in INT LACE mode 3 Press ENTER while the selected mode is displayed When PROGRESS is selected the PROGRESSIVE indicator lights on the display window NOTE Although the picture may be distorted when you press ENTER this is not ...

Страница 23: ...on page 20 with iPod selected as source NOTE Sound distortion may occur when playing back audio sources with high recording levels When distortion occurs it is recommended to turn off the equalizer of the iPod For information on operating the iPod see the iPod instruction manual The buttons described below are used on page 20 1 This button does not function as a stop button to operate an iPod This...

Страница 24: ...ect iPod as the source see page 16 iPod CONNECT appears on the display If an iPod is not connected firmly iPod NO CONNECT appears The iPod indicator lights up on the display 4 Start playing on the iPod On the remote control Press iPod 6 On the center unit Press iPod USB MEMORY CONTROL 8 Press above button again if iPod does not start playback To pause playback On the remote control Press iPod 6 du...

Страница 25: ...ou cannot send any data to your USB mass storage class device from this system The buttons described below are used on pages 22 to 26 Number buttons Basic operations for USB MEMORY NOW READING Appears when the system is reading the file information NO USB DEVICE Appears when no USB mass storage class device is connected CANNOT PLAY THIS DEVICE Appears when unplayable USB mass storage class device ...

Страница 26: ...To stop Press 7 7 To pause On the remote control Press USB MEMORY 6 during playback On the center unit Press iPod USB MEMORY CONTROL 8 during playback To continue playback press the button again 7 Playback information on the display window MP3 WMA WAV MPEG 1 MPEG 2 ASF file Example When an MP3 file is played back Each time you press DISPLAY the elapsed playing time and the file information appears...

Страница 27: ...o locate a desired group 1 Press GROUP during playback is shown in the group number area see page 22 on the display window 2 While the display window shows use number buttons 0 10 h 10 to enter the desired title or group number The system starts playback from the first file of the selected group For details on using the number buttons see How to use the number buttons on the left column NOTE This ...

Страница 28: ...sired group track file while playback is stopped 2 Press USB MEMORY 6 or ENTER Track playback slide show starts from the selected track file When you press ENTER for JPEG only the selected file is played back To skip the file during playback Press x 4 or 5 Y NOTE You can also check playback information on the display window See page 22 Some group track and file names may not be displayed correctly...

Страница 29: ...Video Fine Processor function enables you to adjust the picture character according to the type of programming picture tone or personal preference 7During playback 1 Press VFP The current VFP settings appear on the TV screen 2 Press 2 3 repeatedly to select the VFP mode NORMAL Normally select this CINEMA Suitable for movies When you select NORMAL or CINEMA press VFP to complete the setting USER 1 ...

Страница 30: ...anges Display window TV screen Meanings 1 Repeats the current track files REPEAT TRACK Repeats the current group REPEAT GROUP ALL Repeats all tracks files REPEAT ALL No indication Repeat mode is off The system plays back the file normally Repeat mode indicator See page 21 for button locations TH L1 JC book Page 26 Friday March 16 2007 10 22 AM ...

Страница 31: ...atories such as Dolby Digital EX 7 DTS Digital Surround 2 Used to reproduce multichannel soundtracks of the software encoded with DTS Digital Surround or DTS Digital Surround dts SURROUND is another discrete multi channel digital audio format available on CD and DVD software There are other encoding formats of multi channel digital surround introduced by Digital Theater Systems Inc such as DTS ES ...

Страница 32: ... channel with shows that the corresponding speakers are reproducing the channels sound If the channels sound decoded into 5 1 channel is reproduced only lights Selecting the surround mode The system is set up to automatically select the optimal surround mode for input signal from digital multichannel software When playing back a 2 channel source you can select the desired surround mode manually 7 ...

Страница 33: ...Select this when the aspect ratio of your TV is 4 3 conventional TV While viewing a wide screen picture the black bars do not appear however the left and right edges of the pictures will not be shown on the screen NOTE Even if 4 3 PS is selected the screen size may become 4 3 LB with some files This depends on how files are recorded 7 PICTURE SOURCE You can obtain optimal picture quality by select...

Страница 34: ...r s back to the beginning NOTE No test tone comes out of the subwoofer 7 Delay menu DELAY Example Set to 0 ms for the furthest speaker from your position as the basis for the delay time setting In this case set the delay time of each speaker as follows Delay time of front speakers 0 ms Delay time of center speaker 1 ms Delay time of surround speakers 2 ms FRONT LEFT SPEAKER FRONT RIGHT SPEAKER CEN...

Страница 35: ... 5 Y to select the source you want to set V1 A D For the source of VIDEO 1 V2 A D For the source of VIDEO 2 V3 A D For the source of VIDEO 3 4 Press 2 3 to select the audio input terminal you want to use for the source selected in the above step Example ANALOG Signal from AUDIO jacks comes out of the speakers see page 10 to 12 DIGITAL Signal from DIGITAL IN terminal comes out of the speakers see p...

Страница 36: ...creen the picture is blurred or the picture is divided into two parts The scan mode is set to PROGRESS though the center unit is connected to the TV which does not support the progressive video input Change the scan mode to INT LACE See page 18 The picture does not fit the TV screen The monitor type is not set correctly Set MONITOR TYPE properly See page 29 PLAYBACK The iPod does not play even tho...

Страница 37: ...l Surround with sampling frequency 32 kHz 44 1 kHz 48 kHz 7 Subwoofer SP THL1W Type 1 way Bass Reflex Type Magnetically Shielded Type Speaker 16 cm 6 5 16 inches cone M 1 Power Handling Capacity 100 W Impedance 4 Ω Frequency Range 30 Hz to 1 5 kHz Sound Pressure Level 84 dB W m Dimensions W M H M D 266 mm M 270 mm M 157 mm 10 1 2 inches M 10 11 16 inches M 6 3 16 inches Mass 2 9 kg 6 4 lbs 7 Satel...

Страница 38: ...TH L1 JC book Page 1 Friday March 16 2007 10 22 AM ...

Страница 39: ...TH L1 JC book Page 2 Friday March 16 2007 10 22 AM ...

Страница 40: ...EN 0307JSKMDCJMM 2007 Victor Company of Japan Limited TH L1 DIGITAL MEDIA SYSTEM TH L1 JC book Page xliv Friday March 16 2007 10 22 AM ...

Отзывы: