background image

7

AV28X10EK/EI/ LCT0893-001A-U/ English

6HWWLQJ

#

XS

#

\RXU

#

79

6HWWLQJ

#

XS

#

\RXU

#

79

6HWWLQJ

#

XS

#

\RXU

#

79

6HWWLQJ

#

XS

#

\RXU

#

79

&RQQHFWLQJ

#

WKH

#

DHULDO

#

DQG

#

YLGHR

#

FDVVHWWH

#

UHFRUGHU

#+

9&5

,

&RQQHFWLQJ

#

WKH

#

DHULDO

#

DQG

#

YLGHR

#

FDVVHWWH

#

UHFRUGHU

#+

9&5

,

&RQQHFWLQJ

#

WKH

#

DHULDO

#

DQG

#

YLGHR

#

FDVVHWWH

#

UHFRUGHU

#+

9&5

,

&RQQHFWLQJ

#

WKH

#

DHULDO

#

DQG

#

YLGHR

#

FDVVHWWH

#

UHFRUGHU

#+

9&5

,

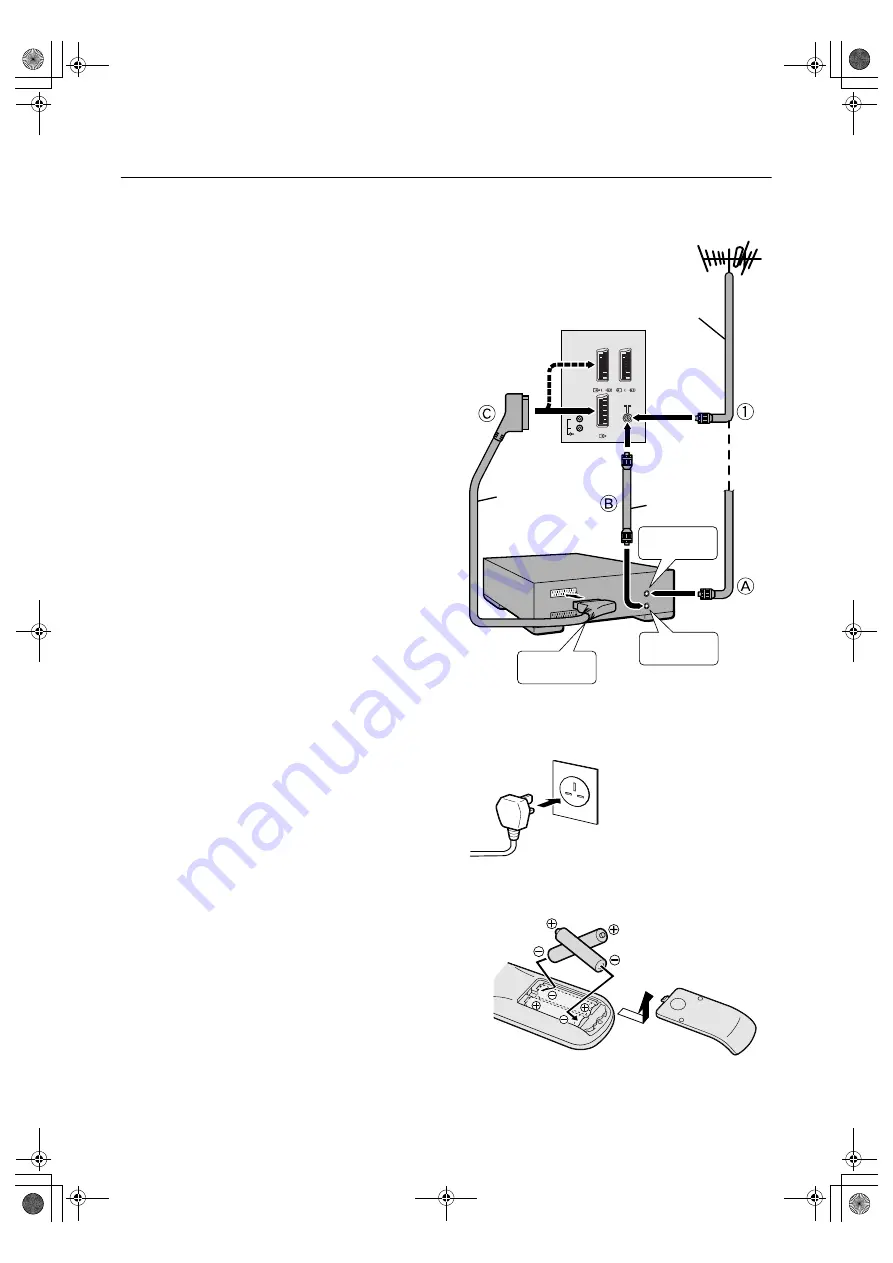
If you are connecting a VCR, follow 

A


B


C

 in the diagram opposite.

If you are not connecting a VCR, follow 

1

.

For more details, see the manuals that came with the
equipment you want to connect.

The connecting cables are not provided.

You can watch a video using the VCR without doing 

C

.

For details, see your VCR instruction manual.

To connect more equipment, please see “Further 
preparation” on page 32.

To connect external speakers and an audio system,
please see “Connecting an amplifier and speakers” on
page 33.

If you connect a decoder to a T-V LINK compatible VCR,
set the DECODER (EXT-2) function to ON. For details, see
“Using the DECODER (EXT-2) function” on page 30. 
Otherwise, you will not be able to watch scrambled 
channels.

To use the T-V LINK functions, you must have a T-V LINK
compatible VCR connected by a  SCART cable 

C

 to the EXT-

2 terminal on the TV. For details about T-V LINK functions,
see “T-V LINK functions” on page 7.

&RQQHFWLQJ

#

WKH

#

SRZHU

#

FRUG

#

WR

#

WKH

#

PDLQV

#

RXWOHW

&RQQHFWLQJ

#

WKH

#

SRZHU

#

FRUG

#

WR

#

WKH

#

PDLQV

#

RXWOHW

&RQQHFWLQJ

#

WKH

#

SRZHU

#

FRUG

#

WR

#

WKH

#

PDLQV

#

RXWOHW

&RQQHFWLQJ

#

WKH

#

SRZHU

#

FRUG

#

WR

#

WKH

#

PDLQV

#

RXWOHW

Caution:

Use only the power source specified on the unit 
(AC 220 – 240 V, 50 Hz).

3XWWLQJ

#

EDWWHULHV

#

LQWR

#

WKH

#

UHPRWH

#

FRQWURO

3XWWLQJ

#

EDWWHULHV

#

LQWR

#

WKH

#

UHPRWH

#

FRQWURO

3XWWLQJ

#

EDWWHULHV

#

LQWR

#

WKH

#

UHPRWH

#

FRQWURO

3XWWLQJ

#

EDWWHULHV

#

LQWR

#

WKH

#

UHPRWH

#

FRQWURO

Use two AAA/R03 dry cell batteries.

Insert the batteries holding the 

ó

 end, making sure the 

ô

 and

ó

 terminals are correctly lined up.

To open the battery compartment, slide the door downwards
and lift off. Replace the door by sliding it upwards until it
fastens into place.

Follow the warnings printed on the batteries.

Battery life is about six months to one year, depending on
how much you use the remote control.

If the remote control does not work properly, fit new 
batteries.

The batteries we supply are only for setting up and
testing your TV. Please replace them as soon as you
need to.

Always use good-quality batteries.

EXT-

1

EXT-

2

EXT-

3

R

AUDIO  OUT

L

Aerial

75-ohm 

coaxial 

cable

21-pin SCART 

cable

75-ohm 

coaxial 

cable

AV IN/OUT 

terminal

To aerial 

output

To aerial 

input

Back of the TV

VCR

JVC TV_MF1.fm  Page 4  Wednesday, March 14, 2001  10:05 AM

Содержание AV28X10EI

Страница 1: ...e size Viewable area 66 cm measured diagonally Audio output Rated Power output 7 5 W 7 5 W Speakers 16 cm 4 cm oval 2 EXT 1 terminal Euroconnector 21 pin SCART Video input Audio L R inputs and RGB inputs are available TV broadcast outputs Video and Audio L R are available EXT 2 terminal Euroconnector 21 pin SCART Video input S VIDEO Y C input Audio L R inputs and RGB inputs are available Video and...

Страница 2: ... the mains supply If you are not going to use this TV for a long period of time be sure to disconnect the mains plug from the mains outlet DUQLQJ DUQLQJ DUQLQJ DUQLQJ DO NOT cut off the mains plug from this equipment If the plug fitted is not suitable for the power points in your home or the cable is too short to reach a power point then obtain an appropriate safety approved extension lead or adap...

Страница 3: ...ctrical shock Never leave this equipment operating unattended unless otherwise specifically stated that it is designed to do so or in standby mode Only use the designated power switch to turn off the power and ensure that all potential users are instructed how to do so Make special arrangements for infirm or handicapped persons Never watch TV while operating a motor vehicle It is illegal to watch ...

Страница 4: ...nal on the TV For details about T V LINK functions see T V LINK functions on page 7 RQQHFWLQJ WKH SRZHU FRUG WR WKH PDLQV RXWOHW RQQHFWLQJ WKH SRZHU FRUG WR WKH PDLQV RXWOHW RQQHFWLQJ WKH SRZHU FRUG WR WKH PDLQV RXWOHW RQQHFWLQJ WKH SRZHU FRUG WR WKH PDLQV RXWOHW Caution Use only the power source specified on the unit AC 220 240 V 50 Hz 3XWWLQJ EDWWHULHV LQWR WKH UHPRWH FRQWURO 3XWWLQJ EDWWHULHV L...

Страница 5: ...change to green your TV is in the standby mode Press the ü standby button on the remote control to turn your TV on If the JVC logo does not appear this is because your TV has already been turned on for the first time use the LANGUAGE and AUTO PROGRAM functions to make the initial settings For details see INSTALL on page 25 2 Press the á button The LANGUAGE menu appears 3 Press the ì and ë buttons ...

Страница 6: ...KS BBC1 BBC2 ITV Channel 4 and Channel 5 are automatically set to the programme numbers PR1 to PR5 If the TV doesn t receive one of these TV channels that programme number PR will not be set Programme number PR6 is not normally set For Ireland model AV28X10EIS If your TV can detect the TV channel name from the TV channel broadcast signal the TV channel name is assigned to the programme number PR t...

Страница 7: ...ording images from an external device connected to the TV for example a camcorder when recording a TV channel after it has been unscrambled on a decoder when recording a TV channel by using the TV s output because the VCR s own tuner cannot properly receive that channel You cannot carry out Direct Rec using your TV s control Generally the VCR cannot record a TV channel that it cannot receive prope...

Страница 8: ... 79 RQ IURP VWDQGE PRGH Press the ü standby button the button the ë buttons or the number buttons The power lamp goes from red to green and your TV will be turned on To turn the TV off Press the ü standby button again The power lamp changes from green to red and the TV goes into standby mode KRRVH D 79 FKDQQHO KRRVH D 79 FKDQQHO KRRVH D 79 FKDQQHO KRRVH D 79 FKDQQHO Choose the programme number PR ...

Страница 9: ... LIST 1 Press the information button to display the PR LIST 2 Press the ì and ë buttons to choose an EXT terminal Then press the á button The EXT terminals are listed after programme number PR 99 You can choose two types of video input signal S VIDEO Y C signal and regular video composite signal For details see S IN S VIDEO input on page 21 If you do not have a clear picture or no colour appears c...

Страница 10: ... P B buttons to turn the TV on from standby mode 2 Press the P B buttons to choose a programme number PR or an EXT terminal 3 Press the D volume button and the C buttons to change the volume 1 Press the D volume button The volume level indicator appears 2 Press the C buttons while the volume level indicator is on screen Behind the Cover English book Page 10 Tuesday March 6 2001 3 16 PM ...

Страница 11: ...ideal one from the following ZOOM modes AUTO For any picture format except normal picture 4 3 aspect ratio the picture will be automatically displayed in the ideal screen size For normal picture 4 3 Aspect Ratio you can choose a ZOOM mode from the 4 3 AUTO ASPECT menu For details see 4 3 AUTO ASPECT on page 19 AUTO may not work properly with poor signal quality In this case choose the best ZOOM mo...

Страница 12: ...m an external device When you want to return to the previous ZOOM mode choose the ZOOM mode again GMXVWLQJ WKH YLVLEOH DUHD RI WKH GMXVWLQJ WKH YLVLEOH DUHD RI WKH GMXVWLQJ WKH YLVLEOH DUHD RI WKH GMXVWLQJ WKH YLVLEOH DUHD RI WKH SLFWXUH SLFWXUH SLFWXUH SLFWXUH If subtitles or the top or bottom of the picture are cut off you can adjust the visible area of the picture manually 1 Press the button Th...

Страница 13: ...olour buttons are used for the teletext operations or the menu operations For details see Teletext control buttons and VCR DVD switch on page 14 or Using the TV s menus on page 16 0 2 EXWWRQ 2 EXWWRQ 2 EXWWRQ 2 EXWWRQ The á button is used to operate menus For details see Using the TV s menus on page 16 ë XWWRQV XWWRQV XWWRQV XWWRQV You can choose a programme number PR or an EXT terminal Press the ...

Страница 14: ...the teletext station The ZOOM function will not work in the text mode or TV and text mode You cannot operate menus when viewing a teletext programme 8VLQJ WKH LVW 0RGH 8VLQJ WKH LVW 0RGH 8VLQJ WKH LVW 0RGH 8VLQJ WKH LVW 0RGH You can store the numbers of your favourite teletext pages in memory and call them up quickly using the colour buttons To store the page numbers 1 Press the é button to go int...

Страница 15: ... is hidden or revealed 6L H 6L H 6L H 6L H You can double the height of the teletext display Press the ä button QGH QGH QGH QGH You can return to the index page instantly Press the â button FLOF Fastext WST World Standard Text Returns to page 100 or a previously specified page List mode Returns to the page number displayed in the lower left area of the screen DQFHO DQFHO DQFHO DQFHO You can search...

Страница 16: ...e the descriptions of each menu and its functions on the following pages The display appearing at the bottom of a menu shows you a button on the remote control that you can use when you operate a chosen function 4 Press the á button to complete the setting The menu disappears To return to the previous menu Press the information button To exit a menu instantly Press the button When watching the tel...

Страница 17: ...to choose an item 2 Press the ì buttons to change the setting You can change the HUE setting picture hue only when the colour system is NTSC 3 58 or NTSC 4 43 See Specifications on the back cover To return to the default settings in each TINT mode Press the blue button This returns the picture settings in the TINT mode you have chosen to the default settings and stores them in the TINT mode 3 Pres...

Страница 18: ...e function This function helps to create a natural looking picture by eliminating unnecessary edges from high contrast and crisp images For images with low contrast edges are added to produce a sharper more detailed picture You can choose from the three DigiPure function settings of AUTO MIN and MAX If you set the DigiPure effect too high on a low quality picture that contains a lot of noise this ...

Страница 19: ...nually You cannot choose NTSC 3 58 or NTSC 4 43 for programme numbers PR 0 AV to PR 99 7 6 872 63 7 7 6 872 63 7 7 6 872 63 7 7 6 872 63 7 You can choose one of three ZOOM modes REGULAR PANORAMIC or 14 9 ZOOM as the ZOOM mode for the normal picture 4 3 aspect ratio 1 Press the ë buttons to choose 4 3 AUTO ASPECT Then press the á button The sub menu of the 4 3 AUTO ASPECT function appears 2 Press t...

Страница 20: ... the TV speakers but you should only do this if you have connected an audio system to the TV instead of the TV speakers When you are using this function see Turning the TV s speakers off on page 31 When there is no sound from the TV speaker If the SPEAKER function is set to OFF there is no sound from the TV speaker Press the ë buttons to choose SPEAKER Then press ì buttons to choose ON You can use...

Страница 21: ...does not support S VIDEO signal Y C signal and you cannot set S IN S VIDEO input in the EXT 1 terminal Setting S IN S VIDEO input changes the head character from E to S When an EXT terminal receives a normal video signal E1 E2 E3 or E4 appears on the display This changes to S2 S3 or S4 when it receives an S VIDEO signal Even a device which can output an S VIDEO signal Y C signal may output a regul...

Страница 22: ... picture and sound of the TV channel you are currently viewing are output from the EXT 2 terminal 3 Press the á button to complete the setting The menu disappears During dubbing you should not turn off the TV Turning off the TV also turns off the output from the EXT 2 terminal When you choose an EXT terminal as an output you can view a TV programme or a picture from the other EXT terminal while du...

Страница 23: ...e ì buttons to choose ON To cancel the BLUE BACK function Press the ì buttons to choose OFF 3 Press the á button to complete the setting The menu disappears 2 2 2 2 When there is a TV channel you do not want your children to watch you can use the CHILD LOCK function to lock out the TV channel Even when a child chooses a programme number PR for a locked TV channel the screen will change to blue and...

Страница 24: ...e ID number press the button to exit the menu Even if you reset the lock temporarily it does not mean that the CHILD LOCK function set for the TV channel is cancelled The next time anyone tries to view the TV channel it will be locked again When you want to cancel the CHILD LOCK function you must perform the operation To set the CHILD LOCK function again To stop it being easy to choose the program...

Страница 25: ...n now edit the programme numbers PR list using the EDIT MANUAL function For details see EDIT MANUAL on page 26 When not using the EDIT MANUAL function If you do not need to use the EDIT MANUAL function go to the next step 4 Press the á button to display the T V LINK menu 5 Operate the T V LINK menu according to the type of video cassette recorder VCR you have connected to the EXT 2 terminal If you...

Страница 26: ...l for which the DECODER EXT 2 function has been set to ON returns the setting of the DECODER EXT 2 function for that channel to OFF When a TV channel has already been registered in PR 99 using the INSERT function deletes that TV channel 1 Press the ë buttons to choose EDIT MANUAL Then press the á button 2 Follow the options for the function you want to use 3 Press the á button to complete the sett...

Страница 27: ... you will register a new TV channel 2 Press the green button and start the INSERT function To cancel the INSERT function Press the Information button 3 For UK model AV28X10EKS Press the number buttons to enter the remaining CH number You cannot enter CC numbers For Ireland model AV28X10EIS Press the ë buttons to choose CH or CC then enter the remaining CH or CC number The TV shifts to registration...

Страница 28: ...l AV28X10EK cannot receive the CC number channels or the channels from CH 02 to CH 12 D0035 EK MANUAL CH PR ID AV 01 02 03 04 05 06 07 08 09 CH CH CH CH CH CH CH CH CH 21 22 23 24 25 26 27 28 29 BBC1 BBC2 ITV CH4 CH5 BACK TV OK SEARCH SEARCH FINE FINE CC Channel CC 01 S1 CC 02 S2 CC 03 S3 CC 04 S4 CC 05 S5 CC 06 S6 CC 07 S7 CC 08 S8 CC 09 S9 CC 10 S10 CC 11 S11 CC 12 S12 CC 13 S13 CC 14 S14 CC 15 ...

Страница 29: ...plete the setting The DEMO function is set to ON and the demonstration will start To stop the demonstration Press one of the buttons on the remote control When the DEMO function is set to ON Each time the TV is turned on the demonstration starts automatically If you do not want that to happen cancel the DEMO function 1 Display the DEMO menu again 2 Press the ë buttons to choose OFF 3 Press theá bu...

Страница 30: ...e cable TV station s broadcast selection menu or how to operate the menu please contact your cable TV station When the cable TV broadcast reception is poor the ACI function will not work properly If there is an error in the ACI data itself the TV channel cannot be registered properly If this happens turn the ACI function off ACI SKIP and use the AUTO PROGRAM function or the EDIT MANUAL function to...

Страница 31: ...u need to change the VCR settings in order to connect the decoder Confirm that the VCR is set properly by rechecking the VCR Instruction manual 7XUQLQJ WKH 79 V VSHDNHUV RII 7XUQLQJ WKH 79 V VSHDNHUV RII 7XUQLQJ WKH 79 V VSHDNHUV RII 7XUQLQJ WKH 79 V VSHDNHUV RII 1 Press the á button to display the MENU main menu 2 Press the ë buttons to choose SOUND SETTING Then press the á button to display the ...

Страница 32: ...equipment including the TV The Specifications on the back cover give the details of the EXT terminals If you are connecting equipment not listed in the following connection diagram see the table to choose the best EXT terminal Connecting cables are not supplied 1VCR composite signal 2VCR composite signal S VIDEO signal 3T V LINK compatible VCR composite signal S VIDEO signal 4Decoder 5DVD player c...

Страница 33: ...QDO WKH 705 WHUPLQDO WKH 705 WHUPLQDO WKH 705 WHUPLQDO You can change over the output of the video sound signal from the EXT 2 terminal This is useful when you want to dub the video sound from another device onto the VCR connected to the EXT 2 terminal For details on how to do this see DUBBING on page 22 79 RXWSXW IURP WKH 704 WHUPLQDO 79 RXWSXW IURP WKH 704 WHUPLQDO 79 RXWSXW IURP WKH 704 WHUPLQD...

Страница 34: ...es 5 and 8 8 HYPER SOUND lamp The HYPER SOUND lamp lights while the HYPER SOUND function is in use 4 Headphone jack mini jack page 32 9 ECO lamp If you set the ECO MODE function to ON the ECO lamp lights 5 P buttons buttons page 10 0 SLEEP TIMER lamp The SLEEP TIMER lamp lights while the SLEEP TIMER function is operating Aerial socket page 4 EXT 3 terminal pages 21 and 32 EXT 1 terminal pages 4 21...

Страница 35: ...e picture disappears from the screen the unnatural colours will also disappear When viewing images from commercially available video software products or videos from videotapes which have been recorded improperly the top of the image may be distorted This is due to the condition of the video signal and not because of malfunction 3RRU VRXQG 3RRU VRXQG 3RRU VRXQG 3RRU VRXQG Have you adjusted BASS or...

Отзывы: