background image

30

Using the TV’s menu


• To cancel the AUTO PROGRAM 

function, press the 

b

 button.

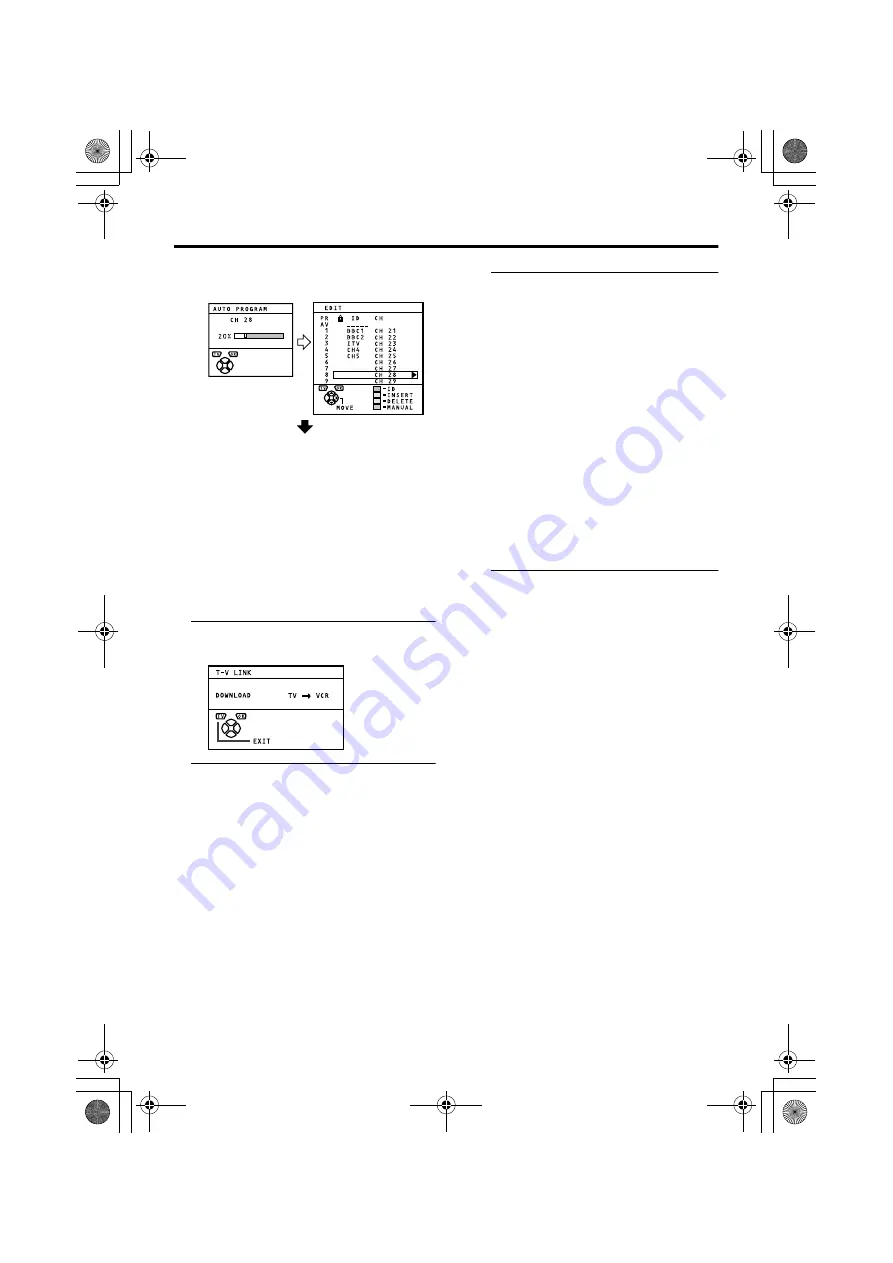
After the TV channels have been 

registered in the programme 

numbers (PR), the EDIT menu 

appears.

• You can now edit the programme 

numbers (PR) using the EDIT/

MANUAL function. For details, see 
“EDIT/MANUAL” on page 30.

• If you do not need to use the EDIT/

MANUAL function, go to the next 
step.

3 Press the 

a

 button to display the 

T-V LINK menu

4 If you do not have a T-V LINK 

compatible VCR connected:

Press the 

b

 button to leave the T-V 

LINK menu.
The T-V LINK menu disappears and all 
the settings are completed.

If you have a T-V LINK compatible 

VCR connected to the EXT-2 

terminal:

See “Downloading data to a VCR” on 
page 35 to transmit the programme 

number (PR) data to the VCR.

• If a TV channel you want to view is 

not set to a programme number (PR), 

set it manually using the MANUAL 
function. For details, see “EDIT/
MANUAL” on page 30.

• The AUTO PROGRAM function does 

not set the programme number PR 0 

(AV) for your video cassette recorder. 
You will need to set this using the 
manual function.

• In some areas you may get TV 

reception from more than one 

transmitter, for example, different ITV 
regions. In this case each TV channel 
could be set twice. If this happens, the 

first set of channels will have the 
stronger signal. If you want to delete 
the second set of channels, you will 

have to do it manually (see page 33).

„

EDIT/MANUAL

The EDIT/MANUAL functions are divided 
into two types:

• editing the current programme numbers 

(PR) (EDIT functions); and 

• manually storing a TV channel you want 

to view a programme number (PR) 
(MANUAL function).

Here are the details about these functions:

Caution

• Using the MOVE, DELETE or INSERT 

functions rewrites the current programme 

numbers (PR) list. Therefore, the 

programme numbers (PR) of some of the 

TV channels will change.

• Using the MANUAL function for a TV 

channel for which the CHILD LOCK 

function has been set cancels the CHILD 

LOCK function for that channel.

• Using the MANUAL function for a TV 

channel for which the DECODER (EXT-2) 

function has been set to ON returns the 

setting of the DECODER (EXT-2) function 

for that channel to OFF.

• When a TV channel has already been 

registered in PR 99, using the INSERT 

function deletes that TV channel.

AV-32&28R25EK Re.fm  Page 30  Thursday, March 7, 2002  10:17 PM

Содержание AV28R250EK

Страница 1: ...cm round woofer 1 EXT 1 terminal Euroconnector 21 pin SCART Video input Audio L R inputs and RGB inputs are available TV broadcast outputs Video and Audio L R are available EXT 2 terminal Euroconnector 21 pin SCART Video input S VIDEO Y C input and Audio L R inputs are available Video and Audio L R outputs are available T V LINK functions are available EXT 3 terminal Euroconnector 21 pin SCART Vid...

Страница 2: ...liquid is allowed to enter this equipment fire or electric shock may be caused DO NOT place any naked flame sources such as lighted candles on the TV WARNING TO PREVENT FIRE OR SHOCK HAZARD DO NOT EXPOSE THIS APPLIANCE TO RAIN OR MOISTURE CAUTION Operate only from the power source specified AC 220 240 V 50 Hz on the unit Avoid damaging the AC plug and power cord When you are not using this unit fo...

Страница 3: ...etent electrician How to replace the fuse Open the fuse compartment with a blade screwdriver and replace the fuse Guidelines for safe operation This equipment has been designed and manufactured to comply with international safety standards However as with any electrical appliance care must be taken to ensure optimal results and operational safety Before attempting to use this equipment read the op...

Страница 4: ...en to insert anything into an opening in the case Doing so may result in a fatal electrical shock Never guess or take chances with electrical equipment of any kind It is better to be safe than sorry Caution The woofer unit is mounted on the TV Always move the TV and woofer unit together when removing the TV from the box or when moving the woofer unit If the TV is tilted during movement the woofer ...

Страница 5: ...onnect external speakers and an audio system please see Connecting speakers or an amplifier on page 40 If you connect a decoder to a T V LINK compatible VCR set the DECODER EXT 2 function to ON For details see Using the DECODER EXT 2 function on page 35 Otherwise you will not be able to watch scrambled channels Rear Panel 1 WOOFER terminal page 39 2 AUDIO OUT terminal page 40 3 SURROUND REAR termi...

Страница 6: ...goes into the initial setting mode and you will see the JVC logo Follow the instructions on the screen display to make the initial settings 1 Press the Main power button on the TV The Power lamp lights red for power on then green for TV on and the JVC logo appears If the power lamp stays red and does not change to green your TV is in the standby mode Press the standby button on the remote control ...

Страница 7: ... button After the TV channels have been registered in the programme numbers PR the EDIT menu appears If you want to you can now edit the programme numbers PR using the EDIT MANUAL function For details see EDIT MANUAL on page 30 If you do not want to edit programme numbers PR go to the next step 5 Press the a button to display the T V LINK menu 6 If you do not have a T V LINK compatible VCR connect...

Страница 8: ...To use T V LINK functions A T V LINK compatible VCR means a JVC video cassette recorder with the T V LINK logo or with one of the following logos However these VCRs may support some or all of the features described earlier For details see your VCR instruction manual Q LINK a trademark of Panasonic Corporation Data Logic a trademark of Metz Corporation Easy Link a trademark of Phillips Corporation ...

Страница 9: ...r cannot properly receive that channel You cannot carry out Direct Rec using your TV s control Generally the VCR cannot record a TV channel that it cannot receive properly on its own tuner even if you can view that TV channel on the TV However some VCRs can record a TV channel by using the TV s output if that channel can be viewed on the TV For details see your VCR instruction manual TV auto power...

Страница 10: ...goes off Caution The main power button on the TV does not fully isolate the TV from the AC supply If you are not going to use the TV for a long period of time be sure to disconnect the AC plug from the AC socket Turn the TV on from standby mode Press the P p buttons to turn the TV on from standby mode Choose a TV channel Press the P p buttons to choose a programme number PR or an EXT terminal Adju...

Страница 11: ...ndby button to turn the TV on or off When the TV is turned on the power lamp changes from red to green The power can be turned on by pressing the b button 6 buttons or Number buttons Choose a TV channel Use the number buttons Enter the programme number PR of the channel using the number buttons Example PR6 press 6 PR12 press 1 and 2 Use the 6 buttons Press the 6 buttons to choose the programme num...

Страница 12: ...ing the sound Press the l muting button to turn off the sound Pressing the l muting button again restores the previous volume level Watch images from external equipment Use the o button Press the o button to choose an EXT terminal Use the 6 buttons Press the 6 buttons to choose an EXT terminal Use the PR LIST 1 Press the h Information button to display the PR LIST 2 Press the 5 and 6 buttons to ch...

Страница 13: ...choose a ZOOM mode from the 4 3 AUTO ASPECT menu For details see 4 3 AUTO ASPECT on page 21 AUTO may not work properly with poor signal quality In this case choose the best ZOOM mode manually This TV supports WSS wide screen signals When broadcasts with WSS are received with the ZOOM mode set at AUTO WSS the most suitable ZOOM mode is automatically chosen according to the WSS received REGULAR Use ...

Страница 14: ...e picture manually 1 Press the c button The ZOOM menu appears 2 Press the a button to display the ZOOM mode indicator The indicator appears 3 While it is displayed press the 6 6 6 6 buttons to change the height of the picture You cannot adjust the visible area in REGULAR or FULL mode PRO LOGIC 3D PHONIC function You can turn the PRO LOGIC 3D PHONIC function on or off or you can switch to the 3D HE...

Страница 15: ...JVC brand VCR or DVD player Pressing a button that looks the same as the device s original remote control button has the same effect as the original remote control 1 Set the VCR P DVD switch to the VCR or DVD position VCR When you are using a VCR set the switch to the VCR position DVD When you are using a DVD player set the switch to the DVD position P Text When you are viewing Teletext programmes...

Страница 16: ...e menus when viewing a teletext programme Using the List Mode You can store the numbers of your favourite teletext pages in memory and call them up quickly using the colour buttons To store the page numbers 1 Press the M button to go into the List mode The page numbers you have stored are displayed at the bottom of the screen 2 Press a colour button to choose a position Then press the number butto...

Страница 17: ...n text Each time you press the Q button text is hidden or revealed Size You can double the height of the teletext display Press the R button Index You can return to the index page instantly Press the T button FLOF Fastext TOP WST World Standard Text Returns to page 100 or a previously specified page List mode Returns to the page number displayed in the lower left area of the screen Cancel You can ...

Страница 18: ...ot a malfunction When the menu disappears the ZOOM mode will return to the previously set ZOOM mode 2 Press the 6 buttons to choose a menu title and press the a button The menu appears To return to the previous menu Press the h information button To exit a menu instantly Press the b button 3 Press the 6 buttons to choose a function For details of the functions in the menus see the following pages ...

Страница 19: ...TINT mode as you like CONTRAST You can adjust the picture contrast 2 lower 3 higher BRIGHT You can adjust the picture brightness 2 darker 3 brighter SHARP You can adjust the picture sharpness 2 softer 3 sharper COLOUR You can adjust the picture colour 2 lighter 3 deeper HUE You can adjust the picture tint 2 reddish 3 greenish You can change the HUE setting picture hue only when the colour system i...

Страница 20: ... this may reduce the sharpness of the picture COLOUR SYSTEM The colour system is chosen automatically However if the picture is not clear or no colour appears choose the colour system manually 1 Choose COLOUR SYSTEM then press the a button 2 Press the 5 buttons to chose the appropriate colour system Then press the a button PAL PAL system NTSC 3 58 NTSC 3 58 MHz system NTSC 4 43 NTSC 4 43 MHz syste...

Страница 21: ... When you are viewing a bilingual broadcast programme you can choose the sound from Bilingual I Sub I or Bilingual II Sub II If you have poor reception on a stereo broadcast you can change from stereo to mono sound so that you can hear the broadcast more clearly and easily The sound mode you can choose differs depending on the TV programme This function does not work in the EXT modes And this func...

Страница 22: ...on or PRO LOGIC 3D PHONIC function is operating the SPEAKER item does not appears Digital surround Connecting the headphones to the TV automatically changes to the HEADPHONE SURROUND function which corresponds to the current DIGITAL SURROUND function However the PRO LOGIC 3D PHONIC function and DOLBY PRO LOGIC function are changed over to the 3D HEADPHONE function as headphones cannot play back th...

Страница 23: ...an audio system is not connected to your TV please be sure to leave the TV SPEAKER setting to L C R If you don t a normal sound will not come from the TV speakers If the TV SPEAKER is not set to L C R press the 6 buttons to choose TV SPEAKER and press the 5 buttons to choose L C R again DOLBY PRO LOGIC You can enjoy Dolby Surround Pro Logic sound if you add surround speakers Before using the DOLBY...

Страница 24: ...he headphones are not connected to the TV the DIGITAL SURROUND function becomes active instead of the HEADPHONE SURROUND function Disconnecting the headphones from the TV automatically changes to the DIGITAL SURROUND function corresponding to the current HEADPHONE SURROUND function However the 3D HEADPHONE function is changed over to either the PRO LOGIC 3D PHONIC function or DOLBY PRO LOGIC funct...

Страница 25: ...olby Surround encoded programmes EXT SETTING y S VIDEO input You can connect a device such as an S VHS VCR to enjoy the high quality picture of the S VIDEO signal Y C signal Preparation First read the device s instruction manual and Additional preparation on page 39 to connect the device to the TV properly Second follow the device s instruction manual to set the device so that it sends an S VIDEO ...

Страница 26: ...th its name 1 Choose an EXT terminal 2 Press the blue button to display the name list LIST 3 Press the 6 buttons to choose a name Then press the a button The LIST disappears and the name is assigned to the EXT terminal You cannot choose an EXT terminal name that is not on the name list LIST To erase a name assigned to the EXT terminal Choose a blank space 4 Press the a button to complete the setti...

Страница 27: ...ss the a button A Sub menu of the SLEEP TIMER function appears 2 Press the 5 buttons to set the period of time Then press the a button You can set the period of time a maximum of 120 minutes 2 hours in 10 minute steps One minute before the SLEEP TIMER function turns off the TV GOOD NIGHT appears The SLEEP TIMER function cannot be used to turn off the TV s main power When the SLEEP TIMER function i...

Страница 28: ...5 buttons to move the cursor 3 Press the a button The Sub menu of CHILD LOCK appears 4 Press the 6 buttons to choose a TV channel Every time you press the 6 buttons the Programme number PR changes and the picture of the TV channel registered in the Programme number PR is displayed on the screen 5 Press the blue button and set the CHILD LOCK function Then press the a button n CHILD LOCK appears and...

Страница 29: ...o the EXT 2 terminal To use this function see Using the DECODER EXT 2 function on page 35 Caution If you have not connected a decoder with a T V LINK compatible VCR to the EXT 2 terminal setting this function to ON by mistake causes the picture sound of a TV channel you are currently viewing to disappear INSTALL LANGUAGE You can choose the language you want to use for the on screen display from th...

Страница 30: ...l function In some areas you may get TV reception from more than one transmitter for example different ITV regions In this case each TV channel could be set twice If this happens the first set of channels will have the stronger signal If you want to delete the second set of channels you will have to do it manually see page 33 EDIT MANUAL The EDIT MANUAL functions are divided into two types editing...

Страница 31: ...nnel in the programme number PR DELETE This function deletes a TV channel you do not want to list MANUAL This function manually stores a new TV channel in a programme number PR 3 Press the a button to complete the settings The T V LINK menu appears 4 If you do not have a T V LINK compatible VCR connected Press the b button to exit the T V LINK menu The T V LINK menu disappears and all the settings...

Страница 32: ...s the h Information button 6 Press the a button to give a channel name ID to a TV channel You can give your own unique channel name ID to the TV channel When you have finished step 3 do not go to step 4 Press the 5 buttons to move the cursor and press the 6 buttons to choose each character of the channel name ID Then press the a button to register the channel name ID to the TV channel INSERT Prepa...

Страница 33: ... appears on the screen 2 Press the yellow button to delete the TV channel The TV channel is deleted from the programme numbers PR list MANUAL 1 Press the 6 buttons to choose a programme number PR for a new TV channel 2 Press the blue button to activate the MANUAL function To cancel the MANUAL function Press the h Information button 3 Press the green or red button to search for a TV channel Scannin...

Страница 34: ...is turned on the demonstration starts automatically If you do not want that to happen cancel the DEMO function 1 Display the DEMO menu again 2 Press the 6 buttons to choose OFF 3 Press the a button to cancel the DEMO function CH Channel CH 21 E21 CH 22 E22 CH 23 E23 CH 24 E24 CH 25 E25 CH 26 E26 CH 27 E27 CH 28 E28 CH 29 E29 CH 30 E30 CH 31 E31 CH 32 E32 CH 33 E33 CH 34 E34 CH 35 E35 CH 36 E36 CH ...

Страница 35: ...2 terminal Has the VCR power been turned on Does the SCART cable that connects the EXT 2 terminal to the T V LINK compatible VCR have all its proper connections Using the DECODER EXT 2 function If you have a decoder connected to a T V LINK compatible VCR which in turn is connected to the EXT 2 terminal use the DECODER EXT 2 function to unscramble the scrambled TV channels 1 Turn on the decoder pow...

Страница 36: ...peakers for the PRO LOGIC 3D PHONIC function When connecting surround speakers Follow Setting the DOLBY PRO LOGIC function When connecting both an audio system front speakers and an amplifier and surround speakers Follow Turning the TV s speakers off and Setting the DOLBY PRO LOGIC function The 5 buttons of the TV remote control and the r volume buttons at the front panel of your TV set can be use...

Страница 37: ...ress the a button to complete the settings The menu disappears Use the amplifier volume to control and set the volume of the front speakers to fit in with the TV speakers Setting the DOLBY PRO LOGIC function Set the items in the sub menu of the DOLBY PRO LOGIC function properly and use the test signal to control the volume of the speakers so that you can listen to the sounds from them evenly Be su...

Страница 38: ...e volume from the front speaker is roughly equal to that from the TV speakers or surround speakers 6 Press the 5 buttons to adjust the sound volumes of the speakers so that you can listen to the sounds at the same volume when you are sitting where you would normally sit to watch the TV LEFT CENTRE RIGHT SURROUND LEFT and RIGHT stands for the left and right of the front speakers CENTRE refers to th...

Страница 39: ... in the following connection diagram see the table to choose the best EXT terminal Connecting cables are not supplied 1 VCR composite signal 2 VCR composite signal S VIDEO signal 3 T V LINK compatible VCR composite signal S VIDEO signal 4 Decoder 5 DVD player composite signal S VIDEO signal 6 DVD player composite signal RGB signal 7 TV game composite signal RGB signal 8 TV game composite signal S ...

Страница 40: ... number PR also changes over the TV output from the EXT 1 terminal The video sound signal from an EXT terminal cannot be output Teletext programmes cannot be output Connecting speakers or an amplifier See the audio equipment diagram and connect the audio equipment to the TV Before connecting anything Read the manuals that came with the amplifier and speakers Turn the TV and amplifier off Use imped...

Страница 41: ...itting the woofer unit Fit the woofer unit in the reverse order to that described in Removing the woofer unit Align the projection on the base of the woofer unit with the hole in the top of the TV and insert the connector into the WOOFER terminal Cautions when fitting the woofer unit Check that the woofer unit is fitted correctly on the top of the TV Do not use excessive force when inserting the c...

Страница 42: ... 22 to check the SPEAKER function setting Poor picture If noise snow totally block out the picture there may be a problem with the aerial or aerial cable Check the following to try to solve the problem Have the TV and aerial been connected properly Has the aerial cable been damaged Is the aerial pointing in the right direction Is the aerial itself faulty If the TV or aerial suffers interference fr...

Страница 43: ...s automatically turned off If the TV is turned off suddenly try to press the standby button to turn on the TV once again If the TV goes back to normal there is no problem When the TV is receiving a wide screen signal WSS or a signal from an external device affecting the screen size the ZOOM mode automatically changes When you want to resume the previous ZOOM mode press the c button again If you br...

Отзывы: