background image

4

Data Size: 

B6L (182 mm x 128 mm)

Book Size: 

B6L (182 mm x 128 mm)

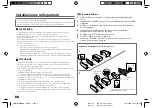
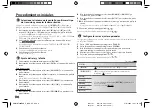
    Instalación de la antena DAB

Conecte una antena DAB a la toma de antena DAB. (Página 3)
•  Se suministra antena DAB para 

. Para obtener información, 

consulte lo siguiente.

• Para 

, deberá adquirir una antena DAB por separado. Para 

obtener más información, consulte el manual de instrucciones suministrado con 
la antena DAB.

 PRECAUCIÓN

•  La antena tipo película (F) debe utilizarse exclusivamente en el interior del 

vehículo.

•  No la instale en los siguientes lugares:
  –  en un lugar donde pueda bloquear la vista del conductor.
  –  en un lugar donde puede obstaculizar el funcionamiento de dispositivos de 

seguridad, como los airbags.

  –  sobre superficies de cristal móviles, como el portón trasero.
  –  en la parte lateral del vehículo (por ejemplo, la puerta, la ventanilla delantera).
  –  en la ventanilla trasera.
•  La intensidad de la señal se debilitará si instala la antena en los siguientes 

lugares:

  –  en un cristal que refleje los rayos infrarrojos o en zonas cubiertas con una 

película de cristal tipo espejo.

  –  en un punto en el que se superponga con la antena de radio original 

(patrón).

  –  en un punto en el que se superponga con cables de calefacción de la luneta.
  –  sobre un cristal que bloquee las señales de radio (por ejemplo,un cristal que 

refleje los rayos infrarrojos o un cristal de aislamiento térmico).

•  Puede producirse una mala recepción:
  –  debido al ruido que genera el limpiaparabrisas, el aire acondicionado o el 

motor cuando está encendido.

  –  según la dirección de la emisora de difusión con respecto al vehículo 

(antena).

•  Limpie totalmente el aceite y la superficie de la superficie adhesiva con el 

limpiador (I) suministrado.

•  No doble ni dañe la antena tipo película (F).
•  Es posible que no se pueda instalar, dependiendo del modelo del vehículo.
•  Compruebe la trayectoria del cable de la antena tipo película (F) y del 

amplificador (G) antes de adherir.

•  No aplique ningún limpiacristales después de adherir la antena tipo película (F).

  Lista de piezas (suministradas)

(F)  Antena tipo película (×1)
(G)  Amplificador (cable con amplificador, 3,5 m) (×1)
(H)  Abrazadera para cables (×3)
(I) Limpiador 

(×1)

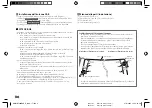
Determine la posición de instalación de la antena

•  La dirección de la antena tipo película (F) cambia en función de que la 

antena tipo película (F) se instale en el lado derecho o izquierdo.

•  Antes de la instalación, asegúrese de comprobar la ubicación de la antena 

tipo película (F). La antena tipo película no se puede volver a adherir.

•  Sepárela de otras antenas al menos 100 mm.
•  No adhiera el amplificador (G) en la línea cerámica (parte negra) alrededor 

del parabrisas. No se podrá obtener una adhesión suficiente.

Instalación de la antena en el lado izquierdo

Instalación de la antena en el lado derecho

Línea cerámica (parte negra)

Hoja de conexión a tierra*

Hoja de conexión 
a tierra*

*  Pegue la hoja de conexión a tierra del amplificador (G) sobre la parte metálica 

del montante delantero.

KMM-BT508DAB_E_QSG_SP.indd   4

KMM-BT508DAB_E_QSG_SP.indd   4

27/4/2022   12:47:17 PM

27/4/2022   12:47:17 PM

Содержание KMM-BT508DAB

Страница 1: ... le operazioni e le informazioni dettagliate fare riferimento al ISTRUZIONI PER L USO nel seguente sito web Para obtener más información y detalles sobre las operaciones consulte el MANUAL DE INSTRUCCIONES en el siguiente sitio web https www kenwood com cs ce ENGLISH FRANÇAIS DEUTSCH NEDERLANDS ITALIANO ESPAÑOL DIGITAL MEDIA RECEIVER Quick Start Guide RÉCEPTEUR MULTIMÉDIA NUMÉRIQUE Guide de démarr...

Страница 2: ...et weggooien van elektrische en elektronische apparatuur en batterijen particulieren Dit symbool geeft aan dat gebruikte elektrische elektronische producten en batterijen niet bij het normale huishoudelijke afval mogen Lever deze producten in bij de aangewezen inzamelingspunten waar ze gratis worden geaccepteerd en op de juiste manier worden verwerkt teruggewonnen en hergebruikt Voor inleveradress...

Страница 3: ... Amsterdamseweg 37 1422 AC UITHOORN Niederlande Conformiteitsverklaring met betrekking tot de RE richtlijn van de Europese Unie 2014 53 EU Conformiteitsverklaring met betrekking tot de RoHS richtlijn van de Europese Unie 2011 65 EU Fabrikant JVCKENWOOD Corporation 3 12 Moriya cho Kanagawa ku Yokohama shi Kanagawa 221 0022 JAPAN EU vertegenwoordiger JVCKENWOOD Europe B V Amsterdamseweg 37 1422 AC U...

Страница 4: ...AB jest zgodny z dyrektywą 2014 53 UE Pełny tekst deklaracji zgodności EU jest dostępny pod adresem https www kenwood com euukdoc Český Společnost JVCKENWOOD tímto prohlašuje že rádiové zařízení KMM BT508DAB KMR M508DAB splňuje podmínky směrnice 2014 53 EU Plný text EU prohlášení o shodě je dostupný na následující internetové adrese https www kenwood com euukdoc Magyar JVCKENWOOD ezennel kijelenti...

Страница 5: ...а KMM BT508DAB KMR M508DAB е в съответствие с Директива 2014 53 ЕС Пълният текст на ЕС декларацията за съответствие е достъпен на следния интернет адрес https www kenwood com euukdoc Turkish Burada JVCKENWOOD KMM BT508DAB KMR M508DAB radyo ekipmanının 2014 53 AB Direktifine uygun olduğunu bildirir AB uyumluluk deklarasyonunun tam metni aşağıdaki internet adresinde mevcuttur https www kenwood com e...

Страница 6: ...inal copies or related materials continue in the possession of the User and that the User shall cause the transferee to comply with this Software License Agreement 2 The User shall not carry out reverse engineering disassembling decompiling or any other code analysis works in connection with the Licensed Software Article 4 Right pertaining to the Licensed Software Any and all copyrights and other ...

Страница 7: ...he Tokyo District Court for its first instance Important Notice concerning the Software jansson Copyright c 2009 2012 Petri Lehtinen petri digip org Permission is hereby granted free of charge to any person obtaining a copy of this software and associated documentation files the Software to deal in the Software without restriction including without limitation the rights to use copy modify merge pu...

Страница 8: ... com Copyright c 2000 2001 Aaron D Gifford All rights reserved You may obtain a copy of the license at https opensource org licenses BSD 3 Clause THE SOFTWARE IS PROVIDED AS IS WITHOUT WARRANTY OF ANY KIND EXPRESS OR IMPLIED INCLUDING BUT NOT LIMITED TO THE WARRANTIES OF MERCHANTABILITY FITNESS FOR A PARTICULAR PURPOSE AND NONINFRINGEMENT IN NO EVENT SHALL THE AUTHORS OR COPYRIGHT HOLDERS BE LIABL...

Страница 9: ...tware T Kernel 2 0 This product uses the source code of T Kernel 2 0 under T License 2 0 granted by T Engine Forum www tron org BSD 3 Clause Copyright c 2000 2001 Aaron D Gifford All rights reserved You may obtain a copy of the license at https opensource org licenses BSD 3 Clause THE SOFTWARE IS PROVIDED AS IS WITHOUT WARRANTY OF ANY KIND EXPRESS OR IMPLIED INCLUDING BUT NOT LIMITED TO THE WARRAN...

Страница 10: ... prevent a short circuit To prevent short circuit Insulate unconnected wires with vinyl tape Be sure to ground this unit to the car s chassis again after installation Secure the wires with cable clamps and wrap vinyl tape around the wires that comes into contact with metal parts to protect the wires CAUTION Install this unit in the console of your vehicle Do not touch the metal parts of this unit ...

Страница 11: ...er or to the antenna control terminal in the vehicle c Brown Connect to the device equipped with muting feature to mute this unit d Yellow Battery wire e Red Ignition wire f Red A7 from ISO connector g Yellow A4 from ISO connector Pin Color and function for ISO connectors A4 Yellow Battery A5 Blue White 1 Power control A7 Red Ignition ACC A8 Black Earth ground connection B1 B2 Purple Purple black ...

Страница 12: ...ction of the broadcast station with respect to the vehicle antenna Thoroughly wipe oil and dirt from the pasting surface with the supplied cleaner I Do not bend or damage the film antenna F It may not be possible to install on certain vehicles Check the cable routing of the film antenna F and amplifier unit G before pasting Do not apply any glass cleaner after pasting the film antenna F Part list ...

Страница 13: ...bag Air bag Antenna installation 1 Remove the front pillar cover of your car Front pillar 2 Clean the windscreen with the supplied cleaner I I Wait until the glass surface is completely dry before proceeding Warm the surface of the windscreen with defroster if it is cold during winter 3 Remove the separator tag 1 of film antenna F horizontally and paste the antenna on the windscreen Separator tag ...

Страница 14: ...emove the film covering the earth sheet and paste the earth sheet on the metal part of the vehicle Provide sufficient leeway for the earth sheet so that it does not interfere with the interior parts front pillar cover Also take care that the interior parts do not interfere with the amplifier unit G G Windscreen Earth sheet Front pillar cover 8 Wire the antenna cables Use cable clamper H to secure ...

Страница 15: ...that takes your attention away from safe driving CAUTION Volume setting Adjust the volume so that you can hear sounds outside the car to prevent accidents Lower the volume before playing digital sources to avoid damaging the speakers by the sudden increase of the output level General Avoid using the external device if it might hinder safe driving Make sure all important data has been backed up We ...

Страница 16: ...b 6 Turn the volume knob to select 12H or 24H then press the knob To set the date 7 Turn the volume knob to select DATE FORMAT then press the knob 8 Turn the volume knob to select DD MM YY or MM DD YY then press the knob 9 Turn the volume knob to select DATE SET then press the knob 10 Turn the volume knob to make the settings then press the knob Set the date in the order of Day Month Year or Month...

Страница 17: ...mble 4 Press S T to select an ensemble service or component to listen Settings in memory You can store up to 18 services Store a service Press and hold one of the number buttons 1 to 6 Select a stored service Press one of the number buttons 1 to 6 Analog Radio Search for a station 1 Press BSRC repeatedly to select RADIO 2 Press BAND repeatedly to select FM1 FM2 FM3 MW LW 3 Press S T to search for ...

Страница 18: ...enu items AUDIO CONTROL Sets your preferred audio settings DISPLAY Sets your preferred control for the display window TUNER SETTING Settings for radio source USB Settings for using a USB device BT MODE Settings for using a Bluetooth device REMOTE APP Settings for using smartphone to control this unit ALEXA SETUP Sets your preferred voice control language for Alexa MIC GAIN 1 Sets the sensitivity o...

Страница 19: ... the Personal Identification Number PIN code immediately after searching 3 Press the volume knob to start pairing PAIRING OK appears when pairing is completed Once pairing is completed Bluetooth connection is established automatically BT 1 and or BT 2 indicator on the display window lights up indicator lights up to show the strength of the battery and signal of the connected device Answer a call P...

Страница 20: ...r les courts circuits Pour éviter les courts circuits Isolez les fils non connectés avec du ruban adhésif Assurez vous de raccorder de nouveau la mise à la masse de cet appareil au châssis de la voiture après l installation Fixez les câbles avec des serre câbles et enrouler un ruban de vinyle autour des câbles qui entrent en contact avec des pièces métalliques pour protéger les câbles AVERTISSEMEN...

Страница 21: ... la borne de commande d antenne du véhicule c Marron Connectez à l appareil équipé d une fonction de mise en sourdine pour mettre cet appareil en sourdine d Jaune Câble de batterie e Rouge Câble d allumage f Rouge A7 à partir du connecteur ISO g Jaune A4 à partir du connecteur ISO Broche Couleur et fonction pour les connecteurs ISO A4 Jaune Pile A5 Bleu Blanc 1 Commande d alimentation A7 Rouge All...

Страница 22: ...e la climatisation ou le moteur est mis en marche en fonction de la direction de station de diffusion par rapport au véhicule antenne Essuyez soigneusement l huile et les saletés de la surface de collage avec le nettoyant I fourni Ne tordez pas ni n endommagez l antenne film F L installation peut ne pas être possible sur certains véhicules Vérifiez le câblage de l antenne film F et de l amplificat...

Страница 23: ...onctionnement du coussin de sécurité Coussin de sécurité Installation de l antenne 1 Retirez le couvercle du pilier avant de votre voiture Pilier avant 2 Nettoyez le pare brise avec le nettoyant I fourni I Attendez que la surface de la vitre soit complètement sèche avant de continuer Réchauffez la surface du pare brise avec le dégivreur s il fait froid en hiver 3 Retirez le séparateur balise 1 de ...

Страница 24: ...e et collez la feuille de masse sur la partie métallique du véhicule Laissez suffisamment d espace pour la feuille de masse afin qu elle n interfère pas avec les parties intérieures couverture de pilier avant Faites aussi attention à ce que les parties intérieures n interfèrent pas avec l amplificateur G G Pare brise Feuille de masse Couvercle du pilier avant 8 Attachez les câbles d antenne Utilis...

Страница 25: ... distraire de la conduite sure de votre véhicule AVERTISSEMENT Réglage du volume Ajustez le volume de façon à pouvoir entendre les sons extérieurs à la voiture afin d éviter tout risque d accident Réduisez le volume avant de reproduire des sources numériques afin d éviter d endommager les enceintes par la soudaine augmentation du niveau de sortie Généralités Éviter d utiliser le périphérique extér...

Страница 26: ...u 24H puis appuyez sur le bouton Pour régler la date 7 Tournez le bouton de volume pour choisir DATE FORMAT puis appuyez sur le bouton 8 Tournez le bouton de volume pour choisir DD MM YY ou MM DD YY puis appuyez sur le bouton 9 Tournez le bouton de volume pour choisir DATE SET puis appuyez sur le bouton 10 Tournez le bouton de volume pour faire les réglages puis appuyez sur le bouton Réglez la dat...

Страница 27: ...isir un ensemble un service ou un composant à écouter Réglages en mémoire Vous pouvez mémoriser un maximum de 18 services Mémorisez un service Maintenez enfoncée une des touches numériques 1 à 6 Sélectionnez un service mémorisé Appuyez sur l une des touches numériques 1 à 6 Radio analogique Recherchez une station 1 Appuyez répétitivement sur BSRC pour sélectionner RADIO 2 Appuyez répétitivement su...

Страница 28: ...ON AUDIO CONTROL Règle vos réglages audio préférés DISPLAY Règle votre commande préférée pour la fenêtre d affichage TUNER SETTING Réglages pour la source radio USB Réglages pour l utilisation d un périphérique USB BT MODE Réglages pour l utilisation d un périphérique Bluetooth REMOTE APP Réglages pour l utilisation d un smartphone pour commander cet appareil ALEXA SETUP Règle votre langue de comm...

Страница 29: ...e code PIN numéro d identification personnel immédiatement après la recherche 3 Appuyez sur le bouton de volume pour démarrer le pairage PAIRING OK apparait quand le pairage est terminé Une fois le pairage terminé la connexion Bluetooth est établie automatiquement BT 1 et ou BT 2 s allument sur la fenêtre d affichage L indicateur s allume pour montre la puissance de la batterie et du signal du pér...

Страница 30: ...r Fahrzeugkarosserie oder dem Massekabel schwarz an um einen Kurzschluss zu vermeiden Zum Verhindern von Kurzschlüssen Isolieren Sie nicht angeschlossene Kabel mit Vinylband Sicherstellen daß das Gerät nach dem Einbau a Chassis des Fahrzeugs geerdet wird Sichern Sie die Kabel mit Kabelklemmen und wickeln Sie Vinylband um die Kabel die mit Metallteilen in Berührung kommen um die Kabel zu schützen A...

Страница 31: ...ungsanschluss oder an den Antennensteuerungsanschluss des Fahrzeugs durchführen c Braun Verbinden Sie dies mit dem Gerät mit Stummschaltfunktion um diese Einheit stummzuschalten d Gelb Batteriekabel e Rot Zündkabel f Rot A7 vom ISO Anschluss g Gelb A4 vom ISO Anschluss Stift Farbe und Funktion für ISO Anschlüsse A4 Gelb Batterie A5 Blau Weiß 1 Stromsteuerung A7 Rot Zündung ACC A8 Schwarz Erdungsan...

Страница 32: ...f das Fahrzeug Antenne Wischen Sie gründlich Öl und Schmutz mit Hilfe des mitgelieferten Reinigungsmittels I von der Anbringungsfläche ab Biegen oder beschädigen Sie die Folienantenne F nicht Die Installation kann bei bestimmten Fahrzeugen unmöglich sein Prüfen Sie die Kabelführung auf der Folienantenne F und auf der Verstärkereinheit G vor dem Aufkleben Wenden Sie nach dem Aufkleben der Folienant...

Страница 33: ...rbag Antenneneinbau 1 Entfernen Sie die Frontsäulenabdeckung an Ihrem Fahrzeug Frontsäule 2 Reinigen Sie die Windschutzscheibe mit dem mitgelieferten Reiniger I I Warten Sie bis die Glasoberfläche vollständig trocken ist bevor Sie fortfahren Wärmen Sie die Oberfläche der Frontscheibe mit dem Entfroster an wenn es kalt ist im Winter 3 Entfernen Sie das Trägerblatt Zapfen 1 der Folienantenne F horiz...

Страница 34: ...tfernen Sie die Folie die das Erdungsblatt abdeckt und kleben Sie das Erdungsblatt auf den Metallteil des Fahrzeugs Lassen Sie ausreichend Spielraum für das Erdungsblatt damit es nicht Innenteile Frontsäulenabdeckung behindert Achten Sie auch darauf dass Innenteile nicht die Verstärkereinheit G behindern G Windschutzscheibe Erdungsblatt Frontsäulenabdeckung 8 Verdrahten Sie die Antennenkabel Verwe...

Страница 35: ...Ihre Aufmerksamkeit vom Straßenverkehr ablenkt ACHTUNG Lautstärkeeinstellung Stellen Sie die Lautstärke so ein dass Sie immer noch Geräusche von außerhalb des Fahrzeugs hören können um Unfälle zu vermeiden Senken Sie die Lautstärke vor dem Abspielen digitaler Tonquellen um Beschädigung der Lautsprecher durch plötzliche Tonspitzen zu vermeiden Allgemeines Vermeiden Sie Verwendung des externen Gerät...

Страница 36: ...den Lautstärke Regler zum Wählen von 12H oder 24H und drücken Sie dann den Regler Zum Einstellen des Datums 7 Drehen Sie den Lautstärke Regler zum Wählen von DATE FORMAT und drücken Sie dann den Regler 8 Drehen Sie den Lautstärke Regler zum Wählen von DD MM YY oder MM DD YY und drücken Sie dann den Regler 9 Drehen Sie den Lautstärke Regler zum Wählen von DATE SET und drücken Sie dann den Regler 10...

Страница 37: ...nsemble einen Dienst oder eine Komponenten zum Hören zu suchen Einstellungen im Speicher Sie können bis zu 18 Dienste speichern Speichern eines Dienstes Halten Sie eine der Zifferntasten 1 bis 6 gedrückt Wählen Sie einen gespeicherten Dienst aus Drücken Sie eine der Zifferntasten 1 bis 6 Analogradio Suche nach einem Sender 1 Drücken Sie BSRC wiederholt um RADIO zu wählen 2 Drücken Sie BAND wiederh...

Страница 38: ... FUNCTION Menüelemente AUDIO CONTROL Stellt Ihre bevorzugten Audio Einstellungen ein DISPLAY Wählen Sie Ihre bevorzugte Steuerung für das Anzeigefenster TUNER SETTING Einstellungen für Radioquelle USB Einstellungen zur Verwendung eines USB Geräts BT MODE Einstellungen zur Verwendung eines Bluetooth Geräts REMOTE APP Einstellungen zur Verwendung des Smartphones zur Steuerung dieser Einheit ALEXA SE...

Страница 39: ... nach der Suche eingeben 3 Drücken Sie den Lautstärke Regler zum Starten des Pairing Vorgangs PAIRING OK erscheint wenn das Pairing fertig ist Wenn der Pairing Vorgang ausgeführt ist wird die Bluetooth Verbindung automatisch hergestellt Die Anzeige BT 1 und oder BT 2 im Displayfenster leuchtet auf Die Anzeige leuchtet auf um die Stärke der Batterie und das Signal des angeschlossenen Geräts anzuzei...

Страница 40: ...ochassis of de aardedraad zwart aan Om kortsluiting te voorkomen Isoleer niet verbonden draden met isolatieband Aard dit toestel beslist op het autochassis na het monteren Zet de draden vast met draadklemmen en wikkel isolatietape om de draden die in contact komen met metalen onderdelen om de draden te beschermen VOORZORGEN Installeer dit toestel in de console van uw voertuig Raak de metalen onder...

Страница 41: ...are eindversterker gebruikt ofwel naar de antenne aansluiting van de auto c Bruin Verbind met het apparaat dat is uitgerust met de dempingsfunctie om dit toestel te dempen d Geel Accukabel e Rood Ontstekingskabel f Rood A7 vanaf ISO connector g Geel A4 vanaf ISO connector Pen Kleur en functie voor ISO aansluitingen A4 Geel Accu A5 Blauw Wit 1 Spanningsregeling A7 Rood Contact ACC A8 Zwart Massaver...

Страница 42: ... wordt ingeschakeld de richting van de zender in verhouding tot de auto antenne Verwijder olie en vuil van het te gebruiken oppervlak met de bijgeleverde reiniger I Buig en beschadig de stripantenne F niet De antenne kan mogelijk niet in bepaalde auto s worden bevestigd Controleer de richting van de kabel van de stripantenne F en versterkerunit G alvorens op te plakken Gebruik geen glasreiniger na...

Страница 43: ...an de airbag niet wordt belemmerd Airbag Installeren van antenne 1 Verwijder de afdekking van de voorpilaar van de auto Voorpilaar 2 Reinig het voorruit met de bijgeleverde reiniger I I Wacht totdat het glasoppervlak geheel droog is Verwarm het voorruit met de verwarming indien het koud is in de winter 3 Verwijder de scheider tag 1 van de stripantenne F in horizontale richting en plak de antenne o...

Страница 44: ...rwijder de strook die het aardingsvel bedekt en plak het vel op een metalen gedeelte van de auto Zorg dat er voldoende ruimte voor het aardingsvel is zodat het geen andere interieuronderdelen overlapt bijv afdekking van voorpilaar Controleer tevens of de interieuronderdelen de versterkerunit G niet hinderen G Voorruit Aardingsvel Afdekking voorpilaar 8 Leid de antennekabels Bevestig de antenne met...

Страница 45: ...e uw aandacht van de verkeersveiligheid af zou kunnen leiden VOORZORGEN Volume instelling Voorkom ongelukken en stel het volume derhalve zodanig in dat u geluid van buiten nog goed kunt horen Verlaag het volume alvorens de weergave van digitale bronnen te starten om beschadiging van de luidsprekers door een plotselinge verhoging van het uitgangsniveau te voorkomen Algemeen Vermijd het gebruik van ...

Страница 46: ...op Instellen van de datum 7 Draai de volumeknop om DATE FORMAT te kiezen en druk vervolgens op de knop 8 Draai de volumeknop om DD MM YY of MM DD YY te kiezen en druk vervolgens op de knop 9 Draai de volumeknop om DATE SET te kiezen en druk vervolgens op de knop 10 Draai de volumeknop om de instellingen te maken en druk vervolgens op de knop Stel de datum in de volgorde van Dag Maand Jaar of Maand...

Страница 47: ...een ensemble service of component voor weergave te kiezen Geheugeninstellingen U kunt maximaal 18 services opslaan Opslaan van een service Houd een van de cijfertoetsen 1 tot 6 even ingedrukt Kiezen van een opgeslagen service Druk op een van de cijfertoetsen 1 tot 6 Analoge radio Opzoeken van een zender 1 Druk herhaaldelijk op BSRC om RADIO te kiezen 2 Druk herhaaldelijk op BAND om FM1 FM2 FM3 MW ...

Страница 48: ...TION menu items AUDIO CONTROL Stelt uw gewenste audio instellingen in DISPLAY Stelt uw gewenste besturing voor het weergavevenster in TUNER SETTING Instellingen voor radiobron USB Instellingen voor het gebruik van een USB apparaat BT MODE Instellingen voor het gebruik van een Bluetooth apparaat REMOTE APP Instellingen voor het gebruik van een smartphone om dit apparaat te bedienen ALEXA SETUP Hier...

Страница 49: ...dentificatienummer invoeren 3 Druk op de volumeknop om het koppelen te starten PAIRING OK verschijnt wanneer het koppelen is voltooid Nadat het koppelen eenmaal is uitgevoerd wordt de Bluetooth verbinding automatisch gemaakt BT 1 en of BT 2 indicator s licht en op het displayvenster op indicator gaat branden om het vermogen van de batterij en het verbonden apparaat te tonen Beantwoorden van een ge...

Страница 50: ...eria giallo né il cavo di accensione del motore rosso al telaio del veicolo né al cavo di messa a terra nero Per prevenire i cortocircuiti Avvolgere con del nastro adesivo i cavi non collegati Al termine dell installazione si deve nuovamente collegare l unità a massa attraverso la carrozzeria della vettura Fissare in posizione tutti i cavi con apposite fascette e avvolgere con del nastro adesivo q...

Страница 51: ...e oppure alla presa dell antenna del veicolo c Marrone Collegarsi al dispositivo dotato di funzione di silenziamento per silenziare questa unità d Giallo Cavo della batteria e Rosso Cavo di accensione f Rosso A7 del connettore ISO g Giallo A4 del connettore ISO Contatto Colori e funzioni connettori ISO A4 Giallo Batteria A5 Blu Bianco 1 Controllo alimentazione A7 Rosso Accensione ACC A8 Nero Colle...

Страница 52: ...ntenna Con la salviettina I fornita in dotazione rimuovere dalla superficie di applicazione qualsiasi traccia d unto o sporcizia Non piegare né danneggiare in altro modo l antenna a pellicola F Questa antenna potrebbe non essere installabile su certi veicoli Prima di applicare definitivamente l antenna a pellicola F e l amplificatore G si raccomanda innanzi tutto di controllare la disposizione del...

Страница 53: ...mento Airbag Installazione dell antenna 1 Rimuovere il coprimontante Montante anteriore 2 Pulire il parabrezza con la salviettina I fornita in dotazione I Prima di procedere con l installazione attendere che la superfice del vetro si sia perfettamente asciugata Se fa freddo riscaldare questa superficie con lo sbrinatore 3 Rimuovere orizzontalmente il separatore linguetta 1 dell antenna a pellicola...

Страница 54: ...ettiva dalla lamina di collegamento a massa e applicare quest ultima alla parte metallica del veicolo Si suggerisce di lasciare un certo margine per la lamina in modo che non interferisca con le parti interne del veicolo ad esempio il coprimontante Altrettanta attenzione è necessaria affinché tali parti interne non interferiscano con l amplificatore G G Parabrezza Lamina di collegamento a massa Co...

Страница 55: ...cchio in alcun modo che distragga dalla guida ATTENZIONE Regolazione del volume Per ridurre il rischio d incidenti regolare il volume in modo che sia possibile udire i rumori esterni al veicolo Per evitare di danneggiare i diffusori con l aumento improvviso del livello d uscita ridurre il volume prima di riprodurre le sorgenti digitali Generale Non usare un apparecchio esterno se ciò può far distr...

Страница 56: ...e sino a selezionare 12H o 24H e quindi premerla Per impostare la data 7 Ruotare la manopola del volume sino a selezionare DATE FORMAT e quindi premerla 8 Ruotare la manopola del volume sino a selezionare DD MM YY o MM DD YY e quindi premerla 9 Ruotare la manopola del volume sino a selezionare DATE SET e quindi premerla 10 Ruotando la manopola del volume eseguire le varie impostazioni e quindi pre...

Страница 57: ...vizio o componente da ascoltare Impostazioni in memoria È possibile registrare sino a 18 servizi Per salvare un servizio Premere a lungo uno dei tasti numerici da 1 a 6 Per selezionare un servizio salvato in memoria Premere uno dei tasti numerici da 1 a 6 Radio analogica Ricercare una stazione 1 Premere quante volte necessario BSRC sino a selezionare RADIO 2 Premere quante volte necessario BAND pe...

Страница 58: ...odello Elementi del menu FUNCTION AUDIO CONTROL Imposta le impostazioni audio preferite DISPLAY Imposta il comando preferito per la finestra del display TUNER SETTING Impostazioni per la sorgente radio USB Impostazioni per l uso di una periferica USB BT MODE Impostazioni per l uso di una periferica Bluetooth REMOTE APP Impostazioni per l utilizzo dello smartphone per controllare questa unità ALEXA...

Страница 59: ...ario inserire il codice PIN Personal Identification Number 3 Premere la manopola del volume per avviare l accoppiamento Al termine dell accoppiamento appare PAIRING OK Al termine dell accoppiamento la connessione Bluetooth si stabilisce automaticamente Sul display appare l indicatore BT 1 e o BT 2 S illumina l indicatore per indicare lo stato di carica della batteria e la forza del segnale del dis...

Страница 60: ...el vehículo o cable de conexión a masa negro Para evitar cortocircuitos Utilice una cinta de vinilo para aislar los cables no conectados Asegúrese de volver a conectar a masa esta unidad al chasis del automóvil después de la instalación Para proteger los cables asegúrelos con abrazaderas de cables y con una cinta de vinilo enrolle los cables que entran en contacto con partes metálicas PRECAUCIÓN I...

Страница 61: ...or de potencia opcional o al terminal de control de la antena en el vehículo c Marrón Conecte al dispositivo equipado con la función de silenciamiento para silenciar esta unidad d Amarillo Cable de la batería e Rojo Cable de encendido f Rojo A7 desde el conector ISO g Amarillo A4 desde el conector ISO Patilla Color y función para conectores ISO A4 Amarillo Batería A5 Azul Blanco 1 Control de alime...

Страница 62: ... genera el limpiaparabrisas el aire acondicionado o el motor cuando está encendido según la dirección de la emisora de difusión con respecto al vehículo antena Limpie totalmente el aceite y la superficie de la superficie adhesiva con el limpiador I suministrado No doble ni dañe la antena tipo película F Es posible que no se pueda instalar dependiendo del modelo del vehículo Compruebe la trayectori...

Страница 63: ... airbag Airbag Instalación de la antena 1 Retire la cubierta del montante delantero de su vehículo Montante delantero 2 Limpie el parabrisas con el limpiador I suministrado I Espere a que la superficie de cristal esté completamente seca antes de proceder Si la superficie del parabrisas está fría caliéntela con el desempañador durante el invierno 3 Retire el separador lengüeta 1 de la antena tipo p...

Страница 64: ...e la hoja de conexión a tierra y pegue la hoja en la parte metálica del vehículo Deje suficiente margen para que la hoja de conexión a tierra no interfiera con las partes interiores cubierta del montante delantero También preste atención para que las piezas interiores no interfieran con el amplificador G G Parabrisas Hoja de conexión a tierra Cubierta del montante delantero 8 Tienda los cables de ...

Страница 65: ...a desviar su atención mientras está conduciendo el vehículo PRECAUCIÓN Ajuste del volumen Ajuste el volumen a un nivel que le permita oír los ruidos del exterior para impedir accidentes Antes de reproducir fuentes digitales baje el volumen para evitar que el repentino aumento del nivel de salida cause daños a los altavoces General Evite el uso de dispositivos externos cuando puedan afectar la segu...

Страница 66: ...da de volumen para seleccionar 12H o 24H y a continuación pulse la rueda Para ajustar la fecha 7 Gire la rueda de volumen para seleccionar DATE FORMAT y a continuación pulse la rueda 8 Gire la rueda de volumen para seleccionar DD MM YY o MM DD YY y a continuación pulse la rueda 9 Gire la rueda de volumen para seleccionar DATE SET y a continuación pulse la rueda 10 Gire la rueda de volumen para rea...

Страница 67: ...un ensemble 4 Pulse S T para seleccionar un ensemble servicio o componente a escuchar Ajustes en la memoria Puede guardar hasta 18 servicios Guardar un servicio Pulse y mantenga pulsado uno de los botones numéricos 1 a 6 Seleccione una emisora almacenada Pulse uno de los botones numéricos 1 a 6 Radio analógica Búsqueda de una emisora 1 Pulse BSRC repetidamente para seleccionar RADIO 2 Pulse BAND r...

Страница 68: ... modelo Opciones del menú FUNCTION AUDIO CONTROL Establece sus ajustes de audio preferidos DISPLAY Establece su control preferido para la ventanilla de visualización TUNER SETTING Configuración de la fuente de radio USB Configuración utilizando un dispositivo USB BT MODE Configuración utilizando un dispositivo Bluetooth REMOTE APP Configuración utilizando un smartphone para controlar esta unidad A...

Страница 69: ...ediatamente después de la búsqueda 3 Pulse la rueda de volumen para iniciar el emparejamiento El mensaje PAIRING OK aparece cuando ha finalizado el emparejamiento Cuando haya finalizado el emparejamiento la conexión Bluetooth se establece automáticamente BT 1 y o BT 2 se iluminan en la ventanilla de visualización El indicador se enciende para mostrar la carga de la batería y la intensidad de la se...

Страница 70: ...KMM BT508DAB_E_QSG_SP indd 12 KMM BT508DAB_E_QSG_SP indd 12 27 4 2022 12 47 19 PM 27 4 2022 12 47 19 PM ...

Страница 71: ...KMM BT508DAB_E_QSG_SP indd 13 KMM BT508DAB_E_QSG_SP indd 13 27 4 2022 12 47 19 PM 27 4 2022 12 47 19 PM ...

Страница 72: ...note that the use of this accessory with an Apple product may affect wireless performance Apple iPhone iPod iPod touch and Lightning are trademarks of Apple Inc registered in the U S and other countries IOS is a trademark or registered trademark of Cisco in the U S and other countries and is used under license Android is a trademark of Google LLC The Bluetooth word mark and logos are registered tr...

Отзывы: