background image

33

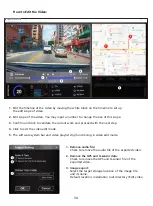
Video time line :

Drag the Video time line bar to Rewind or 

Forward to cue Video, Speed and G-Sensor date.

Video play control buttons :

Available options from left to right are stop, last 

clip, last frame, play, next frame next clip. 

Available hot keys for individual options are

(1) Play / Pause: space

(2) Stop: esc

(3) Last frame: left

(4) Next frame: right

(5) Next clip: N

(6) Last clip: B 

Full screen display :

Toggle to fit the image to the entire screen.

- Hot key: Alt + Enter

Video volume adjustment :

Drag this to change the audio volume.  

- Default volume: 100%

Digital zoom in / out :

Roll the mouse wheel forward/backward on the 

video area or drag this to change the zoom 

in/out.

Video play speed :

Click to speed up / down videos on the main 

screen. 

Available speed options may range from one 

quater to quadruple to original one. 

-Default speed : 1X

Share Button :

Click to open different sharing options. 

Video edit mode :

Click to open the video edit function window.

Screen shot :

Click to capture the current image displayed on 

the main screen and save the file in a given 

space. 

-Default location : installation root directory 

/Snapshot.

Speed :

Display the speed of the car in the video when it 

was recorded. You may change the UOM of 

speed under Setup 

 Speed Unit. 

(Function available on the device with built-in 

GPS)

-Unit of measure (UOM) option :  Imperial Unit 

or Metric Unit

-Default unit of measure : MPH

G-sensor data : 

Display the G-data of the vehicle in the video 

when it was recorded. 

1.

2.

3.

4.

5.

6.

7.

8.

9.

10.

11.

Chart of G-sensor data :

Display the G-data of the vehicle in the video 

when it was recorded. 

Video shot on : 

Display date and time of the video when it 

was recorded.

Latitude : 

Display the latitude of the video where it was 

recorded. 

(Function available on the device with built-in 

GPS)

Longitude :

Display the longitude of the video where it 

was recorded. 

(Function available on the device with built-in 

GPS)

Driving direction :

Display the direction of the video where it 

was recorded. 

(Function available on the device with built-in 

GPS)

Average Speed :

Display the average speed of the video where 

it was recorded. 

(Function available on the device with built-in 

GPS)

Max Speed :

Display the max speed of the video where it 

was recorded. 

(Function available on the device with built-in 

GPS)

Google Maps : 

Display the location of the video where it was 

recorded. 

(Function available on the device with built-in 

GPS)

Add the file / Remove the file :

Click the “Add” key to display the “add file” 

window. Click the “Remove” key to erase the 

selected files from the play list.

File group / File ungroup : 

You may group multiple files into the playlist then play 

them in one file and link the data of each file to display in 

data table. For example, adding 5 1-minute length files 

into one group will end up with a 5 minutes display time 

shown in the data table. The name of a group is a string of  

the name of the first file suffixed with the number of files 

in the group. That is, for a group of 5 files with the first 

name “20180925_191823”, the name of the group is 

“20180925_191823(5)”. 

Video playlist : 

A video thumbnail will show in this table 

after the videos added in the list.

12.

13.

14.

15.

16.

17.

18.

19.

20.

21.


22.

Содержание DRV-A201

Страница 1: ...RV A201 2019 JVCKENWOOD Corporation 201 V1 3 A A EN GPS Integrated Dashboard Camera INSTRUCTION MANUAL Updated information the latest Instruction Manual etc is available from https www kenwood com cs ce ...

Страница 2: ......

Страница 3: ...Accessories Key Features Parts Name and Functions Installation and Connection Initial Settings Basic Operation Settings Connection with Computer Using the Desktop Software Troubleshooting Appendix Specifications 01 01 02 09 09 10 13 17 19 29 31 32 42 44 47 Contents ...

Страница 4: ...e here are a few tips from the designers Reduce the amount of sky in the picture By adjusting the device towards the road the automatic exposure compensation will be focused on the road and not the light from the sky Position the device in the center of the dash If you place the device behind the rearview mirror you will avoid all distractions from the road Remove any objects that will obstruct yo...

Страница 5: ... event of moisture condensation allow the device to dry out completely before use The screen surface can easily be scratched Avoid touching it with sharp objects Nonadhesive generic screen protectors designed specifically for use on portable devices with LCD panels may be used to help protect the screen from minor scratches Never clean your device with the power on Use a soft lint free cloth to wi...

Страница 6: ...ting surface If the device is re affixed or mounted using for example general purpose double sided tape the adhesion strength may weaken and cause the device to fall After mounting the device leave it for 24 hours before use to enable the mounting strength of the adhesive mount to improve Failing to do so may result in the adhesion of the adhesive mount becoming weak and the device falling Fix the...

Страница 7: ...AN Rappresentante UE JVCKENWOOD Europe B V Amsterdamseweg 37 1422 AC UITHOORN PAESI BASSI Declaración de conformidad con respecto a la Directiva RE 2014 53 UE Declaración de conformidad con respecto a la Directiva RoHS 2011 65 UE Fabricante JVCKENWOOD Corporation 3 12 Moriyacho Kanagawa ku Yokohama shi Kanagawa 221 0022 JAPAN Representante en la UE JVCKENWOOD Europe B V Amsterdamseweg 37 1422 AC U...

Страница 8: ...rnet Español Por la presente JVCKENWOOD declara que el equipo de radio DRV A201 cumple la Directiva 2014 53 EU El texto completo de la declaración de conformidad con la UE está disponible en la siguiente dirección de internet Português Deste modo a JVCKENWOOD declara que o equipamento de radio DRV A201 está em conformidade com a Diretiva 2014 53 UE O texto integral da declaração de conformidade da...

Страница 9: ...vyhlasuje že rádiové zariadenie DRV A201 vyhovuje smernici 2014 53 EÚ Celý text EÚ vyhlásenia o zhode nájdete na nasledovnej internetovej adrese Dansk Herved erklærer JVCKENWOOD at radioudstyret DRV A201 er i overensstemmelse med Direktiv 2014 53 EU EUoverensstemmelseserklæringens fulde ordlyd er tilgængelig på følgende internetadresse Norsk JVCKENWOOD erklærer herved at radioutstyret DRV A201 er ...

Страница 10: ...rasyonunun tam metni aşağıdaki internet adresinde mevcuttur Русский JVCKENWOOD настоящим заявляет что радиооборудование DRV A201 соответствует Директиве 2014 53 EU Полный текст декларации соответствия ЕС доступен по следующему адресу в сети Интернет Limba românã Prin prezenta JVCKENWOOD declară că echipamentul radio DRV A201 este în conformitate cu Directiva 2014 53 UE Textul integral al declarați...

Страница 11: ... производства Срок службы годности кроме срока хранения дополнительных косметических материалов упомянутых в предыдущих двух пунктах не затрагивает никаких других прав потребителя в частности гарантийного свидетельства KENWOOD которое он может получить в соответствии с законом о правах потребителя или других законов связанных с ним Условия хранения Температура от 20 C до 60 C Влажность от 5 до 95 ...

Страница 12: ...button around the screen you are able to save an individual file Automatic Start Stop Tech The dashboard camera comes with built in sensors that automatically turn the device on and off with the vehicle Built In Microphone Speaker A built in microphone and speaker come standard The feature also works with the device s playback feature GPS Data Dashboard camera is able to record your location and s...

Страница 13: ...screenshot of the current frame Up Mute Button Up Navigate up within menus or go to the previous file in playback mode Mute Turn on or off the audio recording function while in video mode Record OK Button Record In Video mode press to start or stop recording In Photo mode press to take a photo OK The confirm button used to select options in menus Down Screen Off Button Down Navigate down within me...

Страница 14: ...a video clip the previous clip will also be protected If the button is pressed within the final third of a video clip the next clip will also be protected if recording continues Screen The device is equipped with a standard 2 7 LCD color screen to let you view Status LED Indicator Red Power On Red Flashing Recording Blue Charging Connector Port Attach the magnetic connector to the connector port S...

Страница 15: ...d Slot Insert your microSD card here Push your memory card into the slot until you hear a click microSD card is inserted into microSD Card Slot at the factory shipment condition 12 Microphone Built in microphone for audio recording 13 TIP If you cannot hear the CLICK take a small coin by the edge and push on the outside end of the card until the sound is made Remember DO NOT REMOVE OR INSERT THE M...

Страница 16: ... the rear view mirror Install the device so that it is within the wiping range of the wiper Mounting the device to the center of the windshield behind the rear view mirror will facilitate optimal video recording Caution When passing the power cord through the front pillar or another part observe the points below when performing the wiring work Wire the power cord farther forward or farther rearwar...

Страница 17: ...to attach and detach from the windshield while the adhesive mount provides more solid support for the camera The magnetic connector is already installed on the suction mount If you prefer using the adhesive mount please follow the guide below REPLACE THE SUCTION MOUNT WITH THE ADHESIVE MOUNT CONNECT THE DEVICE TO THE MAGNETIC MOUNT Attach the device onto e the magnetic connector on the mount Make ...

Страница 18: ...ount in place and press against the window While holding it in place pull the b locking lever back to lock the mount Loosen the c locking ring on the suction mount and pull the e magnetic connector out Next loosen the c locking ring from the adhesive mount and plug the e magnetic connector into the adhesive mount Clean the installation area on the windshield and peel off the plastic covering Adher...

Страница 19: ...hat is in the package to your vehicle s 12 V outlet The provided cable clips can help you keep the power cable neat Plug the cigar lighter adapter cable into the d power socket of the mount or the device This will allow the device to begin charging 3 4 Caution Before performing the connection work first check that the engine key is removed and then be sure to disconnect the negative terminal of th...

Страница 20: ...setup guide below Select the Language Select Time Zone United States EST United States CST United States MST United States PST Press OK to continue Set Time and Date 11 17 01 02 13 2019 MM DD YYYY Press OK to continue Language Language Press OK to continue En De Fr Nl Select Country United States Canada Russia Spain Press OK to continue English Deutsche Français Nederlands ...

Страница 21: ...ar lighter socket for your vehicle use the included USB power cord DO NOT wire the device directly to the car cigar lighter socket or any 12 V outlet Doing so will result in permanent damage to the device The device has a hardwire kit CA DR1030 optional accessory that will directly connect to your vehicle s fuse box This will allow you to have your 12 V outlet available for other use Please read c...

Страница 22: ...nd remain stable on the screen Recording Duration This will indicate the length of the current recording Parking Mode Sensor Indicates the parking mode sensor is on File Protection Indicates the current video clip is protected Date Displays current date Time Displays current time Microphone When the audio recording function is off there will be a red line across the icon Power Status Indicates if ...

Страница 23: ... the oldest and non protected video clip when the memory card is full OPTIONS 1 Minute default 3 Minutes 5 Minutes Exposure Adjust exposure levels settings OPTIONS 2 1 0 default 1 2 Access the VIDEO MENU by pressing the MENU button while in VIDEO MODE Use the UP and DOWN buttons to select setting options and press the OK button to enter the sub menu Once you access the sub menu highlight the desir...

Страница 24: ...rces When it senses any forces it will protect the current file automatically Adjust the sensitivity of G sensor here OPTIONS High Medium default Low Off GPS Turn the GPS function ON or OFF OPTIONS On default Off Speed Units Adjust the unit for speed data OPTIONS MPH default KMH Screen Saver the device has a function to let the screen shut down after a period of inactivity Press any button to re a...

Страница 25: ...s in PHOTO MODE Some icons show up only when corresponding functions are activated 1 2 3 4 5 Mode Indicates when the device is in photo mode Exposure Indicates the current exposure level settings Date Displays current date Time Displays current time Charging Indicator Indicates if the device is charging or not Photo Mode Basic Operation 11 17 01 02 13 2019 1 2 5 4 3 ...

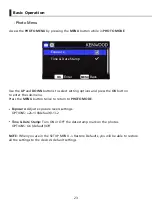
Страница 26: ...tton twice to return to PHOTO MODE Exposure Adjust exposure levels settings OPTIONS 2 1 0 default 1 2 Time Date Stamp Turn ON or OFF the date stamp mark on the photos OPTIONS On default Off NOTE When you are in the SETUP MENU Restore Defaults you will be able to restore all the settings to the device s default settings Photo Menu Basic Operation Exposure Time Date Stamp OK Enter MENU Back ...

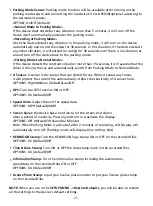
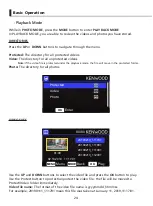
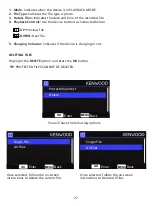
Страница 27: ...photos Use the UP and DOWN buttons to select the video file and press the OK button to play Use the Protect button to protect unprotect the video file the file will be moved to Protect Video folder immediately Video file name The format of the video file name is yyyymmdd_hhmmss For example 20190111_111701 mean this file was taken at January 11 2019 11 17 01 DIRECTORIES VIDEO FILES Playback Mode Ba...

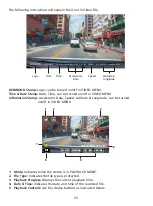
Страница 28: ... in VIDEO MENU Mode Indicates when the device is in PLAYBACK MODE File Type Indicates the file type is protected Playback Progress Displays the current playback time Date Time Indicates the date and time of the recorded file Playback Controls Use the device buttons as instructed below 1 2 3 4 5 1 2 3 7 4 6 5 00 59 02 13 2019 11 17 01 02 13 2019 11 17 01 X 3 80 Y 1 02 Y 1 65 30MPH N5 41 33 15 W62 4...

Страница 29: ...otect button to protect unprotect the photo file PHOTO FILES Charging Indicator Indicates if the device is charging or not Protected File Indicates the selected file is protected 6 7 MENU DELETE or PROTECT the video Play Back Menu 02 13 2019 11 17 01 OK Play MODE Back MENU Menu 20190213_111701 20190213_111801 20190213_111901 20190213_112001 OK Play MENU Menu MODE Back 80 80 02 13 2019 11 17 01 4 1...

Страница 30: ...ctions to delete All files TIP PROTECTED FILES CANNOT BE DELETED You will have the following options DELETING FILES Mode Indicates when the device is in PLAYBACK MODE File Type Indicates the file type is photo Date Time Indicates the date and time of the recorded file Playback Controls Use the device buttons as instructed below 1 2 3 4 Charging Indicator Indicates if the device is charging or not ...

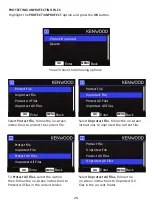
Страница 31: ...o unprotect the current file To Protect All Files select the option then follow the on screen instructions to Protect All files in the current folder Select Unprotect All Files follow the on screen instructions to Unprotect All files in the current folder PROTECTING UNPROTECTING FILES Highlight the PROTECT UNPROTECT option and press the OK button You will have the following options Protect Unprote...

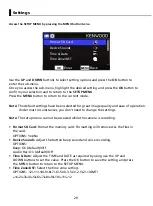
Страница 32: ... you don t need to change the settings Note The setup menu cannot be accessed while the camera is recording Format SD Card Format the memory card Formatting will remove ALL the files in the card OPTIONS Yes No Device Sounds Adjust the button beep sound and voice recording OPTIONS Beep On default Off Audio Rec On default Off Time Date Adjust the TIME and DATE as required by using use the UP and DOW...

Страница 33: ...fault Restore Defaults Reset all the settings to the factory default System Info Displays the firmware version card info and GPS satellite signal OPTIONS System Info Displays the firmware version Card Info Displays the memory card information Satellite Signal The count of how many satellite signals the device is receiving NOTE Make sure the Dash Cam is not recording Press and Hold the File Protect...

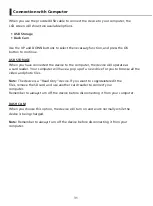
Страница 34: ...r computer will have a pop up of a new drive for you to browse all the video and photo files Note The device is a Read Only device If you want to copy delete edit the files remove the SD card and use another card reader to connect your computer Remember to always turn off the device before disconnecting it from your computer DASH CAM When you choose this option the device will turn on and work nor...

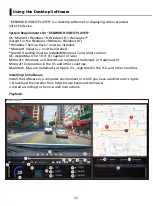
Страница 35: ...the U S and other countries Install the software in a computer environment in which you have administrator s rights 1 Download the installer from https www kenwood com cs ce 2 Install according to the on screen instructions System Requirements for KENWOOD VIDEO PLAYER Installing the Software Playback File JVC VIDEO PLAYER Edit Setup Share Help 01 00 00 27 INFORMATION N 25 1 56 Latitude Compass W 2...

Страница 36: ... Chart of G sensor data Display the G data of the vehicle in the video when it was recorded Video shot on Display date and time of the video when it was recorded Latitude Display the latitude of the video where it was recorded Function available on the device with built in GPS Longitude Display the longitude of the video where it was recorded Function available on the device with built in GPS Driv...

Страница 37: ...Check to remove the GPS and G sensor file of the exported video Image export Select the target storage location of the image file and its name Default location installation root directory Edit video 1 2 3 File JVC VIDEO PLAYER Edit Setup Share Help Edit Mode OK Cancel 01 00 00 27 Cut Time 00 07 00 37 N 25 1 56 Latitude Compass W 263 1 2018 08 14 19 33 03 Time Longitude W 121 33 32 Max Speed 135mph...

Страница 38: ...red colors ink and synced with item 2 The export is finished once the frame is fully inked in layered colors 1 2 3 OK Click to go back to the play mode page Open folder Click to open folders with image files saved in there 1 2 Retry Click to export the image file again with the previous settings Cancel Click to abort image file export and go back to the video edit page 1 2 Yes Click to go back to ...

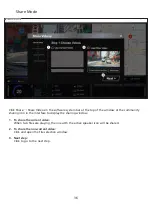
Страница 39: ...hared To share the non current video Click and open the file selection window Next step Click to go to the next step Click Share Share Videos in the software system bar at the top of the window or the community sharing icon in the interface to display the sharing window 1 2 3 00 27 INFORMATION KENWOOD VIDEO PLAYER ...

Страница 40: ...lic Private and Unlisted when you upload the video Upload title The title item will define the name of the video when you upload the video you can select the Auto DD MM YYYY default Dash Cam KENWOOD VIDEO PLAYER or define the title by yourselves Last step Click to go back to the last step Next step Click to go to the next step 1 2 3 4 5 01 00 00 27 Public Private Unlisted 4 5 KENWOOD VIDEO PLAYER ...

Страница 41: ...failure This page displays if an upload failed or there is a server connection timeout Last step Click to go back to the last step 1 2 00 27 File JVC VIDEO PLAYER Edit Setup Share Help INFORMATION KENWOOD VIDEO PLAYER ...

Страница 42: ...n is being initiated Your default browser will display and connect to the selected community platform You are required to bundle your account ID with the platform for connection the first time only no longer needed once bundled Cancel Click to go back to the last step 1 2 00 27 INFORMATION KENWOOD VIDEO PLAYER ...

Страница 43: ...ogress is presented by a frame being filled with layered colors ink and synced with item 1 The file is uploaded successfully once the frame is fully inked in layered colors Upload progress The former number is the MB uploaded and the latter is the total for the upload Cancel Click to go back to the last step 1 2 3 4 KENWOOD VIDEO PLAYER ...

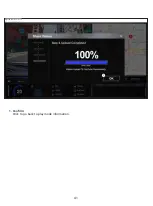
Страница 44: ...41 Confirm Click to go back to play mode information 1 KENWOOD VIDEO PLAYER ...

Страница 45: ...mmends for best quality is the Class 10 SD Card If your computer does not recognize the video files try another computer to view the recorded video Copy the video file on to the computer and allow for the computer video player rather than the device Playback feature Be sure to hold the device still while you take your photo Reminder The photo is not taken unless you have heard the shutter click Al...

Страница 46: ...creen saver function turns off the screen after a period of inactivity If you want to turn off this function go to SETUP menu Screen Saver and turn it off The message Please Format SD Card appears on my screen The device requires formatting the SD card if the card is used on the device for the first time Please format the SD card in the SETUP menu The device does not charge Be sure the power cord ...

Страница 47: ...rs Unresolved Issues Appendix Do not subject the screen section to strong shocks Doing so could damage the screen Do not let direct sunlight shine on the screen Leaving the screen with direct sunlight shining on it for long periods of time will increase the temperature and could damage the screen Extremely high or low temperatures could cause the display to operate slowly or darken or result in re...

Страница 48: ...ded to replace the SD card with a new one regularly depending on the usage conditions When inserting and removing an SD card confirm the orientation do not bend it and do not apply a strong force or impact to it Do not directly touch the contact part with a hand or metal The stored data may be damaged or lost due to static electricity Be sure to back up copy the required files in the SD card to a ...

Страница 49: ... a function of a computer just changes the file management information and does not completely delete the data in a SD card We recommend either physically destroying the actual SD card or using commercially available PC data deletion software or the like to completely delete the data in the SD card before disposal or transfer of ownership Manage the data in SD cards at your own responsibility 46 I...

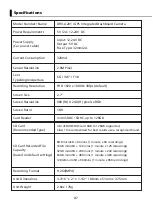
Страница 50: ...16 9 microSDXC SDHC card 8GB to 128GB supported Class 10 recommended for best results use a recognized brand H 264 MP4 3 7 16 x 2 x 1 1 2 88mm x 51mm x 37 5mm 2 8oz 78g Sensor Resolution 2 0M Pixel Card Reader microSDXC SDHC up to 128GB Input 12 24V DC Output 5V DC Fuse Type 32mm 2A Current Consumption 320mA Lens Type Angle Aperture 8GB microSD 60 mins 1 minute x 60 recordings 16GB microSD 120 min...

Страница 51: ......

Страница 52: ......

Отзывы: