Jura IMPRESSA S70 Скачать руководство пользователя страница 9

9

5. Rinsing the machine

RINSE UNIT

Place an empty cup under the coffee-spout (15).

Press rinsing key 

.

If the machine has been switched off and has already cooled
down it will be necessary to carry out this rinsing function
when the machine is switched on again.
After switching off the machine, the rinsing sets off automa-
tically.

6. Adjusting for water hardness

The water is heated inside the machine. With use, this leads to
calcium deposits (furring) forming on the machine. This will be
automatically indicated on the display.
For this reason, it is necessary to adjust the machine to the
hardness of your local water before you use it for the first time.
Use the enclosed test-sticks for this purpose.

1° water hardness on the German scale represents 1.79° on
the French scale.

The machine has got 5 hardness settings to choose from. While
adjusting the chosen grade is shown on the display.

The symbols on the display mean:

HARDNESS
LEVEL – –

water hardness function is switched off

HARDNESS

German water hardness

1 – 7°

LEVEL 1

French water hardness

1.79 – 12.53°

HARDNESS

German water hardness

8 – 15°

LEVEL 2

French water hardness

14.32 – 26.85°

HARDNESS

German water hardness

16 – 23°

LEVEL 3

French water hardness

28.64 – 41.14°

HARDNESS

German water hardness

24 – 30°

LEVEL 4

French water hardness

42.96 – 53.7°

The machine is adjusted to hardness level 3 before it leaves the
factory. You can alter this setting by following the instructions
below:

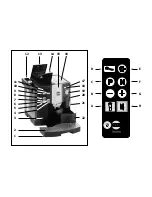
Switch the machine on by pressing ON/OFF key 

. The

machine adjusts fully-automatically to the starting position.

PLEASE WAIT

Open cover (3) and press key 

, until you hear an acoustic

signal

PRESS KEY / POWDER QUANTITY

Press key 

several times until the following message appears:

HARDNESS LEVEL 3

By pressing key 

you can hear an acoustic signal, the set

hardness level flashes

You can alter the hardness level by pressing key 

or 

. After

setting, press key 

once again to confirm. An acoustic signal

can be heard.

Press key 

to return to stand-by-status.

7. Use of Claris filter cartridges

Under proper implementation of Claris filter cartridges,
decalcifying of the machine becomes unnecessary. For
further information, please read the brochure “Claris. Tough
to calcium deposits, gentle to your coffee machine”.
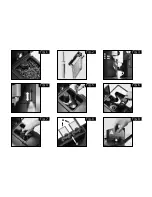
7.1 Placing filter

Pull up cartridge mounting. Pressing lightly, place the filter car-
tridge in the water tank (Fig. 2).

Pull down cartridge mounting, until it engages audibly.

Fill water tank with cold, fresh tap-water and replace it.

N

P

+

-

P

+

P

E

Содержание IMPRESSA S70

Страница 1: ...IMPRESSA S70 IMPRESSA X70 Instructions for use 01 03 Art Nr 61957...

Страница 2: ...ISPLAY serves as information DISPLAY please follow the instructions shown Note Important Tip Jura Impressa S70 X70 English 6 22 Jura Elektroapparate AG CH 4626 Niederbuchsiten Internet http www jurawo...

Страница 3: ...Fig 1 Fig 4 Fig 7 Fig 2 Fig 5 Fig 8 Fig 3 Fig 6 Fig 9 A B...

Страница 4: ...7 8 9 17 18 12 13 14 15 16 19 D C B A E F G H 10 11 20 22 21 6 5 4 3 2 1...

Страница 5: ...lid 14 Cover for pre ground coffee filler funnel 15 Height adjustable coffee spout 16 Cup warming tray 17 Selector key for steam 18 Selector key for hot water 19 Selector switch for coffee or hot wate...

Страница 6: ...uantity page 12 12 4 Programming FILTER page 13 12 5 Programming WATER HARDNESS page 13 12 6 Programming ECONOMY MODE page 13 12 7 Programming TIMER CLOCK page 13 12 8 Programming automatic switch on...

Страница 7: ...chine or even parts of it in the dishwasher To prevent overheating place the machine in an airy place Important information for the user Thank you for choosing this Jura product Please study these ins...

Страница 8: ...re not covered by warranty Lift up cover of the bean container 13 and remove aroma pro tection lid Clean out any dirt or foreign object from the bean container Fill the grinder container with coffee b...

Страница 9: ...5 HARDNESS German water hardness 16 23 LEVEL 3 French water hardness 28 64 41 14 HARDNESS German water hardness 24 30 LEVEL 4 French water hardness 42 96 53 7 The machine is adjusted to hardness level...

Страница 10: ...ay You will find a special turntable on the cartridge mounting to set the replacement date N P P P Empty water tank and pull up cartridge mounting Pressing light ly place the filter cartridge in the w...

Страница 11: ...flow The machine has a stand by status for hot water If you want to alternate between drawing off coffee and hot water the selector switch for hot water can be left turned on If you draw off hot wate...

Страница 12: ...age selection 12 1 Programming POWDER QUANTITY Switch the machine on by pressing ON OFF key Press key until you can hear an acoustic signal P POWDER QUANTITY SELECT KEY Now press the key that you want...

Страница 13: ...fly pressing key or you can set the hours and then confirm by pressing key By briefly pressing key or you can set the minutes and then confirm by pressing key You can call up the next setting by press...

Страница 14: ...le to call up hot water and steam supplies P P N P P P P 12 11 Programming language selection Press key By briefly pressing key or call up the language desired and then confirm by pressing key By pres...

Страница 15: ...any remaining beans with a vacuum cleaner Put the spanner on Fig 7 Now turn spanner anticlockwise until the foreign object loosens Remove remaining powder with a vacuum cleaner Replace bean container...

Страница 16: ...ently large container under the coffee spout 15 in order to prevent cleaning liquid from running into the drip tray ADD TABLET Fig 9 PRESS CLEANING UNIT CLEANING 16 EMPTY TRAY RINSE UNIT COFFEE READY...

Страница 17: ...sing key UNIT RINSING COFFEE READY 15 2 Decalcifying water sector This message will only appear if the unit is ready to draw off water or steam Remove and empty water tank Replace empty water tank Swi...

Страница 18: ...t the height of the coffee spout to your cup sizes Grinding Please refer to chapter 3 4 Adjusting grinder Pre warm cups You should warm cups in advance with hot water or steam The smaller the quantity...

Страница 19: ...y grounds container replace tray Message still displayed although grounds The tray was out of the machine for less than container emptied 8 sec for emptying Take tray out again for approx 10 sec and r...

Страница 20: ...CALCED The appropriate sector needs decalcifying Run decalcifying program as described COFFEE SECTOR in chapter 15 WATER SECTOR Message still displayed although machine decalcified Run cleaning progr...

Страница 21: ...Not enough coffee powder in the system Draw off one cup of coffee after pre brewing Grinder is extremely noisy Foreign element in grinder Proceed as described in chapter 13 5 Not enough froth while F...

Страница 22: ...this warranty are neither extended nor limited in any form by the information in these operating instructions These operating instructions contain information that is protected by copyright The photo...

Отзывы: