10
Fixing the hood
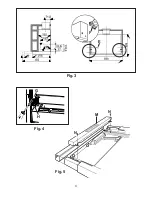
Apply the scheme supplied (Nº 49A) on the
right of the cabinet so that the lines marked
by the arrows match the cabinet ensuring
that they meet at the back and under.
Make two Ø 2 mm holes at points 1 and
2 (fig. 3).
Carry out the same operation on the left.
Fix the hood to the cabinet using screws E
(4,5x16) supplied with the appliance (fig. 3).
Use the shim F supplied with the hood for 16
mm cupboard side panels.
Fit the shim F to the left and to the right of the
fixing curves of the hood and hook them in
the holes.
Adjusting the removable drawer
The hood may be mounted in cabinets with
different depths.
The back of the drawer can be adjusted so
that the front of the removable drawer is the
same depth as the cabinet.
Proceed as follows: unscrew the screws G,
move the square plates H as required and
tighten the screw G (fig. 4).
Replacing the plastic front
The hood is supplied with a brown plastic
front which can replace the white one already
mounted.
To mount the brown plastic front proceed as
follows:
— Completely open the removable drawer L
(fig. 1).
— Remove the two grease filters.
— remove the shaped metal piece M by
unscrewing the two fixing screws N
(fig. 5).
— Remove the three screws O which fix the
band P from the inside of the removable
drawer.
— Fit the brown plastic front to the drawer
with the same three screws O.
— Refit the shaped metal piece M and the
grease filters.
Operation
The hood model JDA 3830 is fitted with two
motors.
The speed of the motors is adjusted by
means of a continuous sliding switch.
The hood is provided with an intensive
speed.
Use the intensive speed switch only in case
of high concentration of vapour.
The hood should be switched ON several
minutes before you start cooking and should
be allowed to run until all the vapours have
been eliminated.
The switching plate is fitted with two switches
one for continuous adjustment of the
ventilator (left switch) and one for illuminating
the work surface (right switch).
Maintenance
Before performing any maintenance
operation, disconnect the hood from the
electricity.
Metal grease filter
Wash the filter, in a dishwasher or with
detergent and water, periodically according
to how often the appliance is used, but at
least once every 4 weeks.
Attention! When washed in a dishwasher,
the metal grease filter may discolour.
Before refitting the filter ensure that it is
perfectly dry.
To remove this filter push simultaneously the
two handle Q towards the centre of the
cooker hood then extract them (fig. 5).
Grill and metal filter are a unique indivisible
component and they cannot be divided, to
avoid any damage to it.
0
0 I
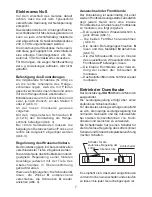
Intensive speed
Light switch
Electronic speed switch
Содержание JDA3830
Страница 2: ...2 ...
Страница 3: ...3 A D L C Fig 1 Fig 2 C ...
Страница 4: ...4 Fig 3 E F Fig 4 G H M N N P O O O Fig 5 ...
Страница 5: ...5 Fig 6 Fig 7 ...
Страница 12: ...LI08QA ELECTROLUX ZANUSSIHAUSGERÄTEGMBH Rennbahnstraße72 74 D 60528Frankfurt ...


