background image

SRX210 Services Gateway Quick Start

Use the instructions in this quick start to help you connect the SRX210 Services 
Gateway to your network. For details, see the SRX210 Services Gateway Hardware 
Guide at 
http://www.juniper.net/techpubs/en_US/release-independent/junos/information-products/p
athway-pages/srx-series/product/index.html.

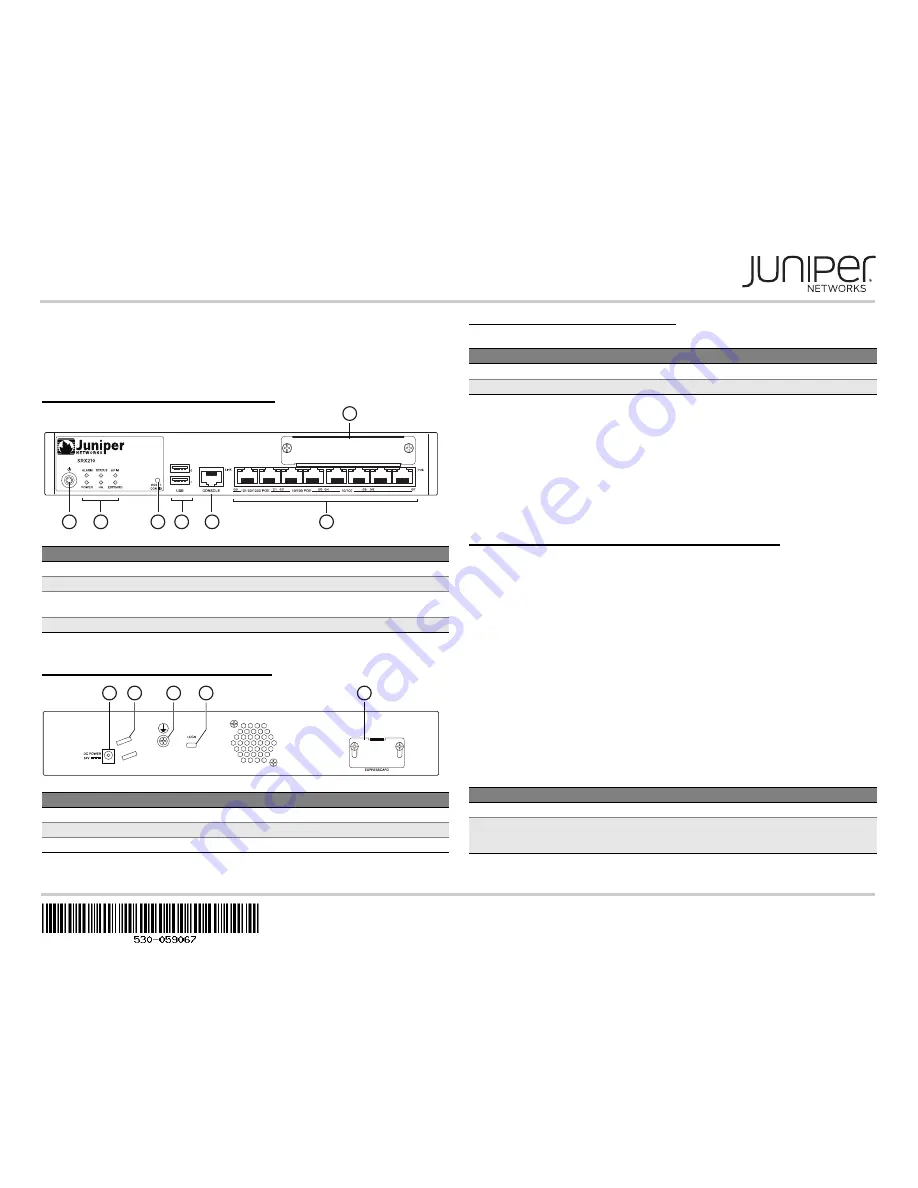
SRX210 Services Gateway Front Panel

SRX210 Services Gateway Back Panel

SRX210 Services Gateway Models

The following models of SRX210 Services Gateways are available:

On the SRX210HE2-POE model, Power over Ethernet (PoE) of 50 watts is supported 
across four ports (

0/0

0/1

0/2

, and 

0/3

).

Note that you must use the following power supply adapters (supplied) for your services 
gateway:

54V, 200 watts power supply adapters for the PoE model

12V, 60 watts power supply adapters for the non-PoE model

Connecting and Configuring the SRX Series Device

Use the instructions below to connect and set up the SRX210 Services Gateway to 
protect your network. Refer to the LEDs on the front of the device to help you determine 
the status of the device.

Overview

The SRX210 Services Gateway requires these basic configuration settings to function 
properly:

Interfaces must be assigned IP addresses.

Interfaces must be bound to zones.

Policies must be configured between zones to permit or deny traffic.

Source NAT rules must be set.

The device has the following default configuration set when you power it on for the first 
time. To use the device, you do not need to perform any initial configuration.

Factory-Default Settings:

Callout

Description

Callout

Description

1

Mini-PIM slot

5

USB ports

2

Power button

6

Console port

3

LEDs: ALARM, POWER, STATUS, 
HA, mPIM, EXPCARD

7

Gigabit Ethernet (

0/0

 and 

0/1

) and Fast 

Ethernet (

0/2

 to 

0/7

) ports

4

RESET CONFIG button

Callout

Description

Callout

Description

1

Power supply input

4

Lock for security cable

2

Cable tie holder

5

ExpressCard slot

3

Grounding point

g031

132

1

5

6

7

2

3

4

g031

113

5

2

3

4

1

Device

DDR Memory

NAND Flash Memory

SRX210HE2

2 GB

2 GB

SRX210HE2-POE

2 GB

2 GB

Port Label

Interface

Security Zone

DHCP State

IP Address

0/0

ge-0/0/0

untrust

client

unassigned

0/1 

and

 0/2 

to

 0/7

ge-0/0/1 and 
fe-0/0/2 to 
fe-0/0/7

trust

server

192.168.1.1/24

Содержание SRX210HE2

Страница 1: ...t of the device to help you determine the status of the device Overview The SRX210 Services Gateway requires these basic configuration settings to function properly Interfaces must be assigned IP addresses Interfaces must be bound to zones Policies must be configured between zones to permit or deny traffic Source NAT rules must be set The device has the following default configuration set when you...

Страница 2: ... We recommend this connection method If you are using this method to connect proceed to Task 3 Connect an RJ 45 cable Ethernet cable from the port labeled CONSOLE to the supplied DB 9 adapter which then connects to the serial port on the management device serial port settings 9600 8 N 1 If you are using this method to connect proceed with the CLI configuration instructions in the Getting Started G...

Страница 3: ...he wizard type the following information Device name of the services gateway for example SRX210 Enter and confirm the root password NOTE As you type in the password the password evaluator indicates the password strength We recommend that you use a strong password which should contain 12 or more characters and include uppercase and lowercase letters numbers and symbols To add users click Add Enter ...

Страница 4: ...ure the Point to Point Protocol over Ethernet PPPoE connection and click Next The Configuration page appears NOTE If you select Not Applicable or DSL Modem then a plain IP is configured Proceed to step e d Type the username and password Confirm the password and click Next e Configure the Internet zone Select the Static option Click Add IP to enter the static IP address provided by your ISP and cli...

Страница 5: ...ick Next The Commit Configuration page appears 2 Click Apply Settings to apply the configuration changes to the services gateway NOTE Check the connectivity to the services gateway because you might lose connectivity if you have changed the management zone IP Click the URL for reconnection instructions for information on how to reconnect to the device 3 Click Done to complete the setup After succe...

Страница 6: ...n information see the Getting Started Guide for the Branch SRX Series at http www juniper net techpubs en_US release independent junos information products pathway pages srx series product index html For detailed software configuration information see the software documentation available at http www juniper net techpubs en_US release independent junos information products pathway pages srx series ...

Отзывы: