background image

Site Electrical Wiring Guidelines

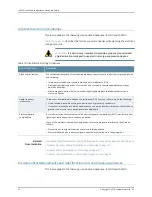
This topic applies to the following Junos Space Appliances: JA1500 and JA2500.

Table 13 on page 24

describes the factors you must consider while planning the electrical

wiring at your site.

WARNING:

It is particularly important to provide a properly grounded and

shielded environment and to use electrical surge-suppression devices.

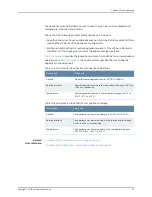
Table 13: Site Electrical Wiring Guidelines

Guidelines

Site Wiring Factor

If your site experiences any of the following problems, consult experts in electrical surge suppression
and shielding:

Improperly installed wires cause radio frequency interference (RFI).

Damage from lightning strikes occurs when wires exceed recommended distances or pass
between buildings.

Electromagnetic pulses (EMPs) caused by lightning damage unshielded conductors and
electronic devices.

Signaling limitations

To reduce or eliminate radio frequency interference (RFI) from your site wiring, do the following:

Use a twisted-pair cable with a good distribution of grounding conductors.

If you must exceed the recommended distances, use a high-quality twisted-pair cable with one
ground conductor for each data signal when applicable.

Radio frequency
interference

If your site is susceptible to problems with electromagnetic compatibility (EMC), particularly from
lightning or radio transmitters, seek expert advice.

Some of the problems caused by strong sources of electromagnetic interference (EMI) are as
follows:

Destruction of the signal drivers and receivers in the appliance.

Electrical hazards due to power surges conducted over the lines into the equipment.

Electromagnetic
compatibility

Related

Documentation

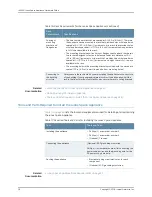
Environmental Requirements and Specifications for Junos Space Appliances on page 24

General Electrical Safety Guidelines and Warnings on page 175

General Safety Guidelines and Warnings on page 151

General Site Guidelines for Junos Space Appliances on page 23

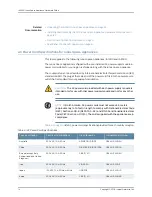
Environmental Requirements and Specifications for Junos Space Appliances

This topic applies to the following Junos Space Appliances: JA1500 and JA2500.

Copyright © 2018, Juniper Networks, Inc.

24

JA2500 Junos Space Appliance Hardware Guide

Содержание Junos Space JA1500

Страница 1: ...JA2500 Junos Space Appliance Hardware Guide Modified 2018 11 21 Copyright 2018 Juniper Networks Inc...

Страница 2: ...014 Revision 1 August 2014 Revision 2 January 2015 Revision 3 updated for PL 314 August 2015 Revision 4 PR 1091263 PR 1103391 and PR 917908 The information in this document is current as of the date o...

Страница 3: ...t Interfaces Overview 7 NTP Time Source for a Junos Space Appliance 11 Chapter 2 Component Descriptions and Specifications 13 Field Replaceable Units on the JA2500 Junos Space Appliance 13 AC Power Co...

Страница 4: ...rough a NAT Gateway 64 Configuring the eth1 Interface 69 Configuring a Junos Space Appliance as a Standalone or Primary FMPM Node 70 Configuring a Junos Space Appliance as the Primary FMPM Node 71 Con...

Страница 5: ...pliance 126 Removing the AC Power Supply Module 126 Installing the AC Power Supply Module 127 Replacing the DC Power Supply Cable on a Junos Space Appliance 128 Removing the DC Power Supply Cable 129...

Страница 6: ...160 Chapter 15 Installation and Maintenance Safety Information 161 Installation Instructions Warning 161 Chassis Lifting Guidelines for Junos Space Appliances 162 Ramp Warning 162 Rack Mounting Warni...

Страница 7: ...ments for EMC Requirements for JA2500 192 Canada 192 European Community 193 Japan 193 Korea 193 United States 193 FCC Part 15 Statement 194 Compliance Statements for Acoustic Noise for JA2500 194 Decl...

Страница 8: ...Copyright 2018 Juniper Networks Inc viii JA2500 Junos Space Appliance Hardware Guide...

Страница 9: ...www juniper net documentation If the information in the latest release notes differs from the information in the documentation follow the product Release Notes Juniper Networks Books publishes books...

Страница 10: ...e type the configure command user host configure Represents text that you type Bold text like this user host show chassis alarms No alarms currently active Represents output that appears on the termin...

Страница 11: ...embers community ids Encloses a variable for which you can substitute one or more values square brackets edit routing options static route default nexthop address retain Identifies a level in the conf...

Страница 12: ...at https www juniper net us en local pdf resource guides 7100059 en pdf Product warranties For product warranty information visit http www juniper net support warranty JTAC hours of operation The JTA...

Страница 13: ...ttps entitlementsearch juniper net entitlementsearch Opening a Case with JTAC You can open a case with JTAC on the Web or by telephone Use the Case Management tool in the CSC at https www juniper net...

Страница 14: ...Copyright 2018 Juniper Networks Inc xiv JA2500 Junos Space Appliance Hardware Guide...

Страница 15: ...PART 1 Appliance and Components Overview and Specifications JA2500 Appliance Overview on page 3 Component Descriptions and Specifications on page 13 1 Copyright 2018 Juniper Networks Inc...

Страница 16: ...Copyright 2018 Juniper Networks Inc 2 JA2500 Junos Space Appliance Hardware Guide...

Страница 17: ...pplications that simplify network operations scale services and automate support The all in one design of the Junos Space Appliance enables administrators to easily deploy Junos Space Network Manageme...

Страница 18: ...ppliance can also be powered on by using one or two DC power supply modules The appliance has six 1 TB hard drives in a RAID 10 configuration Two externally accessible cooling fans provide the require...

Страница 19: ...k Activity LED Network Ethernet ports 8 4 Power LED USB port Table 4 JA2500 Appliance Front Panel Components Description Component The JA2500 appliance has six hot swappable 1 TB hard disk drives in a...

Страница 20: ...llow 1000 Mbps or 1 Gbps Ethernet LAN port LEDs In addition to the LEDs on the appliance chassis there are two LEDs on each hard disk Hard Disk Activity LED green which indicates disk activity Hard Di...

Страница 21: ...Panel of a JA2500 Appliance on page 5 Chassis Physical Specifications for the JA2500 Appliance on page 4 Junos Space Appliance Overview Junos Space Ethernet Interfaces Overview This topic applies to...

Страница 22: ...ot Configured Configured Configured IPv4 Not Configured Configured Not Configured Configured IPv4 and IPv6 Configured Configured Not Configured Configured IPv6 Configured Not Configured Not Configured...

Страница 23: ...e nodes in the fabric and VIP address of the fabric are on the same subnet and are reachable through Ethernet interface ETH0 JA1500 appliance or Ethernet interface 0 JA2500 appliance The devices being...

Страница 24: ...n_US release independent junos space index html Table 7 on page 10 summarizes the functions of Ethernet interfaces on the Junos Space Appliance Table 7 Junos Space Appliance Ethernet Interfaces Functi...

Страница 25: ...at http www juniper net documentation en_US release independent junos space index html NOTE By default Junos Space Network Management Platform synchronizes the time zone of the client computer with t...

Страница 26: ...pace Appliance as a Standalone or Primary FMPM Node on page 70 Changing Network and System Settings for a Junos Space Appliance on page 87 Copyright 2018 Juniper Networks Inc 12 JA2500 Junos Space App...

Страница 27: ...ecomponentswithoutpowering off the appliance Cold swappable FRUs You must power off the appliance in order to remove replace or add these components The FRUs supported in the JA2500 appliance are list...

Страница 28: ...odule is intended only for use with that power supply module and not for any other use NOTE In North America AC power cords must not exceed 4 5 meters approximately 14 76 feet in length to comply with...

Страница 29: ...pliances on page 15 Replacing the AC Power Supply Cord on a Junos Space Appliance on page 124 AC Power Supply in Junos Space Appliances This topic applies to the following Junos Space Appliances JA150...

Страница 30: ...e chassis to the back Airflow One Power Supply Module LED present on the power supply faceplate Green indicates that the power supply module is working properly the module is powered on and is powerin...

Страница 31: ...power supply module However you can use a DC power supply shown in Figure 5 on page 17 to power the appliance NOTE WhileitispossibletoprovideredundancyintheJunosSpaceAppliance using a combination of...

Страница 32: ...odule is in standby mode the module is powered on but it is not powering the appliance Off indicates that the power supply module is not powered on or that the module is not working properly Power Sup...

Страница 33: ...Transmit Data TxD Output 3 Chassis Ground GND 4 Chassis Ground GND 5 Receive Data RxD Input 6 Data Set Ready DSR Input 7 Clear to Send CTS Input 8 Related Documentation Connecting a Junos Space Appli...

Страница 34: ...Copyright 2018 Juniper Networks Inc 20 JA2500 Junos Space Appliance Hardware Guide...

Страница 35: ...PART 2 Planning for Appliance Installation Site Preparation on page 23 Mounting Requirements on page 27 21 Copyright 2018 Juniper Networks Inc...

Страница 36: ...Copyright 2018 Juniper Networks Inc 22 JA2500 Junos Space Appliance Hardware Guide...

Страница 37: ...must be unrestricted Allow sufficient clearance between the front and back of the chassis and adjacent equipment Ensure that there is adequate circulation in the installation location Follow the elec...

Страница 38: ...with a good distribution of grounding conductors If you must exceed the recommended distances use a high quality twisted pair cable with one ground conductor for each data signal when applicable Radi...

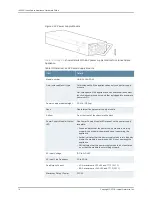
Страница 39: ...14 Environmental Specifications for Appliance Operation Tolerance Description No performance degradation upto 10 000 ft 3048 m Altitude Normal operation ensured in the relative humidity range of 8 to...

Страница 40: ...Copyright 2018 Juniper Networks Inc 26 JA2500 Junos Space Appliance Hardware Guide...

Страница 41: ...n Cabinets Racks Panels and Associated Equipment document number EIA 310 D published by the Electronic Components Industry Association http www ecianow org A 600 mm rack as defined in the four part Eq...

Страница 42: ...of the building If your geographical area is subject to earthquakes bolt the rack to the floor For maximum stability also secure the rack to ceiling brackets Connecting to the building structure Relat...

Страница 43: ...Mounting the JA2500 Junos Space Appliance on page 34 29 Copyright 2018 Juniper Networks Inc Chapter 4 Mounting Requirements...

Страница 44: ...Copyright 2018 Juniper Networks Inc 30 JA2500 Junos Space Appliance Hardware Guide...

Страница 45: ...and Connecting the JA2500 Appliance and Appliance Components Installing the Appliance on page 33 Connecting the Appliance on page 39 Performing Initial Configuration on page 47 31 Copyright 2018 Juni...

Страница 46: ...Copyright 2018 Juniper Networks Inc 32 JA2500 Junos Space Appliance Hardware Guide...

Страница 47: ...ping carton Do not unpack it until you are ready to begin installation WARNING The shipping dimensions of a JA2500 appliance are 17 81 in x 17 31 in x 3 5 in 45 2 cm x 44 cm x 8 89 cm and the applianc...

Страница 48: ...page 27 Mounting the JA2500 Junos Space Appliance on page 34 Tools and Parts Required to Install the Junos Space Appliance on page 28 Mounting the JA2500 Junos Space Appliance You can mount the JA250...

Страница 49: ...the rear mount rail brackets to your equipment rack with two rack mount screws each 4 Insert locking screws on the sides of the rear mount brackets to secure the front and rear mounting brackets in pl...

Страница 50: ...ount rail brackets into the backs of the front rails on either side of the chassis and align with your rear equipment rack posts Secure the rear mount rail brackets to your equipment rack with two rac...

Страница 51: ...a two post rack do the following 1 Remove the two front mount rails from either side of the chassis 2 Insert one midmount bracket to the center on either side of the chassis 3 Attach the chassis to th...

Страница 52: ...Appliance Recessed in a Rack on page 36 Junos Space Appliance Rack Requirements on page 27 Tools and Parts Required to Install the Junos Space Appliance on page 28 Copyright 2018 Juniper Networks Inc...

Страница 53: ...wer supply module in the appliance into a grounded AC power outlet by using an AC power cord with the grounding pin appropriate for your geographical location See AC Power Cord Specifications for Juno...

Страница 54: ...rds have plugs appropriate for your geographical location WARNING Ensure that the power cord does not block access to appliance components or drape where people can trip on it 5 Insert the coupler end...

Страница 55: ...you have grounded the appliance by connecting the DC power supply grounding cable to earth ground CAUTION Before you connect power to the Junos Space Appliance in order to meet the safety requirements...

Страница 56: ...e active when you connect the DC power 4 Remove the clear plastic cover protecting the terminal on the faceplate 5 Remove the screws on the terminals by using the screwdriver Save the screws 6 Connect...

Страница 57: ...Requirements and Warning on page 182 DC Power Supply in Junos Space Appliances on page 17 General Electrical Safety Guidelines and Warnings on page 175 DC Power Disconnection Warning on page 181 DC Po...

Страница 58: ...hernet cable into the console port labeled CONSOLE on the front panel of the appliance 3 Connect the other end of the Ethernet cable into the RJ 45 to DB 9 serial port adapter Related Documentation Co...

Страница 59: ...ernet cable into the port labeled 1 and the other end into the network that contains the Junos Space nodes in the fabric 4 Plug the other end of the Ethernet cable into the network NOTE If you choose...

Страница 60: ...Copyright 2018 Juniper Networks Inc 46 JA2500 Junos Space Appliance Hardware Guide...

Страница 61: ...ering Off the Junos Space Appliance on page 102 Booting the Junos Space Appliance NOTE If you have turned on power to the power supply module then the Junos Space Appliance starts booting automaticall...

Страница 62: ...Space Appliance as a Junos Space Node You can configure a Junos Space Appliance as a Junos Space node or as a specialized node used for fault monitoring and performance monitoring FMPM To configure a...

Страница 63: ...ace you must configure the IPv4 address of the default gateway Optional IPv6 address and prefix for the eth3 Ethernet interface Optional IPv6 address of the default gateway for the eth3 Ethernet inter...

Страница 64: ...figuring a Junos Space Appliance as a Junos Space Node You can configure the Junos Space Appliance as a Junos Space node To configure a Junos Space Appliance as a Junos Space node 1 At the serial cons...

Страница 65: ...rated by at least one special character For example big three fork 14 characters long and circlefaceglass no special characters are invalid passphrases but big three fork and circle face glass are val...

Страница 66: ...ress 192 0 2 150 To configure both IPv4 and IPv6 addresses a Type 2 b Type the IPv4 address for the eth0 interface in dotted decimal notation and press Enter Please enter new IPv4 address for interfac...

Страница 67: ...b8 0 1 192 0 2 10 9 Specify whether you want to configure a separate interface for device management or not NOTE On a Junos Space fabric with two or more Junos Space nodes if you configure the eth3 in...

Страница 68: ...imal notation and press Enter Enter the default IPv4 gateway for this interface 192 0 2 75 e Type the IPv4 address of the name server for the eth3 interface and press Enter Please type the IPv4 namese...

Страница 69: ...r interface eth3 255 255 0 0 d Type the IPv4 address of the default gateway for the eth3 interface in dotted decimal notation and press Enter Enter the default IPv4 gateway for this interface 192 0 2...

Страница 70: ...ce to an existing cluster type y If you are configuring an appliance with a Junos Space Network Management Platform Release 16 1 or later installation you are prompted to specify whether you want to c...

Страница 71: ...t to configure NAT Follow the procedure outlined in Configuring Access to Junos Space Through a NAT Gateway on page 64 For releases prior to Junos Space Network Management Platform Release 16 1R1 you...

Страница 72: ...9Rtsgukj are some examples of valid password for maintenance mode When you configure the other nodes in a cluster fabric you are not prompted to enter a maintenance mode password The maintenance mode...

Страница 73: ...2 168 27 2 DNS add 2001 db8 85a3 0 0 8a2e c0a9 1bbd Create as first node or standalone Web IPv4 address 192 168 26 152 Web IPv6 address is 2001 db8 85a3 0 0 8a2e c0a9 1b38 64 NTP add device1 example c...

Страница 74: ...iv Enter the port number of the remote server and press Enter You are prompted to enter the username to access the remote server Please enter Remote Server Remote server IP address user v Type the us...

Страница 75: ...You can unplug the USB storage device after you unmount it To restore from a local drive NOTE To restore data from a local drive you must first copy the backup file from the backup location to the Jun...

Страница 76: ...whether you want to restore backed up data Do you want to Restore Space Backup Type Y to restore backed up data Go to Step h Type N to proceed with the fresh installation You are again prompted to con...

Страница 77: ...Change Time Options 4 Retrieve Logs 5 Security 6 Debug run shell A Apply Settings Q Quit R Redraw Menu Choice 1 6 QR To change the settings type C You are prompted to reenter all the basic configurat...

Страница 78: ...ions that are displayed depend on the IP address or addresses that you have configured for the device management interface If you have configured eth3 as the device management interface then the optio...

Страница 79: ...port number must be in the range 0 65535 Please enter the NAT Outbound SSH Port Number 4545 4 Type the IPv4 address of the NAT trap interface and press Enter The IP address must be in the range 1 0 0...

Страница 80: ...er of the NAT trap interface and press Enter Please enter the NAT Trap Port Number 5054 To configure IPv4 and IPv6 1 Type 3 and press Enter 2 Type the IPv4 address of the NAT outbound SSH interface an...

Страница 81: ...address of the NAT trap interface and press Enter The IP address must be in the range 1 0 0 1 223 255 255 254 excluding 127 x x x Configuring IPV6 Trap for NAT Please enter the NAT Trap IP Address 200...

Страница 82: ...ice ACQR To apply the settings type A The settings that you configured are applied and a series of messages is displayed on the console and then the Junos Space Settings Menu is displayed as shown in...

Страница 83: ...and press Enter You are prompted to enter the IP address of the eth1 interface 4 Type the IP address of the eth1 interface in dotted decimal notation and press Enter The IP address can be in the same...

Страница 84: ...nd nodes and any events or alarms are stored in a PostgreSQL database on this node This topic explains how you can configure an appliance as a primary FMPM node NOTE You must have at least one applian...

Страница 85: ...Web GUI IPv4 address or URI of NTP source to synchronize time Optional IPv4 address for the NAT trap Optional IPv6 address for the NAT trap Optional IPv4 port number for the NAT trap Optional IPv6 por...

Страница 86: ...st not be at the end For example Abcdwip9 Qc9rdiwt and bRfjvin9 are invalid passwords but AAbcdwip99 Qc9rdiwtQ and bRfjvin99 are valid passwords Alternatively instead of using a string of characters y...

Страница 87: ...tation and press Enter Enter the default IPv4 gateway as a dotted decimal IP address 192 0 2 155 To configure both IPv4 and IPv6 addresses a Type 2 b Type the IPv4 address for the eth0 interface in do...

Страница 88: ...FMPM node can be configured as follows P rimary Standalone or first FMPM node in an FMPM high availability pair B ackup Backup FMPM node in an FMPM high availability pair Choosing P installs the node...

Страница 89: ...T Do you want to enable NAT service Y N To configure NAT type Y NOTE If you choose to configure NAT the options that are displayed depend on the IP address or addresses that you have configured for th...

Страница 90: ...ng IPV6 Trap for NAT Please enter the NAT Trap IP Address 2001 db8 85a3 8a2e 130 0 5 c Type the port number of the NAT trap interface and press Enter The port number must be in the range 0 65535 Pleas...

Страница 91: ...ime and press Enter The settings summary is displayed as shown in the following example Settings Summary IPv4 Change eth0 is 192 168 26 151 255 255 254 0 Default IPv4 Gateway 192 168 27 10 on eth0 IPV...

Страница 92: ...gs type Q CAUTION If you quit the configuration without applying the settings then all the settings are discarded 15 Optional If you have applied the settings then type Q to quit You are taken to the...

Страница 93: ...and press Enter You are prompted to enter the IP address of the eth1 interface 4 Type the IP address of the eth1 interface in dotted decimal notation and press Enter The IP address can be in the same...

Страница 94: ...evices and nodes and any events or alarms are stored in a PostgreSQL database on this node The second FMPM node that you configure is the backup or secondary FMPM node The PostgreSQL database containi...

Страница 95: ...terface and the VIP address must be different from the VIP address used to access the Web GUI Optional IPv4 address of the eth1 Ethernet interface If the IP address of the eth1 interface Is not in the...

Страница 96: ...st not be at the end For example Abcdwip9 Qc9rdiwt and bRfjvin9 are invalid passwords but AAbcdwip99 Qc9rdiwtQ and bRfjvin99 are valid passwords Alternatively instead of using a string of characters y...

Страница 97: ...tation and press Enter Enter the default IPv4 gateway as a dotted decimal IP address 192 0 2 155 To configure both IPv4 and IPv6 addresses a Type 2 b Type the IPv4 address for the eth0 interface in do...

Страница 98: ...de The settings summary is displayed as follows 1 IP Change eth0 is 10 205 56 136 255 255 0 0 2 Default Gateway 10 205 255 254 on eth0 3 DNS add 10 209 194 14 4 This node will be the backup FMPM speci...

Страница 99: ...configuration of the appliance as a backup or secondary FMPM node is now complete NOTE AfteryouconfigureanFMPMnode youmustaddittotheJunosSpace fabric using the Junos Space Network Management Platform...

Страница 100: ...ddress is not in the same subnet as the VIP address you are prompted to enter the subnet mask and then the default gateway for the eth1 interface 5 Optional Type the subnet mask for the eth1 interface...

Страница 101: ...ve and transfer system log files Change SSH and firewall settings Run shell commands NOTE An openNMS user does not have permission to modify the Junos Space Settings Before you begin Ensure that you h...

Страница 102: ...Modifying the IP Address of the eth1 Interface on page 92 Changing the Time Zone and NTP Servers on page 93 Retrieving and Transferring System Log Files on page 93 Changing Firewall and SSH Settings o...

Страница 103: ...vin99 are valid passwords Alternatively instead of using a string of characters you can choose a passphrase that is between 16 and 40 characters long and contains at least three dictionary words separ...

Страница 104: ...the IP address in IPv4 format or type 2 to add the DNS server by entering the IP address in IPv6 format and follow the prompts on the CLI After the DNS server is added a message is displayed indicati...

Страница 105: ...ration type 4 or 1 depending on the menu options displayed and follow the prompts on the CLI NOTE The NAT configuration must not be modified in combination with the other changes that require a reboot...

Страница 106: ...configure the eth1 interface SSH is disabled on the eth0 and the eth3 interfaces You can then access the CLI of the Junos Space appliance only through the eth1 interface To modify the eth1 interface s...

Страница 107: ...owing 1 On the Junos Space Settings Menu type 3 at the prompt The Change Time Options menu is displayed 2 Optional To change the time zone type 1 and follow the prompts on the CLI 3 Optional To modify...

Страница 108: ...out applying the changes Changing Firewall and SSH Settings By default the firewall and SSH are enabled on the Junos Space Appliance To change the firewall and SSH settings do the following 1 On the J...

Страница 109: ...of the following To apply all changes type A The changes are applied and you are taken to the Junos Space Settings Menu NOTE For some changes you may be asked to enter your administrator password bef...

Страница 110: ...nagement Platform software image on an appliance by using a standard USB drive both USB 2 0 and USB 3 0 are supported You can use this procedure to restore the factory settings on an appliance or if y...

Страница 111: ...ng a Web browser navigate to the Juniper Networks software download site https www juniper net support downloads then click Junos Space Network Management Platform 3 On the subsequent page click the S...

Страница 112: ...subsequent dialog box select the image file that you want to copy to the USB drive c In the Win32 Disk Imager window verify that the drive letter displayed in the Device drop down box matches the chos...

Страница 113: ...version spin number img is the name of the downloaded Junos Space image file and dev usb drive is the name of the device drive to which your USB drive is mapped The image file is copied to the USB dri...

Страница 114: ...appliance must have USB boot at the top By default the appliance first attempts to boot from the USB drive first and then from the RAID volume or hard drive However if you have changed the boot order...

Страница 115: ...ration If you do not want to proceed power off the appliance immediately 8 At the boot prompt type reinstall and press Enter NOTE If no input is provided for 30 seconds the appliance boots from the lo...

Страница 116: ...Management Platform Workspaces Feature Guide available at http www juniper net techpubs en_US release independent junos space index html for details This topic includes the following sections Powerin...

Страница 117: ...ce using the appliance power switch do the following 1 Locate the appliance power switch on the back panel of the appliance chassis 2 Press the power switch and release it The appliance displays outpu...

Страница 118: ...Copyright 2018 Juniper Networks Inc 104 JA2500 Junos Space Appliance Hardware Guide...

Страница 119: ...PART 4 Hardware Monitoring and Troubleshooting Monitoring the Hardware on page 107 Troubleshooting the JA2500 Appliance on page 117 105 Copyright 2018 Juniper Networks Inc...

Страница 120: ...Copyright 2018 Juniper Networks Inc 106 JA2500 Junos Space Appliance Hardware Guide...

Страница 121: ...red when a fan fails and the Hardware Fault LED on the appliance front panel starts blinking When one fan fails the remaining fan begins to run at full speed To monitor the fans do the following 1 Log...

Страница 122: ...V max 5 50 V 5VSB 5 07 V min 4 52 V max 5 50 V Vbat 0 00 V min 2 70 V max 3 30 V fan1 0 RPM min 329 RPM ALARM fan2 0 RPM min 329 RPM ALARM fan3 3206 RPM min 329 RPM fan4 3461 RPM min 329 RPM fan5 0 R...

Страница 123: ...r Supply Module LED is green when the power supply module is powering the appliance and amber when the power supply module is on but not powering the appliance standby mode If there is a problem with...

Страница 124: ...us monitoring script A sample output of the power monitoring script is as follows Sample Output Juniper Product JA2500 System Power Supply Status PS1 BTM MODULE PRESENT PS1 FAN STATUS GOOD PS1 OTP GOO...

Страница 125: ...d provides information about the RAID volume like volume ID volume status volume state and so on The following is a sample output LSI Corporation SAS2 IR Configuration Utility Version 16 00 00 00 2013...

Страница 126: ...Name RAID 10 Status of volume Okay OKY Volume wwid 0ad030be716b5c70 RAID level RAID10 Size in MB 2858160 Physical hard disks PHY 0 Enclosure Slot 1 4 PHY 1 Enclosure Slot 1 5 PHY 2 Enclosure Slot 1 6...

Страница 127: ...Slot 4 SAS Address 5000c50 0 40c6 29d9 State Optimal OPT Size in MB in sectors 953869 1953525167 Manufacturer SEAGATE Model Number ST91000640SS Firmware Revision 0003 Serial No 9XG0WHZB00009208GMC9 G...

Страница 128: ...lure Do the following 1 Log in to the appliance as the admin user The Junos Space Settings Menu appears 2 Type 6 which is the Debug run shell option You are prompted to enter your password 3 Type the...

Страница 129: ...f the various commands provide information about the status of the RAID volume Related Documentation Maintaining the Junos Space Appliance on page 121 Monitoring the Cooling Fans in a Junos Space Appl...

Страница 130: ...Copyright 2018 Juniper Networks Inc 116 JA2500 Junos Space Appliance Hardware Guide...

Страница 131: ...he shell Refer to the Accessing the Shell section in the Changing Network and System Settings for a Junos Space Appliance on page 87 topic for details To troubleshoot connectivity issues from the eth3...

Страница 132: ...he physical connectivity of Ethernet interface eth3 Related Documentation Junos Space Ethernet Interfaces Overview on page 7 Copyright 2018 Juniper Networks Inc 118 JA2500 Junos Space Appliance Hardwa...

Страница 133: ...PART 5 Hardware Maintenance and Replacement Maintaining the Hardware on page 121 Replacing Hardware Components on page 123 119 Copyright 2018 Juniper Networks Inc...

Страница 134: ...Copyright 2018 Juniper Networks Inc 120 JA2500 Junos Space Appliance Hardware Guide...

Страница 135: ...nce are securely in place and that there is no moisture accumulating near the appliance Ensure that the power and grounding cables are arranged so that they do not obstruct access to other components...

Страница 136: ...Copyright 2018 Juniper Networks Inc 122 JA2500 Junos Space Appliance Hardware Guide...

Страница 137: ...s Space Appliance Hardware Components The JA2500 Junos Space Appliance chassis is a rigid sheet metal structure that houses the hardware components The field replaceable units FRUs in the JA2500 appli...

Страница 138: ...discharge ESD grounding strap to your bare wrist and connect the strap to an external ESD point 2 If the AC power source outlet has a power switch set it to the OFF position If the AC power source out...

Страница 139: ...ce as shown in Figure 14 on page 125 8 Connect the power cord to the power supply module 9 Verify that the power cord does not block the air exhaust and access to device components or drape where peop...

Страница 140: ...emove the AC power supply module do the following 1 Place an antistatic bag or an antistatic mat on a flat stable surface 2 Optional Attach an electrostatic discharge ESD grounding strap to your bare...

Страница 141: ...odule To install the AC power supply module do the following 1 Remove the replacement power supply module from its antistatic bag taking care not to touch power supply pins leads or solder connections...

Страница 142: ...the appliance and amber when the power supply module is in standby mode not powering the appliance Related Documentation AC Power Cord Specifications for Junos Space Appliances on page 14 AC Power Su...

Страница 143: ...screws Save the screws 5 Remove the cable lugs from the terminals 6 Remove the screw from the grounding terminal using a Phillips screwdriver number 2 to loosen and remove the screw Save the screw 7...

Страница 144: ...ng the appliance and amber when the power supply module is in standby mode not powering the appliance Related Documentation DC Power Supply in Junos Space Appliances on page 17 Field Replaceable Units...

Страница 145: ...ess 4 Remove the clear plastic cover protecting the terminal studs on the faceplate 5 Remove the screws from the terminals using a Phillips screwdriver number 2 to loosen and remove the screws Save th...

Страница 146: ...care not to touch power supply pins leads or solder connections remove the replacement power supply module from the bag 3 Using both hands slide the replacement power supply module straight into the...

Страница 147: ...ace appliance should not run on one fan for an extended period of time Failed fans should be replaced as soon as possible Ensure that you have the following parts and tools available to remove the fan...

Страница 148: ...do the following 1 Optional Attach an electrostatic discharge ESD grounding strap to your bare wrist and connect the strap to an external ESD point 2 Remove the replacement fan module from its antista...

Страница 149: ...es in RAID 10 array configuration The hot swappable drives are externally accessible in field replaceable trays You can remove and replace a hard disk without powering off the appliance or disrupting...

Страница 150: ...hard disk locking screw counterclockwise to the unlock position as shown in Figure 23 on page 136 to unlock the hard disk lever 4 Push the screw knob button in so that the hard disk lever is released...

Страница 151: ...t screwdriver turn the screw clockwise to the locked position so that the notch in the screw is oriented vertically Figure 24 Installing a Hard Disk When you install a replacement hard disk the alarm...

Страница 152: ...Copyright 2018 Juniper Networks Inc 138 JA2500 Junos Space Appliance Hardware Guide...

Страница 153: ...PART 6 Returning Hardware Returning the Appliance or Appliance Components on page 141 139 Copyright 2018 Juniper Networks Inc...

Страница 154: ...Copyright 2018 Juniper Networks Inc 140 JA2500 Junos Space Appliance Hardware Guide...

Страница 155: ...the appliance or component For instructions see Locating the Serial Number on a JA2500 Junos Space Appliance or Component on page 142 2 Obtain a Return Materials Authorization RMA number from JTAC as...

Страница 156: ...for which you musthavetherequiredpartsandtoolsavailable See InstallingandRemoving JA2500 Junos Space Appliance Hardware Components on page 123 for more information Listing the JA2500 Appliance Details...

Страница 157: ...1 Label with serial number Locating the Serial Number ID Labels on FRUs in the JA2500 Appliance The cooling fans hard disks and power supply modules installed in the JA2500 appliance are field replace...

Страница 158: ...nce or component Your name organization name telephone number fax number and shipping address Details of the failure or problem Type of activity being performed on the appliance when the problem occur...

Страница 159: ...f the JA2500 Appliance for Shipping on page 146 Packing a JA2500 Appliance for Shipping If you need to transport the JA2500 appliance to another location or return the appliance to Juniper Networks yo...

Страница 160: ...mponent ESD grounding strap CAUTION Do not stack the components of the JA2500 appliance Return individual components in separate boxes if you cannot pack them side by side in the shipping box To pack...

Страница 161: ...in Return Materials Authorization for Junos Space Appliances on page 144 Locating the Serial Number on a JA2500 Junos Space Appliance or Component on page 142 147 Copyright 2018 Juniper Networks Inc C...

Страница 162: ...Copyright 2018 Juniper Networks Inc 148 JA2500 Junos Space Appliance Hardware Guide...

Страница 163: ...eral Safety Information on page 151 Radiation and Laser Warnings on page 157 Installation and Maintenance Safety Information on page 161 Power and Electrical Safety Information on page 175 149 Copyrig...

Страница 164: ...Copyright 2018 Juniper Networks Inc 150 JA2500 Junos Space Appliance Hardware Guide...

Страница 165: ...at only authorized service personnel perform other system services Keep the area around the chassis clear and free from dust before during and after installation Keep tools away from areas where peopl...

Страница 166: ...nd blanks are fully inserted and that the installation screws are fully tightened Related Documentation AC Power Electrical Safety Guidelines on page 178 DC Power Electrical Safety Guidelines on page...

Страница 167: ...r K rperverletzung f hren k nnte Bevor Sie mit der Arbeit an irgendeinem Ger t beginnen seien Sie sich der mit elektrischen Stromkreisen verbundenen Gefahren und der Standardpraktiken zur Vermeidung v...

Страница 168: ...ppression equipment be available in the event of a fire in the vicinity of the equipment and that all local fire safety and electrical codes and ordinances be observed when you install and operate you...

Страница 169: ...nstall or replace the device Waarschuwing Installatie en reparaties mogen uitsluitend door getraind en bevoegd personeel uitgevoerd worden VaroitusAinoastaankoulutettujap tev henkil kuntasaaasentaatai...

Страница 170: ...1 Warning Statement for Norway and Sweden WARNING The equipment must be connected to an earthed mains socket outlet Advarsel Apparatet skal kobles til en jordet stikkontakt Varning Apparaten skall ans...

Страница 171: ...round ports that support optical transceivers observe the following safety guidelines to prevent eye injury Do not look into unterminated ports or at fibers that connect to unknown sources Do not exam...

Страница 172: ...lasse 1 LED product Varoitus Luokan 1 valodiodituote Attention Alarme de produit LED Class I Warnung Class 1 LED Produktwarnung WARNING Avvertenza Avvertenza prodotto LED di Classe 1 Advarsel LED prod...

Страница 173: ...lo direttamente WARNING Advarsel Stirr eller se ikke direkte p strlen med optiske instrumenter WARNING Aviso N o olhe fixamente para o raio nem olhe para ele directamente com instrumentos pticos WARNI...

Страница 174: ...i possono essere emesse attraverso l apertura della porta Evitate di esporvi alle radiazioni e non guardate direttamente nelle aperture Advarsel Unng utsettelse for str ling og stirr ikke inn i pninge...

Страница 175: ...jzingenvoordatuhetsysteem met de voeding verbindt VaroitusLueasennusohjeetennenj rjestelm nyhdist mist virtal hteeseen AttentionAvantdebrancherlesyst mesurlasourced alimentation consulter les directiv...

Страница 176: ...he guidelines in General Site Guidelines for Junos Space Appliances on page 23 Before lifting or moving the appliance disconnect all external cables As when lifting any heavy object lift most of the w...

Страница 177: ...injury when mounting or servicing the device in a rack take the following precautions to ensure that the system remains stable The following directives help maintain your safety The device must be in...

Страница 178: ...siirry sitten sen yl osaan Jos telinett varten on vakaimet asenna ne ennen laitteen asettamista telineeseen tai sen huoltamista siin Attention Pour viter toute blessure corporelle pendant les op ratio...

Страница 179: ...ene montata in un supporto parzialmente pieno caricare il supporto dal basso all alto con il componente pi pesante sistemato sul fondo del supporto Se il supporto dotato di dispositivi stabilizzanti i...

Страница 180: ...mismo Cuandoesteequiposevayaainstalarenunbastidorparcialmenteocupado comenzar la instalaci n desde la parte inferior hacia la superior colocando el equipo m s pesado en la parte inferior Si el bastid...

Страница 181: ...sicher da das Host Ger t w hrend des normalen Betriebs an Erde gelegt ist AvvertenzaQuestaapparecchiaturadeveesserecollegataamassa Accertarsi che il dispositivo host sia collegato alla massa di terra...

Страница 182: ...istajan suosittelema H vit k ytetyt akut valmistajan ohjeiden mukaan Attention Danger d explosion si la pile n est pas remplac e correctement Ne la remplacer que par une pile de type semblable ou quiv...

Страница 183: ...Varoitus Ennen kuin ty skentelet voimavirtajohtoihin kytkettyjen laitteiden parissa ota pois kaikki korut sormukset kaulakorut ja kellot mukaan lukien Metalliesineet kuumenevat kun ne ovat yhteydess...

Страница 184: ...arbetar p utrustning som r kopplad till kraftledningar Metallobjekt hettas upp n r de kopplas ihop med str m och jord och kan f rorsaka allvarliga br nnskador metallobjekt kan ocks sammansvetsas med k...

Страница 185: ...ymp rille on j tett v ainakin 15 2 cm tilaa Attention Pour viter toute surchauffe des routeurs de la gamme Juniper Networks device ne l utilisez pas dans une zone o la temp rature ambiante est sup rie...

Страница 186: ...of this device must be handled according to all national laws and regulations Waarschuwing Dit produkt dient volgens alle landelijke wetten en voorschriften te worden afgedankt Varoitus T m n tuotteen...

Страница 187: ...delines and Warnings on page 175 General Safety Guidelines and Warnings on page 151 Grounded Equipment Warning on page 167 Installation Instructions Warning on page 161 Laser and LED Safety Guidelines...

Страница 188: ...Copyright 2018 Juniper Networks Inc 174 JA2500 Junos Space Appliance Hardware Guide...

Страница 189: ...e are designed for use as intrabuilding within the building interfaces only Type 2 or Type 4 ports as described in GR 1089 CORE Issue 4 and require isolation from the exposed outside plant OSP cabling...

Страница 190: ...oduct usage instructions To ensure that the device and peripheral equipment function safely and correctly use the cables and connectors specified for the attached peripheral equipment and make certain...

Страница 191: ...point on the chassis If no grounding strap is available touch the exposed bare metal of the device to ground yourself before handling the component Avoid contact between the component that is subject...

Страница 192: ...ounding type power outlet Do not circumvent this safety feature Equipment grounding must comply with local and national electrical codes You must provide an external certified circuit breaker rated mi...

Страница 193: ...n das Netzkabel ab bzw Avvertenza Prima di lavorare su un telaio o intorno ad alimentatori scollegare il cavo di alimentazione sulle unit CA Advarsel F r det utf res arbeid p kabinettet eller det arbe...

Страница 194: ...ircuit breaker This breaker must protect against excess currents short circuits and earth grounding faults in accordance with NEC ANSI NFPA 70 Ensure that the polarity of the DC input wiring is correc...

Страница 195: ...teippaa suojakytkimen varsi niin ett se pysyy KATKAISTU asennossa Attention Avant de pratiquer l une quelconque des proc dures ci dessous v rifier que le circuit en courant continu n est plus sous ten...

Страница 196: ...rjningen till likstr mskretsen r bruten Kontrollera att all str mf rs rjning r BRUTEN genom att sl AV det versp nningsskydd som skyddar likstr mskretsen och tejpa fast versp nningsskyddets omkopplare...

Страница 197: ...gen alltid anslutas f rst och kopplas bort sist Related Documentation DC Power Electrical Safety Guidelines on page 180 DC Power Disconnection Warning on page 181 DC Power Wiring Sequence Warning on p...

Страница 198: ...linea ad L e da negativo a negativo da neutro a N Tenere presente che il filo di massa deve sempre venire collegato per primo e scollegato per ultimo Advarsel Riktig tilkoples tilkoplingssekvens er jo...

Страница 199: ...ulee olla kooltaan johtimiin sopivia ja niiden tulee puristaa yhteen sek eristeen ett johdinosan Attention Quand des fils torsad s sont n cessaires utiliser des douilles terminales homologu es telles...

Страница 200: ...v nd tapp Storleken p dessa kontakter m ste vara avpassad till ledningarna och m ste kunna h lla b de isoleringen och ledaren fastkl mda Related Documentation DC Power Electrical Safety Guidelines on...

Страница 201: ...ado para trabajar con sistemas de alimentaci n tipo TN Varning Enheten r konstruerad f r anv ndning tillsammans med elkraftssystem av TN typ Related Documentation General Electrical Safety Guidelines...

Страница 202: ...on page 178 DC Power Electrical Safety Guidelines on page 180 General Electrical Safety Guidelines and Warnings on page 175 General Safety Guidelines and Warnings on page 151 Copyright 2018 Juniper N...

Страница 203: ...PART 8 Compliance Information Compliance Information on page 191 189 Copyright 2018 Juniper Networks Inc...

Страница 204: ...Copyright 2018 Juniper Networks Inc 190 JA2500 Junos Space Appliance Hardware Guide...

Страница 205: ...1 2007 Information Technology Equipment UL 60950 1 2nd Ed Information Technology Equipment EN 60950 1 2006 Information Technology Equipment IEC 60950 1 2005 Information Technology Equipment EN 60825...

Страница 206: ...ertain telecommunications network protective operational and safety requirements Industry Canada does not guarantee the equipment will operate to the users satisfaction Before installing this equipmen...

Страница 207: ...vironment this device might cause radio interference in which case the user needs to take adequate measures VCCI A Korea Korean Class A Warning g040913 The preceding translates as follows This equipme...

Страница 208: ...be determined by turning the equipment off and on the user is encouraged to try and correct the interference by one or more of the following measures Reorient or relocate the receiving antenna Increa...

Страница 209: ...ated Documentation Agency Approvals for JA2500 on page 191 Compliance Statements for Acoustic Noise for JA2500 on page 194 Compliance Statements for EMC Requirements for JA2500 on page 192 195 Copyrig...

Страница 210: ...Copyright 2018 Juniper Networks Inc 196 JA2500 Junos Space Appliance Hardware Guide...

Отзывы: