"JUKI DX-4000QVP - Продвинутая швейная машина для профессионалов и любителей. Инструкция по эксплуатации доступна для скачивания бесплатно на manualshive.com. Перейдите на сайт, чтобы скачать руководство пользователя и начать мастерить с удобством."
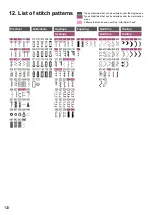
134
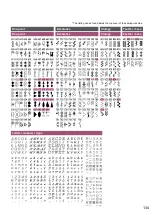
* The listing can be found inside the top cover of the sewing machine.
Letters / numbers / signs
One-point
Decorative
Vintage
Feather / Lace
Страница 1: ...anual before using the machine as it contains important operational and safety information Keep this manual accessible so that you may refer to it at anytime while operating the machine INSTRUCTION MANUAL COMPUTER SEWING MACHINE DX 4000QVP EN ...
Страница 2: ...edle 6 Always use the proper stitch plate The wrong plate can cause the needle to break 7 Do not use bent needles 8 Do not pull or push fabric while stitching It may deflect the needle causing it to break 9 Switch the sewing machine off O when making any adjustments in the needle area such as changing needle threading bobbin or changing presser foot 10 Always unplug the machine from the electrical...
Страница 3: ...nty so that you can read it whenever necessary The instruction manual is subject to change without prior notice for improvement Please visit the JUKI website for the latest version https www juki co jp household_en hsm pdf DX 4000QVP_EN_manual pdf To use the sewing machine safely Marks and pictographs included in the Instruction Manual and shown on the sewing machine are used so as to ensure safe ...
Страница 4: ...rect sunlight or in a humid place Be aware that the following state can take place since the sewing machine incorporates semi conductor electronic parts and precise electronic circuits The operating temperature of the sewing machine is between 5ºC and 40ºC Do not use the sewing machine under the direct sunlight near the burning things such as a stove and candle or in a humid place By so doing the ...
Страница 5: ... Pinch in Squeeze your fingers together Pinch out Spread your fingers Swipe Tap the screen and slide your fingertip Be sure to move the sewing machine by holding its handles Do not hold portion A when you lift the sewing machine If the sewing machine is heavy lift it by put ting your arm through the arm section A A ...
Страница 6: ...ry to correct the interference by one or more of the following measures Reorient or relocate the receiving antenna Increase the separation between the equipment and receiver Connect the equipment into an outlet on a circuit different from that to which the receiver is connected Consult the dealer or an experienced radio TV technician for help This equipment complies with FCC IC radiation exposure ...
Страница 7: ...ments de l aiguille 6 Toujours utiliser la plaque aiguille appropriée Un plaque non appropriée peut faire casser l aiguille 7 Ne pas utiliser d aiguilles courbes 8 Ne pas tirer ou pousser le tissu lorsque vous cousez cela pourrait abîmer voire casser l aiguille 9 Mettre la machine à coudre hors tension O avant de faire tout réglage dans la zone de l aiguille comme enfiler ou remplacer l aiguille e...
Страница 8: ... d instructions est susceptible d être modifié sans préavis à des fins d amélioration Veuillez visiter le site Web de JUKI pour obtenir la dernière version https www juki co jp household_en hsm pdf DX 4000QVP_EN_manual pdf Pour utiliser la machine à coudre en toute sécurité Les symboles et icônes compris dans le Manuel d instructions ou apposés sur la machine à coudre ont pour but d assurer l util...
Страница 9: ...eil ou dans une atmosphère humide Il faut savoir que l état suivant peut avoir lieu du fait que la machine intègre des semi conduc teurs et des circuits électroniques La température de fonctionnement de la machine à coudre est de 5 ºC à 40 ºC Ne pas utiliser la machine à coudre sous la lumière solaire directe près de sources de flammes telles qu un poêle ou une chandelle ni dans un emplacement hum...
Страница 10: ...approchement Rapprocher les doigts Écartement Écarter les doigts Balayage Tapoter l écran et faire glisser le doigt Veiller à déplacer la machine à coudre en la tenant par ses poignées Ne pas tenir la partie A lorsqu on sou lève la machine à coudre Si la machine à coudre est lourde la sou lever en passant le bras par la section du bras A A ...
Страница 11: ... à essayer de corriger les interférences en prenant une ou plu sieurs des mesures suivantes Réorienter ou déplacer l antenne de réception Augmenter la distance entre l équipement et le récepteur Brancher l équipement dans une prise sur un circuit différent de celui auquel le récepteur est connecté Consulter le revendeur ou un technicien radio TV qualifié pour obtenir de l aide Cet équipement est c...
Страница 12: ...4 13 Setting the presser foot pressure 43 4 14 Setting the micro lifter 43 4 15 Setting the automatic back tacking thread trimming and presser foot lifting 44 4 16 When changing the needle position 45 4 17 When changing the zigzag width 46 4 18 When changing the stitch length 47 4 19 Setting the stop position of needle 48 4 20 Pivot setting 48 Contents 5 Setting for the pattern sewing 49 5 1 Singl...
Страница 13: ... 21 Stitch in ditch quilting 104 6 22 Attaching a quilt sleeve 105 7 Operation of the operation panel 107 7 1 Support 107 7 2 Setting 108 Darning adjustment 109 Stop position of needle 110 Pivot 110 Sound volume 111 Brightness 111 Stitch speed 112 Presser foot lifting height 112 Cancel safety 113 Foot switch functions 113 Two needles 114 Wireless LAN 115 Factory data reset 116 Software version 116...
Страница 14: ... cover Bobbin winding shaft Hook cover release but ton Presser foot holder Thread trimming button Auxiliary bed accessory case Thread cutter Lock stitch button Speed controller Needle up down button Knee lifting lever hole Light under arm Reverse stitch button Feed dog UP DOWN LOCK MODE button Hand wheel pulley Power switch Machine socket inlet Foot controller jack USB insertion slot JUKI Smart Fe...
Страница 15: ...ng the speed controller to the right or decreased by moving it to the left When sewing with foot controller Max sewing speed can be set by Speed Controller Lock stitch but ton When this button is pressed the sewing machine performs lock stitch When this button is pressed while the sewing machine is engaged in pat tern sewing the sewing machine stops after it has completed the sewing of the one cyc...
Страница 16: ...tion on the patterns you have sewn remains as history If you want to sew the pattern using the condition you have set previously you may select it from the history JUKI Sewing Net JUKI website is displayed B Adjusting Dial Function of the adjusting dial differs with the selected pattern Function and the numeric value are displayed on the screen Type Presser foot pressure Stitch length Zigzag width...
Страница 17: ...itch Pattern selection icon Press this icon to select a pattern Pattern number of the selected pattern is displayed Pattern edit icon Stitch patterns can be edited JUKI Smart Feed adjustment icon Adjustment value of JUKI Smart Feed can be set Presser foot auto lift icon Presser foot lifting after thread trimming can be set OFF ON Automatic thread trimmer icon Back tacking and thread trimming can b...
Страница 18: ...liary box Accessories in the accessory box can also be stored in the auxiliary bed Refer to the figure given below for the storage procedure storage location Slightly draw the auxiliary bed cover toward side then open it toward side Inside of the auxiliary bed ...
Страница 19: ...his manual Knee lifting lever Buttonhole presser foot E Needle set HA 1 11 1 14 1 16 1 for knit 11 1 Spool cap Middle Auxiliary spool pin Open toe presser foot O Power cord Straight feed dog 7mm guide foot or 1 4 guide foot Spool cap Small Quilt guide Patchwork presser foot P Straight throat plate Straight presser foot S Quilt presser foot for the ruler Q Wide table Edge Sewing presser foot R Zipp...
Страница 20: ...all Wide Table 2 Open legs of Wide Table until they stop securely at the stopping position 3 Assemble Wide Table to sewing machine body Attach it to free arm of sewing machine 4 Don t put any heavy materials on the Wide Table Don t move sewing machine with Wide Table attached 3 Set up 1 Draw the auxiliary bed out to the left ...
Страница 21: ...1 Remove pedal setscrew and block setscrew 2 Attach pedal and block to the opposite side while turning them in the other way around and tighten the pedal setscrew and block setscrew Foot switch Insert the knee lifting lever so that concave and convex meet 3 3 Installation of knee lifting lever Unplug the controller before you change the position of the foot switch Attention ...
Страница 22: ...not operate to start sewing Stop button Can operate to stop sewing WARNING Disconnect the plug and turn off the power switch turn to O that al ways sewing machine is not to use 4 Basic settings and basic operations Connecting the codes Turn OFF the power switch turn to O WARNING For U S A Canada only This appliance has a polarized plug one blade wider than the other To reduce the risk of electric ...
Страница 23: ...the sewing machine in the lock mode keep the feed dog UP DOWN LOCK MODE button held pressed for two seconds When you want to reset the lock mode keep the feed dog UP DOWN LOCK MODE button held pressed for two seconds When turning off the machine lock mode is disengaged If the sewing machine is put in the lock mode operation of all operating buttons operating keys and operation panel will be disabl...
Страница 24: ...alfunctions 4 2 Speed control Maximum sewing speed can be freely set by the speed controller Faster speed Slower speed When the needle up down switch is held pressed the sewing machine performs sewing at a low speed Low speed inching sewing Foot controller Speed controller Setting Stitch speed Adjustable starting stitch speed From the setting the sewing speed at the start of sew ing can be changed...
Страница 25: ... lift position This position is used for fab ric removal and or changing the presser foot Extra lift position This position is used to put heavy materials underneath the presser foot Be careful that the presser foot and the needle should not interfere when the needle is in down position and the presser foot is raised to the extra lift position Setting Pivot setting It is possible to set so that th...
Страница 26: ... presser foot holder Move down the presser foot lifting lever Each presser foot has a marking Use the appropri ate presser foot for the stitch pattern to be sewn Removing presser foot holder Lift the needle and presser foot lifting lever Loosen the setscrew of the presser foot holder to the left and remove the presser foot holder Installing presser foot holder Align the screw hole at the presser b...
Страница 27: ...is is used for the applique and decorative stitches Front part of the presser foot is open for better visibility Quilt presser foot for the ruler Q This is used for the quilt stitch Machine setting Straight Stitch and Center needle position The ruler can be used together with the quilt presser foot Edge Sewing presser foot R This presser foot is used for patchwork etc Use the guide at the center o...
Страница 28: ...gers When JUKI Smart Feed is fitted appropriately the relevant icon is displayed on the screen Adjusting JUKI Smart Feed Press Adjust the JUKI Smart Feed by sliding your finger on the scale mark part The JUKI Smart Feed can also be adjusted by turning the adjusting dial Setting range 5 0 5 0 The top feed amount is decreased The top feed amount is increased When you tap the portion above the semici...
Страница 29: ...emoving the throat plate Remove the presser foot and needle Push the T shape screwdriver into the groove in front of the throat plate When pressing the screw driver down ward throat plate will come off Attaching the throat plate Place the area first and then push center to right hand part of the throat plate to assemble Turn off the machine or leave the Machine in Lock Mode Attaching the feed dog ...
Страница 30: ...re inches Standard throat plate Throat plate for straight stitches 4 7 How to use the throat plate for straight stitch The throat plate is provided with a useful guide for you to determine the sewing position of material Angle index The angle index is useful when using it for piecing of patchworks If you align the material edge with the angle index which is same of the angle of patchwork piece cor...
Страница 31: ...rly installed or a bent needle is used needle breakage can be caused It will cause damage to the machine Attention Removing needle Turn the hand wheel towards you until the needle comes to the highest position and lower the presser foot Turn the needle setscrew towards you 1 2 times and remove the needle T shape screwdriver Attaching the needle Hold the needle with its flat part facing away from y...
Страница 32: ...als Denim Spun thread No 30 50 No 14 16 Jersey Silk thread No 50 Spun thread No 50 60 Knit needle No 11 14 Coat Silk thread No 50 No 11 14 In general the same thread is used for both needle and bobbin threads Thin thread and needle will be used for light weight fabrics and thick thread and needle will be used for heavy weight materials Check that the combination of needle and thread is OK by trial...
Страница 33: ...ause tangling or slip off of thread A A Thread the guide 2 Thread the thread guide guide in the circle Pull the thread by both hands and thread it to bobbin winding thread guide 3 Winding a bobbin In the case of using the spool pin In the case of using the auxiliary spool pin 2 Place the thread spool to the auxiliary spool pin Pass the thread through thread guide Then pass the thread through threa...
Страница 34: ... start winding the bobbin Be careful that the bobbin winding regulator works as a switch 7 When winding is finished the shaft stops automatically the bobbin winding regulator moves to right and return to the original position Remove the bobbin from the bobbin winding shaft and cut the thread by cutter Bobbin winding will automatically stop even while winding when the winding speed is reduced due t...
Страница 35: ...the thread end It will be easier to thread grooves when you press the bobbin lightly with your finger Thread guide 2 by pulling the thread to left side 2 4 3 Placing the bobbin 1 2 Pull forward hook cover release button A and open the hook cover B 1 B A Turn off the machine or leave the Machine in Lock Mode Counter clockwise ...
Страница 36: ... guide until built in cutter C is reached Finally trim the thread with built in cutter C 6 Close the hook cover 7 3 You can start to sew in this condition without pulling up the bobbin thread however if you want to sew with the bobbin thread pulled out refer to Pulling up the bobbin thread in the page 40 C Lightly holding the bobbin with your right hand ...
Страница 37: ...r Use the needle No 11 16 and the thread No 30 90 2 Align the marking A at the hand wheel with the one on the machine body 3 Turn the power ON 4 Lift the presser foot You can thread the machine correctly on condition that the machine is turned on and presser foot is up position 5 Keep the feed UP DOWN LOCK MODE button held pressed to put the sewing machine in the lock mode Turn off the machine A ...
Страница 38: ...ge me dium and small Select the size of spool cap according to the thread spool to be used and use it while changing its direction appropriately Be aware that a spool with a small remaining amount of thread can cause tangling or slip off of thread Threading the needle thread B B 1 1 2 2 3 4 ...
Страница 39: ...the thread end and thread according to the arrow marking Check that the thread take up C is correctly threaded 2 3 Thread the guide 6 from the right hand side Draw the needle thread out from the guide by approxi mately 10 cm 4 6 C ...
Страница 40: ...e threading lever 9 until it comes to a complete stop Lower the threading lever slowly Lift the presser foot Then draw the needle thread backward Pull out the thread from the needle eye by approx 10 cm or 4 inches long 5 Automatic needle threader Be careful that the cutter is inside When twin needle is used the automatic needle threader can not be used Use the needle No 11 16 and the thread No 30 ...
Страница 41: ...th needle and bobbin threads by approx 10 cm 4 inches long and pass them under the presser foot towards the back of the machine 1 Lift the presser foot and lightly hold the end of the needle thread 2 Turn the hand wheel towards you to move the needle up and down Loop of bobbin thread will be pulled out when you will pull the needle thread lightly 3 Pulling up the bobbin thread ...
Страница 42: ...ly seam balance will be lost resulting in puckering or thread breakage Default setting is suitable for most fabrics Adjustment may be necessary according to fabrics and sewing applications Thread tension can be changed even during sewing If a new pattern is selected the set value will be re turned to the initial value When you tap the portion above the semicircular portion shown in the above given...
Страница 43: ...ase the needle thread tension In the case of straight stitch The needle thread and the bobbin thread interlace with each other approximately at the middle of material thickness Needle thread Bobbin thread Fabric right side Fabric wrong side Middle of the fabric thickness In the case of zigzag stitch The needle thread is pulled a little bit to the wrong side of material Well balanced thread tension...
Страница 44: ...ft the presser foot during sewing set the presser foot height for the micro lifter function to 0 Set the presser foot height by turning the adjusting dial so that the presser foot appropriately holds the material The larger the negative set value becomes the higher the presser foot can be lifted Place the material for trial stitching that is the same with the material to be actually sewn Then adju...
Страница 45: ...ied out Sewing start Place the material at the sewing start position and begin sewing In the case the back tacking at the beginning of sewing is se lected the reverse stitch button and back tacking button will not operate In the case of setting the automatic back tacking Setting for the back tacking at the beginning of sewing Select one from the three types of back tacking OFF Reverse stitch Lock ...
Страница 46: ... 0 The rightmost end rep resents 7 0 The needle position is represented by of Numeric values displayed on the screen In mm 0 0 3 5 7 0 If a new pattern is selected the set value will be re turned to the initial value When you tap the portion above the semicircular portion shown in the above given figure the setting you have done is confirmed Then the screen returns to the previous screen White Ini...
Страница 47: ...ial counterclockwise The displayed numeric value is increased and the zigzag width is increased by turning the dial clockwise The zigzag width can be adjusted while sewing Numeric values displayed on the screen Measure of the zigzag width In mm Zigzag width is decreased Zigzag width is increased A 2 0 7 0 4 17 When changing the zigzag width Zigzag width can be changed even during sewing ...
Страница 48: ...creased by turning the dial counterclockwise The displayed numeric value is increased and the stitch length is increased by turning the dial clockwise Numeric values displayed on the screen Measure of the stitch length In mm 1 0 5 0 Stitch length is decreased Stitch length is increased 4 18 When changing the stitch length Stitch length can be changed even during sewing ...
Страница 49: ...he setting screen the screen returns to the common setting screen Select Stop position of needle from Setting Select the Lower stop position or the Upper stop posi tion When you tap the portion outside the setting screen the screen returns to the common setting screen In the case the upper stop position the sewing ma chine stops with its needle up is selected the pivot function will be automatical...
Страница 50: ...ver of the sewing machine Selecting the pattern Press Pattern selection icon Select the pattern you want to sew from among Practical Buttonhole Appliqué Tapering Quilt line Scallop One point Decorative Vintage and Feather Lace How to select the pattern Press the pattern icon Enter the pattern number The setting can be changed by pressing the icon Setting for the repetition stitching single mode Th...
Страница 51: ...g Appliqué Quilt line Scallop One point Decorative Vintage Feather Lace and Characters How to select the pattern Press the pattern letter icon Enter the pattern number In the case 10 patterns have been saved the message will be displayed when you press Create new data Press to delete the combined patterns Selected pattern or selected combination of patterns is sewn once Initial setting Selected pa...
Страница 52: ... stitch No Pattern Application Refer to page 009 Right needle position Zigzag stitch 010 Left needle position 011 Ornamental pattern 012 Two point zig zag 013 Triple standard zigzag 014 Three point zig zag 015 Butting stitch 016 Overcasting stitch 74 5 2 1 Practical Select the type of pattern Practical Buttonhole Appliqué Tapering Quilt line Scallop One point Decorative Vintage Feather Lace Combin...
Страница 53: ...rial 75 027 Blind stitch Used for flexible material 75 028 Shell tuck 78 029 78 030 Back straightline stitch Proceed with the reverse stitch button 031 Back zigzag stitch Proceed with the reverse stitch button No Pattern Application Refer to page 032 Bar tack 79 033 Bar tack Memory Size of bartacking you have sewn once can be stored in memory 79 034 Reinforced stitch 035 038 Eyelet 81 039 81 040 8...
Страница 54: ...e you have sewn once in memory 96 104 Standard buttonholes 89 105 89 106 Decorative 89 107 Rounded end 89 108 89 109 89 No Pattern Application Refer to page 110 Keyhole buttonholes 89 111 89 112 89 113 89 114 For knit 89 115 89 116 89 117 89 118 Decorative 89 119 89 120 89 121 Basting stitch for buttonholing 95 122 Button sewing 98 5 2 2 Buttonhole Select the pattern ...
Страница 55: ...rn 201 209 217 225 233 202 210 218 226 234 203 211 219 227 235 204 212 220 228 236 205 213 221 229 237 206 214 222 230 238 207 215 223 231 239 208 216 224 232 240 5 2 4 Tapering No Pattern No Pattern No Pattern 301 303 305 302 304 306 Select the pattern Select the pattern ...
Страница 56: ... No Pattern No Pattern 401 406 411 416 421 402 407 412 417 422 403 408 413 418 404 409 414 419 405 410 415 420 6 2 6 Scallop No Pattern No Pattern No Pattern No Pattern 501 504 507 510 502 505 508 511 503 506 509 512 Select the pattern Select the pattern ...
Страница 57: ... 603 620 637 654 671 604 621 638 655 672 605 622 639 656 673 606 623 640 657 674 607 624 641 658 675 608 625 642 659 676 609 626 643 660 677 610 627 644 661 678 611 628 645 662 679 612 629 646 663 680 613 630 647 664 681 614 631 648 665 682 615 632 649 666 683 616 633 650 667 684 617 634 651 668 Select the pattern ...
Страница 58: ...6 781 722 737 752 767 782 723 738 753 768 783 724 739 754 769 784 725 740 755 770 785 726 741 756 771 786 727 742 757 772 728 743 758 773 729 744 759 774 730 745 760 775 731 746 761 776 732 747 762 777 733 748 763 778 No Pattern No Pattern 701 710 702 711 703 712 704 713 705 714 706 715 707 716 708 717 709 718 Select the pattern ...
Страница 59: ... 810 818 826 834 803 811 819 827 835 804 812 820 828 836 805 813 821 829 837 806 814 822 830 807 815 823 831 808 816 824 832 5 2 10 Feather Lace No Pattern No Pattern No Pattern No Pattern No Pattern 901 904 907 910 913 902 905 908 911 914 903 906 909 912 915 Select the pattern Select the pattern ...
Страница 60: ...9 5 2 11 Letters Select the letter Select the direction of letters between horizontal vertical using Press Pattern se lection icon Select Combination Press Create new data Select the type of letter font ...
Страница 61: ...he icon and enter JUKI Select One point Press the pattern No 618 When you press the combination of the patterns is saved and the swing screen is displayed 5 3 Combination of patterns under the combination mode 1 Selecting and combining the patterns letters ...
Страница 62: ...he colored vertical line before J with Press the pattern No 618 3 Adding a pattern letter A pattern letter can be added to the colored vertical line portion Move the colored vertical line between J and U with Press the pattern No 618 Example J UKI In the case of adding a pattern letter between the patterns Example JUKI In the case of prepending a pattern letter at the beginning of the patterns ...
Страница 63: ...hen you select Clear all by pressing all of the combined patterns can be deleted Move the colored vertical line with to the right side of the pattern you want to delete Press 5 Deleting copying the combined patterns Press Press of the combi nation display you want to delete copy Select Delete or Copy ...
Страница 64: ... 94 Setting the interval between patterns 65 Reset settings 65 Writing capturing the pat tern data 66 Function Refer to page Thread tension 41 Needle position 45 Horizontal inversion OFF ON 64 Vertical inversion OFF ON 64 Change in the elongation size 103 How to display the edit screen Single mode Sewing screen Sewing screen Pattern selection screen Combination mode Combination selection screen Pr...
Страница 65: ...ly inverted pattern is displayed Vertical inversion Press when you want to sew a vertically inverted pattern The vertically inverted pattern is displayed Combined patterns can be inverted on a pattern by pat tern basis Select the pattern you want to edit with Single mode From the sewing screen Combination mode From the sewing screen Combination mode From the combination selection screen Combinatio...
Страница 66: ...e patterns are combined a lock stitch is done at the between each patterns If the stitch interval is decreased the lock stitch between patterns will be omitted 5 4 2 Setting the interval between patterns When you press Reset settings all of the settings you have done on the edit screen are reset 5 4 3 Reset settings Combination mode From the sewing screen Single mode From the sewing screen Combina...
Страница 67: ...e of Write Enter an arbitrary file name and press Write In the case of Capture Select the file you want to capture Press Capture Do not turn the power OFF while capturing saving is in progress When the backup data has been normally captured the message Turn OFF the power switch is displayed Turn OFF the power to the sewing machine Then re turn it ON Press Select Capture or Write ...
Страница 68: ...edge of thick fabrics Turn the hand wheel and let the needle enter at the posi tion of sewing start Push the black button A by finger and lower the presser foot Release the finger from the black button and start sewing When the presser foot will be on the fabric completely the black button will be disengaged automatically A 6 Sewing Setting Stitch speed Adjustable starting stitch speed Sewing spee...
Страница 69: ...penetrates into the material when the sewing machine is stopped Change the direction of sewing with the needle pen etrated into the material Then lower the presser foot and start sewing Setting Stop position of needle Changing over the needle stop position It is possible to change the stop position to which is the needle is brought when the sewing machine is stopped Refer to page 110 Setting Pivot...
Страница 70: ...by pressing the foot switch Refer to page 113 Notes for thread trimming 1 Do not use thread thicker than No 30 2 After trimming the stitch can be done without pulling up bobbin thread 3 When sewing again after thread trimming if you pull up the bobbin thread again and place it underneath the presser foot together with needle thread you can avoid birds nest on the wrong side of the fabric 4 Regular...
Страница 71: ...everse stitch button is released In the case of sewing one point stitches or letters the sewing machine stops after the completion of lock stitch es Setting Foot switch functions Foot switch functions It is possible to set so as to carry out reverse stitching as long as the reverse stitch button is held pressed Refer to page 113 Setting Stitch speed Adjustable reverse stitch speed Sewing speed of ...
Страница 72: ...ing machine sews until one cycle of the selected pattern is completed sews lock stitches and stops The start stop button lights up in orange during the one cycle Setting Foot switch functions Foot switch functions It is possible to set so as to carry out lock stitching by pressing the foot switch Refer to page 113 Sewing Icons Setting the automatic back tacking thread trimming and presser foot lif...
Страница 73: ...he zipper under the right portion of the zipper presser foot When sewing the right side of the zipper place the zipper under the left portion of the foot 2 Continue sewing until the top end of the slider is reached Then move the slider away from you and continue sewing until the end of zippers is reached No Pattern Presser foot 001 Zipper presser foot B Leave the machine in Lock mode ...
Страница 74: ...ly to 7 mm or 1 4 inches for sewing 1 Cut the fabric with seam allowance 2 Align the right end of the presser foot and the edge of the fabric and sew The needle will enter 7 mm 1 4 from the edge of the fabric so the seam allowance of 7 mm 1 4 can be sewn No Pattern 002 003 Presser foot Standard presser foot A Leave the machine in Lock mode A ...
Страница 75: ...de are apart it will not make a nice stitch formation Make sure to guide the fabric along the guide and sew slowly Before sewing make sure to check that the needle will not hit the presser foot 6 4 Overcasting stitch No Pattern 016 017 018 Lightweight material Presser foot Overcasting presser foot C Leave the machine in Lock mode ...
Страница 76: ...4 for overcasting stitches Fabric wrong side Finish line 2 Carry out basting by hand 0 5 0 6 cm 3 Fold from basting line Leave 0 5 to 0 6 cm Folding fabrics No Pattern 025 026 Lightweight material 027 Stretchy fabrics Presser foot Blind stitch presser foot D Leave the machine in Lock mode ...
Страница 77: ...nd adjust the zigzag width with the zigzag width adjusting dial so that zigzag stitches reach the folded edge Pay attention so that needle will not hit the presser foot 5 Position the folded edge against the guide and sew 6 Turn over the fabric after sewing Fabric right side ...
Страница 78: ... needle is in the up position Turn the zigzag width adjusting dial counterclockwise to the left Turn the handwheel to check the needle entry point When adjusting make sure the needle is in the up position 2 If the stitches fail to reach the folded edge 1 If the stitches reach too far beyond the folded edge When changing the needle entry point ...
Страница 79: ...l in the bias direction 2 Sew the material so that the needle enters the portion that is located on the right side of the top of the folds 3 The seashell shaped tucking is produced Presser foot Manual buttonhole presser foot I Leave the machine in Lock mode ...
Страница 80: ...atically make a u turn when it reaches the maximum of 20 stitches If the presser foot cannot be parallel to throat plate use filler fabric or cardboard Example of use Trousers and skirt Bag Pocket 2 Place the fabric under the presser foot 1 Pass the needle thread through the presser foot 10 cm No Pattern 032 033 Presser foot Manual buttonhole presser foot I Leave the machine in Lock mode ...
Страница 81: ...ern should be selected 3 Start sewing Push the start stop button and the machine starts to sew straight stitches Starting point 4 When it comes to the turning point push the reverse stitch button The machine goes back to the starting point by sewing straight stitches and then it sews zigzag stitches to the point where the reverse stitch but ton is pushed 5 When the machine comes to the sewing end ...
Страница 82: ...an be used for passing a string or ribbon or as a flower hole 1 Sew an eyelet The sewing machine automatically performs lock stitching at the end of sewing and stops No Pattern 036 037 038 Presser foot Manual buttonhole presser foot I No Pattern 039 040 Leave the machine in Lock mode ...
Страница 83: ...g and carry out trial stitching Preparation before sewing Pass down the needle thread through the presser foot hole and draw it sideways Place the fabric underneath the presser foot and start The machine will stop automatically when sewing is finished Note that the sewing speed varies according to stitch patterns letters to be sewn If the automatic thread trimmer is used while sew ing the machine ...
Страница 84: ...o sew a combination of patterns Leave the machine in Lock mode For sewing pattern Nos 772 and 776 in combination For sewing pattern Nos 778 and 778 in combination Caution In the case of tile stitching patterns may be slightly misaligned depending on the pat terns to be combined material thread and type of stitching to be used A B C Sew the pattern No 772 Determine starting point B of the pattern N...
Страница 85: ...w on the edge of the cloth 2 Cut the sewn fabric carefully so that stitches are not cut by the scissors No Pattern 501 502 503 Presser foot Manual buttonhole presser foot I No Pattern 504 505 506 No Pattern 507 508 509 No Pattern 510 511 512 Elongation The length of the patterns can be adjusted Other than the pattern No 501 Refer to page 103 Leave the machine in Lock mode ...
Страница 86: ...omat ically changes by section This means that the finished patterns provide a sense of fun Example No Pattern 206 208 210 212 Presser foot Manual buttonhole presser foot I No Pattern 217 219 221 223 No Pattern 225 227 229 231 No Pattern 233 235 237 Leave the machine in Lock mode ...
Страница 87: ...ally increased at the start of sewing and is gradually decreased at the end of sewing Use the tapering stitch pattern for mitering etc Leave the machine in Lock mode Example of use Mitering Angle of joining part of ta pering stitches can be set Patten length can be set Appliqué of a leaf There are twelve 12 types of shapes of end portions of tapering stitches Angle and shape of tapering stitches ...
Страница 88: ...can be set according to the pattern you want to sew The zigzag width is gradually decreased toward the end of sewing The sewing machine performs lock stitching at the end of sewing and automatically stops Start the sewing machine to sew the pattern The zigzag width gradually increases The sewing machine sews the pattern by the set length How to sew the pattern Place Tapering bottom in ON Select th...
Страница 89: ... stops Set angles and After you have completed sewing the length of seam you have just sewn can be checked by setting Tapering length to ON If you re start sewing from that state you can sew ta pering stitches by the same seam length in repetition History In the state that Tapering length is place in ON the tapering length is also stored in memory to allow the data to be called up with the history...
Страница 90: ...u have sewn once in memory 104 Buttonhole for heavy weight materials Stitch density is coarse This pattern is used for coats etc 105 Sews buttonhole double 106 Decorative Decorative buttonholes 107 Rounded end Buttonholes for women s blouses and children s clothes Also for light weight materials 108 109 Presser foot Buttonhole presser foot E No Pattern Application 110 Keyhole Keyhole buttonhole fo...
Страница 91: ... the buttonhole length A B 3 Set the buttonhole sensor pin Insert the sensor pin into the sensor pin hole at the face plate cover Insert the pin into the hole completely If the machine starts to sew without inserting the pin into the hole the following message will be shown on the display Set the sensor pin and restart Check the following points after setting the presser foot and then start to sew...
Страница 92: ... the same size will be sewn again push the thread trimming button to trim the threads and raise the presser foot Under this condition move to another point lower the presser foot and then start sewing Do not change stitch length and or zigzag width during buttonholing Otherwise this will cause imbalanced stitches If thread trimming button is pushed while sewing buttonhole the machine will stop and...
Страница 93: ...late You can remove the clamping plate by holding B Buttonhole clamping plate 6 Unplug the sensor pin after sewing 7 Opening the buttonhole using a ripper Double bartack Pierce a stopper pin at the bartack and open the buttonhole with a ripper Be careful not to cut the stitches Keyhole buttonhole Place a cardboard under the buttonhole and make a hole with the eyelet punch Then pierce a stopper pin...
Страница 94: ...or another pattern is selected When changing the density of the seam When changing the width of the buttonhole Turn to the left The width becomes narrow Turn to the right The width becomes wide Turn to the left Stitch density be comes denser Turn to the right Stitch density be comes more coarse Wide Large stitches Larger Narrow stitches Narrow Narrow ...
Страница 95: ...f buttonhole is changeable The knife width is reset when you turn the power OFF Seam width Standard Large Small Initial value has been factory set to Standard Invert the pattern Then press The knife width can be changed in three steps by pressing the icon ...
Страница 96: ...ser foot and thread it at the hook of the presser foot 3 After threading at the hook pull the gimp thread back under the presser foot and put it into the notch at the front left side of the presser foot firmly 4 Bring down the needle to the sewing start point and lower the presser foot 5 Sew the buttonhole 6 Pull the left gimp thread to take off slack and cut excess gimp thread Buttonhole with gim...
Страница 97: ...ole 4 Push start stop button to sew At this time if the start stop button is pushed the machine will stop sewing And if the start stop but ton is pushed again then the machine will continue to sew the left side of the buttonhole Push the reverse stitch button when it reaches the necessary length of the left side of the buttonhole Sew bartack and the right side of the buttonhole then the machine se...
Страница 98: ...titches In the case of a 2 step buttonhole sewing di rection of the left and that of the right side is different Due to this and according to fabrics to be sewn it may be possible that the density of each side looks different No 103 In the case of 2 step buttonhole Memory Since the length of a buttonhole that is sewn for the first time is stored in memory step of procedure 4 is not required for bu...
Страница 99: ... in button 3 Make sure that needle enters holes in button by turning hand wheel manually 4 Carry out sewing while turning the handwheel by hand If you pull the material the button could be moved from the correct position causing needle breakage Buttons can be sewn without fail by using the sepa rately available button sewing presser foot refer to page 129 5 Trim needle and bobbin threads by about ...
Страница 100: ...g using a zigzag pattern the separately available quilt presser foot zigzag type and presser foot joint are necessary 4 Place the fabric underneath the presser foot and lower the presser foot 5 Adjust the presser foot height according to the material thickness Height of the presser foot can be changed with the presser foot screw It is also possible to adjust the presser foot height using the micro...
Страница 101: ...bin threads together and sew 3 stitches on the same point After that move fabrics as you wish In this way stitches on the wrong side of the fabrics look neat At sewing end sew 3 stitches on the same point and stop How to sew stitches with the same stitch length When the foot controller is used the fabrics can be guided by both hands and you can move the fabrics freely Set the speed controller to m...
Страница 102: ...k quilt stitches Handsewn look seams can be sewn by using a transparent thread as the needle thread Needle thread Bobbin thread No Pattern Presser foot 418 Manual buttonhole presser foot I Leave the machine in Lock mode ...
Страница 103: ...9 Quilting quilt guide 2 Sew while tracing the stitches with the tip of the quilt guide Distance between sewing lines can be adjusted freely 1 Insert the quilt guide into the groove of the presser foot holder ...
Страница 104: ... Invert the pattern Then press Set the elongation size by turning the adjusting dial 6 20 Elongation No Pattern 502 503 508 509 Presser foot Manual buttonhole presser foot I No Pattern 510 677 678 679 No Pattern 680 681 682 835 No Pattern 836 837 Select the pattern you want to edit with Press Set the elongation size by turning the adjusting dial Single mode Combination mode ...
Страница 105: ...st the needle position Refer to page 45 This is for quilting the edge of patchworks and appliqués The machine will sew the lower thinner side of the fabric layers As a result the stitches will not be noticeable and have an effect to make the design look three dimensional or emphasized No Pattern Presser foot 001 Edge Sewing presser foot R Curved concealed quilting Use manual buttonhole presser foo...
Страница 106: ...d stitching at a slow sewing speed in order to prevent puckering 2cm Quilt sleeve back 3 Sew the quilt sleeve as illustrated in the figure 1cm Quilt sleeve top How to make a quilt sleeve 4 Manually sew basting stitches on the loop side of the folded edge 1cm Quilt sleeve top This stitch type is narrow blind stitch for attaching a sleeve material to be sewn on the back of quilted tapestry for pass ...
Страница 107: ...e quilted fabric Perform lock stitching at the start and end of sewing by pressing the reverse stitch button Quilt sleeve top Quilted fabric top Guide 8 After you have completed sewing remove the basting stitch seam Attach the quilt sleeve to the quilted fabric 7 For the opposite side fold the quilted fabric at the basting stitch seam and join the quilt sleeve to the quilted fabric while pressing ...
Страница 108: ...107 7 Operation of the operation panel 7 1 Support Main usage of the sewing machine can be checked Select the item you want to check ...
Страница 109: ...start of sewing and reverse stitching can be set Low speed The machine can be set to the presser foot lifting amount 6mm The sewing machine can be set to allow operation even when the presser foot is lifted Function can be selected for foot switch Reverse stitch The sewing machine can be set to perform twin needle stitching OFF It is possible to connect the sewing machine to the wireless LAN Sewin...
Страница 110: ...stitch pattern Adjustable range 20 20 Check the longitudinal balance of feed when you want to sew a pattern beautifully or having changed the materi al thread or interlining This adjustment value reflects all patterns Correct shape When right side is higher than left side When right side is lower than left side Increase the numeric value Adjust the shape of darning stitches while performing trial ...
Страница 111: ...ion outside the setting screen the screen returns to the common setting screen Pivot It is possible to set so that the presser foot automatically goes up when the sewing machine stops with its needle down Select Pivot from Setting Setting the ON OFF of the pivot function ON OFF Setting the pivot height Set the pivot height by sliding the slide bar to the right or left When you tap the portion outs...
Страница 112: ...n the screen returns to the common setting screen Brightness Brightness of the operation panel or sewing area can be adjusted The screen is dimmed The screen is brightened The hand LED light color becomes bluish The hand LED light color becomes reddish The sound volume is decreased The sound volume is increased When the bright ness of the screen is increased the operation panel may become warm Vie...
Страница 113: ...ow speed Select Presser foot lifting height from Setting Select the presser foot lifting height from three different heights 6 mm 8 mm and 10 mm When you tap the portion outside the setting screen the screen returns to the common setting screen Select Stitch speed from Setting Set the sewing speed at the start of sewing and that of the reverse stitching When you tap the portion outside the setting...
Страница 114: ...ifted Select Cancel safety from Setting Put a checkmark to the item safety function for which you want to cancel Then the safety function for the item is cancelled to allow you to operate the sewing machine even when the presser foot is lifted When you tap the portion outside the setting screen the screen returns to the common setting screen Attention Added care should be taken to check the sewing...
Страница 115: ...mm Maximum 7 0 mm Maximum 5 0 mm Example A A B B C C D D E E F F G G H H 2 2 3 3 4 4 5 5 Change the needle to the twin needle Make sure to use a twin needle with size of 2 0 mm The twin needle is separately available 1 Place the supplementary spool pin Thread to the thread guide A first After that thread paths are same up from B to G When twin needle sewing make sure to use thread size smaller tha...
Страница 116: ...ess LAN connection destination address to which you want to connect the sewing machine When you press the shown at the upper left of the screen the setting is confirmed and the screen returns to the previous screen Setting the twin needle Select Two needles from Setting Select ON and press Set The setting is confirmed by pressing Erase 6 Select a pattern When you set the sewing machine to the twin...
Страница 117: ...version is displayed When you tap the portion outside the setting screen the screen returns to the common setting screen When you want to update the software press Software update Select Factory data reset from Setting If you do not want to delete the pattern data place a checkmark in the box The data is initialized by pressing Factory data reset If you press Cancel the initialization will be canc...
Страница 118: ...completed is displayed Remove the USB thumb drive and turn OFF the power to the sewing machine Then re turn the power ON Precaution to be observed in saving data on the USB thumb drive Save the software you have downloaded in the storage space directly under the USB thumb drive as it is One folder that is named prog and one zip file that is named HZLUX8_PANEL_ zip are saved If any previous version...
Страница 119: ...of the backup data Select Wireless LAN The software version is checked Press Download When you press Start the updating on the next screen updating of the software starts Longer time will be required to download the soft ware depending on your communication environment When the software has been normally updated the message Software updating is completed is displayed Turn OFF the power to the sewi...
Страница 120: ...y file name and press Write The initial value of the file name is the serial number of your product Since this equipment is not provided with a clock function the uploading date and time of the file you have saved may differ Capturing the backup data Insert USB thumb drive into USB slot Press Capture backup data Select the file you want to capture Press Capture Do not turn the power OFF while capt...
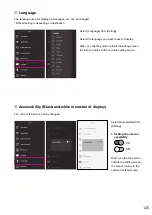
Страница 121: ...g is depending on destination Select Language from Setting Select the language you want to use for display When you tap the portion outside the setting screen the screen returns to the common setting screen Select Accessibility from Setting Setting the user ac cessibility ON OFF When you tap the portion outside the setting screen the screen returns to the common setting screen ...
Страница 122: ...121 Shutdown It is possible to turn the power OFF with the data protected Select Shutdown from Setting When the message Turn OFF the power switch is displayed on the screen turn OFF the power switch ...
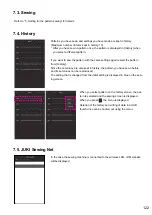
Страница 123: ... select the pattern from History Since the set values are also kept in history the pattern you have sewn before and its set values can be reproduced The setting that is changed from the initial setting is displayed in blue on the sew ing screen In the case the sewing machine is connected to the wireless LAN JUKI website will be displayed When you select pattern on the history screen the pat tern i...
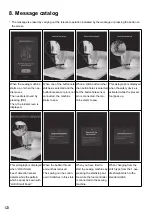
Страница 124: ...s selected but the buttonhole sensor pin is connected the ma chine starts to sew This pictograph is displayed when the safety device is activated while the presser foot goes up This pictograph is displayed when JUKI Smart Feed detection sensor detects while the pattern which cannot be sewn with JUKI Smart Feed When the bobbin thread amount has reduced The sewing can be contin ued 30 stitches in th...
Страница 125: ...andard throat plate In the case the straight throat plate is installed though the stitch type is set to the 1 needle stitch with the standard throat plate When changing the twin needle setting When Delete all is select ed on the history page When this sewing machine data is initialized In the case the combination of stitch patterns cannot be saved any more When Delete all is se lected on the combi...
Страница 126: ... lock mode When the throat plate has come off In the state that the throat plate has been detached While the preparation for shutdown of the sewing ma chine with the data saved is in progress When the preparation for shutdown of the sewing machine with the data has been completed No USB thumb drive is inserted into the USB slot when you try to use the function of accessing the USB thumb drive Data...
Страница 127: ...the lack of interchangeability While the current software version is being confirmed In the case you have con firmed the software version to find it is the latest ver sion In the case you have con firmed the software version to find the later version exists In the case of updating the software using the data stored in the USB thumb drive In the case of updating the software using the data that is ...
Страница 128: ... starting updating of the software When updating of the soft ware is completed In the case some problem has occurred with the appli cation and re starting of the sewing machine is required to reset the problem ...
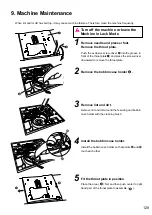
Страница 129: ...oat plate Push the exclusive screw driver into the groove in front of the throat plate and press the screw driver downward to remove the throat plate 2 Remove the bobbin case holder 3 Remove lint and dirt Remove lint and dirt around the feed dog and bobbin case holder with the cleaning brush 4 Fit the throat plate in position Place the area first and then push center to right hand part of the thro...
Страница 130: ...abric edge is hemmed by zigzag while rolling it under Used for bottom of shirts blouses frills and the edge of handkerchiefs Quilt presser foot open type It is used in free motion sewing As the front portion is open it is easy to see the needle en try point Appliqué presser foot Since the front and back of the presser foot is short it is easy to move the materials at curve points Also fabrics can ...
Страница 131: ...wound can be set This spool is useful when sewing many stitches at a time such as quilting The thread stand comes in the different types i e 1 piece type and 2 pieces type LED pointer Crisscross light guide is displayed by the verti cal and horizontal light beams by attaching the LED pointer to the separately available holder This light guide is helpful when you align the sewing starting positions...
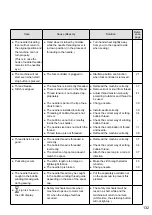
Страница 132: ...oot is used for a certain pattern Needle is bent Check the combination of fabric thread and needle Check the installation of needle Securely tighten the needle set screw Check the combination of stitch pat tern and presser foot to be used Change needle 31 30 30 30 Loud noise and or keen noise while sewing Lint or dust has accumulated in the feed dog Lint or dust has accumulated in the hook Clean t...
Страница 133: ...read tension manually according to fabrics and thread to be used Change needle Install needle correctly Check the correct way of setting bobbin thread Check the correct way of winding bobbin thread Check the combination of thread and needle Rethread the machine correctly 37 41 30 30 34 31 38 Thread tension is not good The needle thread is threaded in correctly The bobbin thread is threaded incorre...
Страница 134: ...nhole Appliqué Tapering Quilt line Scallop Appliqué Quilt line Scallop Types of patterns that can be selected under the single mode Types of patterns that can be selected under the combination mode Patterns that can be sewn with the JUKI Smart Feed ...
Страница 135: ...134 The listing can be found inside the top cover of the sewing machine Letters numbers signs One point Decorative Vintage Feather Lace One point Decorative Vintage Feather Lace ...
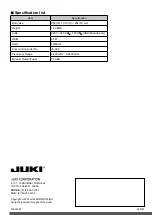
Страница 136: ...s 90 W Hertz 50 60 Hz Foot control model No JC 002 Frequency Range 2 400 GHz 2 4835 GHz Maxium Output Power 7 5 dBm Specification list Copyright 2020 JUKI CORPORATION All rights reserved throughout the world 000920 2 11 1 TSURUMAKI TAMA SHI TOKYO 206 8551 JAPAN PHONE 81 42 357 2341 FAX 81 42 357 2379 40244983 ...