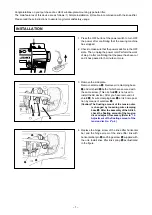
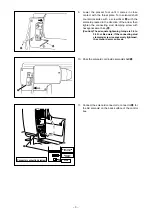
JUKI AK85B Скачать руководство пользователя страница 2

– 1 –

INSTALLATION

Congratulations on your purchase of a JUKI's window-plate-mounting type Auto lifter.
The main features of this device are as follows: 1) Simple installation, 2) Usable in combination with the knee lifter.
Please read these instructions to assure long-term satisfactory usage.

1.  Press the OFF button of the power switch to turn OFF 

the power after confirming that the sewing machine 

has stopped.

3.  Remove the side plate.

  Remove setscrew 

. Remove wire clamping base 

 and oil shield 

 both of which are secured with 

the same screw. (This oil shield 

 is not used to 

install the AK device.) After you have removed oil 

shield 

, fix wire clamping base 

 at its home posi-

tion by means of setscrew 

.

(Caution) The floating amount of the tension disc 

is changed by loosening wire clamping 

base 

. After the assembly of the AK-85, 

check the floating amount of the tension 

disc and adjust if necessary. (Refer to 

"12. 

Adjustment of the floating amount of the 

tension disc No. 2"p.4

.)

4.  Replace the hinge screw of the knee lifter horizontal 

bar and the hinge screw of the knee lifter link with 

horizontal bar pin 

 and hinge screw 

 supplied with 

the unit. Install knee lifter link spring 

 as illustrated 

in the figure.

2.  Check to make sure that the power switch is in the OFF 

state. Then, unplug the power cord.Perform the work 

of step 3. after confirming that the power has been cut 

and it has passed for 5 minutes or more.

1

4

2

0

3

Содержание AK85B

Страница 1: ...i ENGLISH INSTRUCTION MANUAL AK85B ...

Страница 2: ...ave removed oil shield fix wire clamping base at its home posi tion by means of setscrew Caution The floating amount of the tension disc is changed by loosening wire clamping base After the assembly of the AK 85 check the floating amount of the tension disc and adjust if necessary Refer to 12 Adjustment of the floating amount of the tension disc No 2 p 4 4 Replace the hinge screw of the knee lifte...

Страница 3: ... horizontal bar in the lower notch so that no clearance is pro vided in the notches In addition make sure that there is no clearance between the frame and the sponge Improperly installed sponge can be a cause of oil leakage from the bobbin winder 7 Install side plate asm on the sewing machine At this time install side plate asm so that the slot in solenoid link fits over knee lifter horizontal bar...

Страница 4: ...roat plate Turn solenoid shaft counterclockwise with a screwdriver A with the solenoid pressed in the direction of the arrow then tighten the connecting stud clamping screw with hexagonal wrench key B Caution The adequate tightening torque is 3 4 to 5 9 N m Be aware if the connecting stud clamping screw is excessively tightened the solenoid arm can break C Connector connection diagram Pedal AC pow...

Страница 5: ...t loosen screw and move tension release wire to the left After adjustment securely tighten screw Caution 1 To perform re turning ON of the power be sure to perform after the time of one second or more has passed If ON OFF operation of the power is performed quickly setting may be not changed over well 2 Auto lifter is not actuated unless this function is properly selected 3 When FL ON is selected ...

Отзывы: