background image

20 


Lithium Battery Care 


You should fully charge your new battery before your first ride.  

In regular use, keep the battery fully charged after every few short rides. If 
possible try to keep the battery between 50 and 95% charged, charging 
after 10 miles or so.   

Make sure you charge at least once every month. 

Try to charge just before a journey, rather than keep your battery at 100%.  

Letting the battery run empty on most rides will shorten its lifespan 
considerably – it would be better to plan your battery size so regular, 
everyday journeys use about 50% of your battery. 

Never

 charge the battery in 

freezing

 conditions. If the battery has been 

used in very cold conditions, let it warm to room temperature before 
charging.  

If storing the battery for any length of time without use (over the winter 
say), try to keep it at around 60-80% charge, in a cool place inside, and top 
up the charge a little every month. This will decrease the aging process of 
the battery (although every battery will slowly age whether used or not).  

Lithium batteries deteriorate more quickly when stored at higher 
temperatures and when repeatedly fully discharged. 

When returning to use, charge the battery fully to prepare it for everyday 
use.   

Keep your battery out of the weather whilst not riding the bike, preferably 
in a cool place inside.  

Always use the charger supplied with the bike. Before charging, check that 
the rated input voltage matches the voltage level for your country. (For the 
UK it is 240V/50 AC) 

Don’t open the charger case for any reason.   

To recharge the battery: tip up the seat, unlock the battery, remove and 
connect to charger. Alternatively the battery can be recharged while still in 
the bike, just make sure the bike is switched off. 

A full charge can take between 4 to 6 hours before the red charging light 
turns green.  The charger will get quite warm whilst charging. 

When the light changes from red to green the battery is fully charged. After 
charging, disconnect the charger from the battery. 

Содержание Juicy

Страница 1: ...1...

Страница 2: ...2...

Страница 3: ...formance from your new Juicy bike and battery Content sections Quick start Delivery inspection Assembly Before riding Riding your e bike Bike storage and maintenance Lithium Polymer Battery care Warra...

Страница 4: ...ion 3 The In Frame Battery does not need a key put it somewhere safe 2 Switch on the display hold down the M button not needed on older displays 3 If you have a throttle you can push in the button saf...

Страница 5: ...s offer a low speed cruise setting for use only when walking alongside your bike To activate walk assist hold down the button After a few seconds the bike will start Push lever to make pedalling easie...

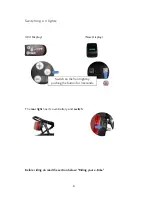
Страница 6: ...ching on lights Old Display New Display The rear light has its own battery and switch Before riding do read the section below Riding your e Bike Switch on the front light by pushing the button for 3 s...

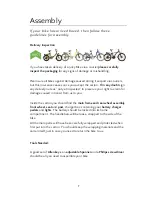
Страница 7: ...or damage caused in transit from us to you Inside the carton you should find the main frame and rear wheel assembly front wheel seat and post charger box containing your battery charger pedals and lig...

Страница 8: ...mbled at a local bike shop where you should find experienced and responsible bike mechanics So if you have any doubts consider using a professional At a bike shop your bike would be assembled using a...

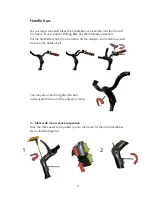
Страница 9: ...lready attached Put the handlebar stem into the frame lift the adjuster and rotate forwards to reveal the hidden bolt You may also need to tighten the bolt underneath the front of the adjuster clamp F...

Страница 10: ...th the lamp and the top of the mudguard 3 Firmly tighten the lamp using the screw at the side Tighten two screws holding the mudguard stays Front wheels may have an optional quick release QR mechanism...

Страница 11: ...n the fork recess cup 1 Finger tighten the nut into the recess 2 Fully tighten using a short hex key as tight as possible Our Compact bike front wheel is fitted with a standard nut and locating washer...

Страница 12: ...max height Charging the battery Fully charge your battery before your first ride The charger light will change from red to green when the battery is fully charged Then switch off and remove the charg...

Страница 13: ...slide rail is positioned into the battery groove Turn the key clockwise to lock the battery into the slider In frame batteries Turn the key and lift the handle A charging port can be found at the bas...

Страница 14: ...14 Fitting the rack 1 Loosen the top and side bolts 2 Attach the stays to the frame 3 Tighten the bolts again 1 3 2...

Страница 15: ...ey to move the inner pad closer to the disk rotor The outer pad can be quickly adjusted closer by unwinding the cable adjuster anti clockwise at either the brake lever or at the calliper Hydraulic bra...

Страница 16: ...d the max height indicator Pedals and chain The pedals should be wound in and fully tightened Gears should engage cleanly and change smoothly Brakes Test front and rear brakes whilst rolling the bike...

Страница 17: ...e same with the back brakes The bike should not move and the brake levers should not touch the handlebars The brakes should work without having to press down too hard on the handles If your bike has a...

Страница 18: ...etres this can increase to 15 metres on wet or snowy roads Never ride through deep puddles or streams Ensure that water never reaches the motor and controller level Avoid loose or uneven surfaces up a...

Страница 19: ...our bike forward Juicy Bike chains are stainless steel and need very little oil Too much oil can pick up grit and so increase wear We recommend Green oil s Clean Chain degreaser and a little Chain Lub...

Страница 20: ...every month This will decrease the aging process of the battery although every battery will slowly age whether used or not Lithium batteries deteriorate more quickly when stored at higher temperatures...

Страница 21: ...brake pads inner tubes tyres chain cables etc are regarded as consumables When replacements are required these can be purchased from your local cycle shop Returns Policy UK We hope you will be pleased...

Страница 22: ...goods received back Damaged or incomplete goods will not be refunded in full Goods damaged as a result of misuse will be subject to a repair and redelivery charge The customer will be advised of all c...

Страница 23: ...conform to the EVS EN 15194 2009 standards for Electric Bikes fulfilling the requirements of Electromagnetic Compatibility 2004 108 EC and where appropriate are provided with EU wide Certificate of Co...

Страница 24: ...24 W...

Отзывы: