


Step 1
First attach the stabilisers (2, 3)
to the main frame (1). Please
note the front stabiliser has the
bolts washers and nuts screwed
into it. The bolts for the back
stabiliser are in the tool kit.
Step 2
The nuts to attach the saddle
(11) to the saddle post (10) are
screwed onto the saddle. Re-
move the nuts and use them to
attach the saddle to the saddle
post.
Then remove the seat adjuster
(16), insert the saddle post to
the main frame (1) and use
the seat adjustor to adjust the
saddle to the required height.
It is recommended that all parts are removed from the box before
commencing assembly. It is also recommended that two people as-
semble the JTX Cyclo 5.
ASSEMBLY
Содержание Cyclo 5
Страница 1: ...JTX Cyclo 5 User Guide...
Страница 5: ...EXPLODED DIAGRAM...
Страница 16: ...Program 11 75 Heart Rate Program Program 12 85 Heart Rate Program Program 13 User 1 Program 14 User 2 PROGRAMS...
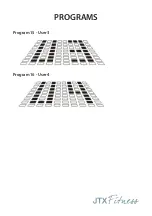
Страница 17: ...Program 15 User 3 Program 16 User 4 PROGRAMS...
Страница 25: ...TRAINING NOTES...
Страница 26: ...TRAINING NOTES...
Страница 27: ...TRAINING NOTES...


