INSTRUCTION MANUAL FOR SAILPLANE
XP9303
9-CHANNEL COMPUTER RADIO SYSTEM
Страница 1: ...INSTRUCTION MANUAL FOR SAILPLANE XP9303 9 CHANNEL COMPUTER RADIO SYSTEM ...
Страница 2: ... 10 Charger Specifications G 10 Battery Charging G 11 Transmitter Receiver G 11 Transmitter Only G 11 Charger G 11 XP9303 Transmitter Features Front G 12 XP9303 Transmitter Features Rear G 13 Battery Cover G 13 XP9303 Transmitter Features Internal G 14 Control Stick Tension Adjustment G 14 Advanced Digital Trims G 15 Control Stick Length G 15 Direct Servo Control DSC G 16 Why you should use the DS...
Страница 3: ...x S 22 Aileron to Flap Mix S 23 Differential S 23 Camber Adjust S 24 Camber Mix S 25 Aileron to Rudder Mix S 26 Butterfly Mix Landing Flaps S 27 Flap Rate S 28 Motor Hold S 29 Programmable Curve Mix 1 S 30 Timer S 31 PROG MIX Programmable Mixers S 32 MULTI POINT Programmable Mixers S 36 Monitor S 39 Programming a 6 Channel Sailplane by Engineering Manager John Adams S 40 Step 1 Servo Assignment S 4...
Страница 4: ...just S 61 Step 29 Aileron to Rudder Mix S 62 Setting Up Land Mode S 62 Step 30 Land Pre sets S 63 Step 31 Dual Rate and Exponential S 64 Step 32 Elevator to Flap Mix S 65 Step 33 Aileron to Flap S 65 Step 34 Aileron Differential S 65 Step 35 Flap Rate Camber Mix and Camber Adjust S 66 Camber Mix S 66 Flap Rate S 66 Camber Adjust S 67 Step 36 Aileron to Rudder Mix S 68 Servo Precautions I 1 General...
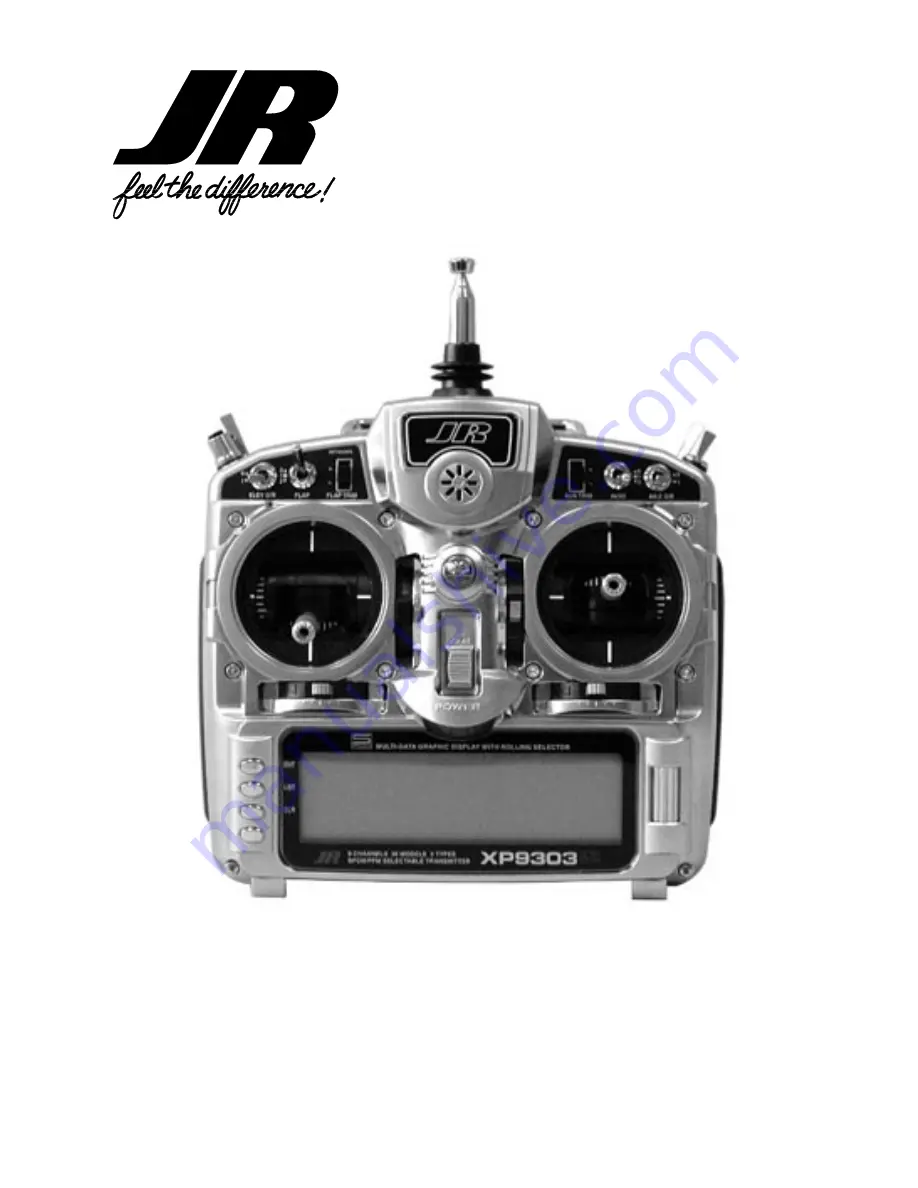
Страница 5: ...ures a comfortable fit in your hands You will also be introduced to our exclusive Rolling Selector on the face of the transmitter for fast and effortless movement through any programming sequence The ultra precision control sticks offer adjustable spring tensions and length The throttle stick offers a ratchet in Airplane Sailplane configuration 30 model memory storage allows programming of all par...
Страница 6: ...proximately 750mw Current Drain 200ma 200ma 200ma Power Source 1 2Vx8 Ni Cd 9 6V 600Mah Output Pulse 1000 2000 1500 neutral Type Airplane Helicopter Sailplane System Name X 9303A basic X 9303H basic X 9303S advanced advanced Transmitter Body NET N339FS NTE N339HS NET N339GS Receiver R770 basic R649 advanced R649 PCM R770 PCM Charger NEC 222 NEC 222 NEC 222 Airborne Battery 1100mah 1100mah 600mah S...
Страница 7: ... 39 for all aircraft frequencies 39 for all aircraft frequencies Type Airplane Helicopter Sailplane Model Number NEC 222 NEC 222 NEC 222 Input Voltage AC 100 120V AC 100 120V AC 100 120V Output Current 65mAh Tx 150mAh Rx Charging Time 15 Hours 15 Hours 15 Hours Airborne Battery Pack Airborne Battery Pack Specifications Type Airplane Helicopter Sailplane Model Number B1100 B1100 Extra 600 Voltage 4...
Страница 8: ... instance You must make sure that the center pin of your JR transmitter is always connected to the negative voltage for correct polarity hookup Important Please note that the charging polarity of the transmitter and receiver are different Charger The pilot lamps should always be on during the charging operation If not check to make sure that both the transmitter and receiver are switched off Do no...
Страница 9: ...vator Dual Rate Flap Trim Lever AUX4 Rudder Dual Rate Aux Trim Aileron Dual Rate AUX2 Mix Switch Lever Elevator Aileron Stick Throttle Rudder Stick Rudder Trim Throttle Trim List Button Enter Button Clear Button Power Switch Aileron Trim Elevator Trim Rolling Selector LCD Display ...
Страница 10: ...XP9303 Transmitter Features Rear G10 Battery Cover CAUTION THE BATTERY CONNECTION IS KEYED SO THAT IT CAN ONLY BE PLUGGED IN ONE DIRECTION DO NOT FORCE ...
Страница 11: ...careful not to cause damage to any components Adjust each screw for desired tension counter clockwise to loosen stick feel clockwise to tighten stick feel When adjusting the throttle ratchet tension make sure that the adjusting screw does not touch the PC board after adjustment is complete ELEVATOR TENSION SCREW AILERON TENSION SCREW THROTTLE TENSION SCREW RUDDER TENSION SCREW ...
Страница 12: ... to match your specific application Please also note that unlike conventional mechanical trim levers when the XP9303 transmitter is in the off position no changes can be made to the trim values during transportation To adjust the stick length use the 2mm Allen wrench supplied with your XP9303 transmitter to unlock the set screw Turn the wrench counterclockwise to loosen the screw Then turn the sti...
Страница 13: ...urely into the switch harness charge cord Why you should use the DSC function 1 The DSC enables you to check the control surfaces of your aircraft without drawing the fully operational 200mAh from your transmitter battery pack Instead you will only draw approximately 70mAh when using the DSC function 2 The DSC function allows you to make final adjustments to your airplane without transmitting any ...
Страница 14: ... use with the XP9303 transmitter It is considerably shorter than the standard antenna However the base loaded antenna cannot be collapsed for storage inside the transmitter You must also use an adapter JRPA156 to attach the antenna to your XP9303 The Base Loaded Antenna JRPA155 is made of a flexible coil and is covered with a soft plastic material Your range will not be affected when using the bas...
Страница 15: ...ightened securely it provides the proper security as well as the proper vibration isolation for your servo 3 The servos must be able to move freely over their entire range of travel Make sure that the control linkages do not bind or impede the movement of any of the servos 4 Mount all switches away from the engine exhaust and away from any high vibration areas Make sure the switch operates freely ...
Страница 16: ...camber and elevator presets transition smoothly A break off delay allows an elevator stick position to be used to override the delay useful during launch when switching from launch to cruise mode for a zoom launch Camber Mix Allows individual up and down flaperon and elevator values for each of the 5 flight modes to be adjusted via the side lever Aileron to Rudder Mix Features separate right and l...
Страница 17: ...follow screens INFO DISP Model SEL MDL Name Type SEL MDL Reset MODULAT TRANSFER TRIM STEP Devic SEL Wing TYPE SYSTEM M TX 10 5v MODEL 1 SPCM Integ 1 29 0 0 0 DISP CONT Select 29 HELI SPCM 30 HELI SPCM MODEL 1 MODEL 1 GLID SPCM 2 ACRO SPCM 3 GLID SPCM Model SEL MODEL 1 GLID ZENITH 56 SPCM MDL Name Type SEL MODEL 1 GLID GLID ACRO HELI Type SEL MODEL 1 GLID LST NO YES MODEL 1 GLID SPCM Are you sure Y...
Страница 18: ...ient for identifying a model or the channel number the model is on The model s name will appear in the upper right corner of the main info screen 1 In the SYSTEM Menu highlight and select MDL Name using the Selector 2 The cursor indicates where the next character will be placed is positioned at the beginning of the model name Press the Selector to obtain a list of available characters 3 Highlight ...
Страница 19: ...elect GLID using the Selector 3 Return to the SYSTEM Menu by pressing the LIST button Model Reset is used to return the program to the factory default settings 1 In the SYSTEM Menu highlight and select MDL Reset using the Selector 2 Press the CLR button that is next to RES on the display 3 Press the lowermost button next to YES on the display to reset all data for this model 4 Return to the SYSTEM...
Страница 20: ... aircraft or the system will not function Note The XP9303 system is not designed for use with Z PCM receivers 1 In the SYSTEM Menu highlight and select MODULAT using the Selector 2 Highlight and select either SPCM or PPM to match the receiver in the aircraft 3 Return to the SYSTEM Menu by pressing the LIST button MODULAT MODEL 1 GLID Modulation SPCM PPM ...
Страница 21: ...lay The TRANSFER function can be found in the SYSTEM Menu and is used to copy the contents of a model memory to another XP9303 transmitter or to a DataSafe device on a Personal Computer PC It is also used to receive data for a model either from another XP9303 transmitter or from a DataSafe unit 3 The model to be transferred must be the currently selected model If the model to be transferred is not...
Страница 22: ...layed highlight and select TRANSMIT changing it to RECEIVE 4 Select the model memory to receive the data by highlighting and selecting the model name memory number and then scrolling to and selecting the model memory that is to receive the data Be careful to select an unused model memory or a memory that contains data for a model no longer needed because the data in this model memory is going to b...
Страница 23: ...nter to each end When set to 4 there are 25 increments When set to 3 there are 34 increments and when set to 1 there are 100 trim increments When set to 0 the trim levers cease to function and can no longer be used to change the trim of the aircraft When adjusting the analog spoiler trim however the total trim travel is actually reduced when set to less than 100 Use a fairly coarse setting such as...
Страница 24: ...each flight mode To assign the flap camber adjustment to one of the two available side levers To assign aux 2 channel to various levers switches or sticks To assign aux 3 channel to various levers switches buttons or sticks To assign aux 4 channel to various levers switches buttons or sticks To activate or inhibit the motor flap aux 2 aux 3 and or aux 4 channels Devic SEL SPEED LAUN INH INH MOTO F...
Страница 25: ...rudder mix is turned off as are landing flaps and elevator to flap mix while camber adjustment of the side lever is programmed to give proportional camber changes to allow for last minute adjustments based on wind and winch conditions Aileron differential is set at 50 All these and many more programming parameters can be selected by simply moving one switch At the top of the launch you prepare to ...
Страница 26: ... selected the launch cruise and land will be activated We recommend starting with the L3P left 3 position switch as this is a convenient place Rotate the Selector until the desired switch is highlighted and press to select AIL D R Aileron dual rate switch ELE D R Elevator dual rate switch RUD D R Rudder dual rate switch AUX4 Auxiliary 4 switch R3P Right 3 position switch L3P Left 3 position switch...
Страница 27: ...d press the Selector to access the available switches that can be programmed to operate the motor Select the desired switch by highlighting it and press the Selector AIL D R Aileron dual rate switch ELE D R Elevator dual rate switch RUD D R Rudder dual rate switch AUX4 SW Auxiliary 4 switch R3P SW Right 3 position switch L3P SW Left 3 position switch BTFL SW Butterfly switch Auxiliary 4 switch TIM...
Страница 28: ...h by highlighting it and press the Selector Activating Inhibiting Channels Channels 6 9 can be inhibited allowing them to be used as slave channels in programmable mix Highlight the desired ACT INH below the appropriate channel Press the Selector to inhibit or activate the channel Devic SEL SPEED LAUN INH INH MOTO FLAP AUX2 AUX3 AUX4 BTFL FLAP SPOI AUX3 AUX4 SW LEV STK LEV SW OUT INH ACT ACT INH A...
Страница 29: ... the Selector to access the wing type screen If your sailplane has a V tail activate the V tail function by highlighting INH and pressing the Selector If your sailplane has dual flaps activate the dual flap function by highlighting INH and pressing the Selector If you choose to have aileron trim to also affect the flaps activate the AILE FLAP trim function WING TYPE V tail INH DUAL FLAP INH AILE F...
Страница 30: ...ristics and response of an aircraft To enter function modes turn on the transmitter then press the ENT button To enter the function list mode press the list mode after the function mode has been selected D R EXP REV SW Sub Trim TRVL ADJ ELE FLP M AIL RUD M DIFFEREN CAMBR ADJ CAMBR MIX AIL RUD M Butterfly FLAP RATE MOTO HOLD Prog Mix1 Prog Mix2 Prog Mix3 Prog Mix4 Prog Mix5 Prog Mix6 Fail Safe Trai...
Страница 31: ...LEV 0 AUX2 0 RUDD 0 AUX3 0 AUX4 0 TRVL ADJ LAIL L 81 R 81 RFLP 100 100 RAIL L 81 R 81 LFLP U100 D106 ELEV D 59 U 50 AUX2 100 100 RUDD L 54 R 56 AUX3 100 100 AUX4 100 100 ELE FLP M 0 U DN UP Offset Pos1 0 0 0 Pos0 0 0 0 AX4 BTF RUD POS1 POS0 FLAP LV Offset 0 CAMBR MIX U FPRN ELEV DN 0 0 0 DN 0 0 0 UP 0 0 0 UP 0 0 0 CRUI SPEE THRM AIL RUD M L Left 40 50 0 Right 40 50 0 CRUISE LAUNCH LAND Butterfly 0...
Страница 32: ... Point 2 Point 3 Point 4 Point 5 Point 6 0 _15 INH 36 INH INH 44 SPOI ELEV SW SELECT EXP OFF IN 1 OUT 0 0 1 2 3 4 5 6 PROG Mix3 0 FPRN FPRN Pos0 0 0 Pos0 0 0 Offset 0 CRU LAU LND AX4 BTF RUD POS1 POS0 TIMER MODEL 1 INTEG T 1 12 TIMER 1 DOWN T TIME SW 10 00 TIMER 2 STOP W TIM KEY MONITOR MONI LAIL RAIL ELEV RUDD MOTO FLAP AUX2 AUX3 AUX4 ...
Страница 33: ...ain the D R EXP display If Flight Modes were activated earlier in the Devic SEL function and D R was set to FM in the same function there will be 3 sets of values displayed for each channel Aileron Elevator and Rudder 2 Use the Selector to change between Aileron Elevator and Rudder Then use it to set dual rate and exponential values D R EXP 100 35 100 35 100 LIN 100 LIN 100 LIN 100 LIN D R EXP 0 F...
Страница 34: ...lected 1 Highlight and select REV SW in the FUNC LIST to obtain the servo reversing display 2 Use the Selector to highlight and select those channels that need to be reversed Pressing the Selector toggles the channel between Normal and Reverse REV SW THR AIL ELE RUD GER FLP AX2 AX3 AX4 REV NORM ...
Страница 35: ...pically have a large travel down 80 to 90 degrees but very little travel up less than 15 degrees To achieve proper flap travel it is necessary that the right flap sub trim be set at 225 down and the left flap sub trim be set at 225 up as a starting point Then when attaching the flap servo arms be sure the spoiler stick is in the up position and camber lever is in the middle position Install the fl...
Страница 36: ... to obtain the Travel Adjust display 2 Use the Selector to highlight and select each channel and adjust the travel in each direction by rotating the Selector The direction of travel is changed by moving the stick switch lever back and forth TRVL ADJ LAIL L 81 R 81 RFLP 100 100 RAIL L 81 R 81 LFLP U100 D106 ELEV D 59 U 50 AUX2 100 100 RUDD L 54 R 56 AUX3 100 100 AUX4 100 100 ...
Страница 37: ...st rotate the Selector until ELE FLP M is highlighted Press the Selector to access the Elevator to Flap mix menu Note that two elevator to flap mix values are available Pos0 and Pos1 and the elevator to flap values can be independently adjusted up and down Also the offset the stick position where the mixing changes from up to down can be adjusted This offset allows the programming of snap flaps a ...
Страница 38: ...al typically more up aileron travel than down is utilized to reduce adverse yaw and to improve the turning handling characteristics Aileron and flap differentials can be adjusted for each of the 5 flight modes To access Differential in FUNC LIST rotate the Selector until DIFFEREN is highlighted Press the Selector to access the Aileron differential menu Rotate the Selector to highlight the desired ...
Страница 39: ...light modes must be programmed in device select and each must have different trim presets See Device Select Pg S9 and Servo Monitor pg S39 for more details To access camber adjust in FUNC LIST rotate the Selector until CAMBR ADJ is highlighted Press the Selector to access the Camber Adjust menu Rotate the Selector to highlight the launch delay value and then press the Selector to access this value...
Страница 40: ... or reflex trailing edge up in each flight mode using the side lever Some pilots prefer the neutral position to be in the lever up position Offset 170 To access camber mix in FUNC LIST rotate the Selector until CAMBR MIX is highlighted Press the Selector to access the Camber Mix menu Rotate the Selector to highlight the desired value then press the Selector to access this value With the flight mod...
Страница 41: ...lector until AIL RUD M is highlighted Press the Selector to access the aileron to rudder mix menu Rotate the Selector to highlight the desired value corresponding to the flight mode and desired direction and then press the Selector to access that value With the flight mode switch in the corresponding mode give an aileron command and rotate the Selector to achieve the desired rudder value Pressing ...
Страница 42: ...f you choose to locate the neutral position in the down position the value would be 170 Rotate the Selector to highlight SW select and press the Selector to access the available switches The default setting is the BTF or butterfly switch To access the various values rotate the Selector to highlight them then depress the Selector to access the value Move the spoiler stick to the full down position ...
Страница 43: ...proceeding to the camber mix menu as the camber mix values are based on a percentage of the flap values To access Flap Rate in FUNC LIST rotate the Selector until FLAP RATE is highlighted Press the Selector to access the Flap Rate menu Rotate the Selector to highlight the desired value then press the Selector to access this value With the flight mode switch in the corresponding launch mode move th...
Страница 44: ...conjunction with a programmable mix by mixing motor to an AUX channel When the motor hold mix is on the throttle hold program holds the throttle in the desired position usually motor off To access Motor Hold in FUNC LIST rotate the Selector until MOTO HOLD is highlighted Press the Selector to access the Motor Hold menu Rotate the Selector to highlight desired flight mode or switch and then press t...