background image


Service of driving parts 

(cont.)  

Wartung Antriebsteile 

(Vorts.) 

(Forts.)

 Underhåll av drivande delar


(cont.) 

Entretien des pièces motrices


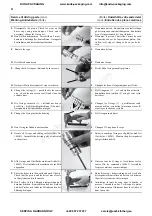
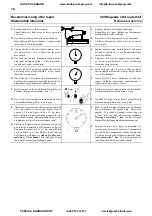
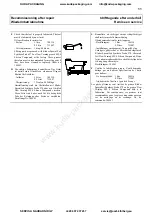
Disassemble the piston. Check for wear on the 
driver edge and piston bumper. Check, and if 
necessary, change the O-ring set. 

Den Kolben demontieren. Verschleiß an Treiber-
kante und Kolbenpuffer kontrollieren. O-ringsatz 
kontrollieren und bei Bedarf austauschen.


S

  Demontera kolven. Kontrollera eventuellt slitage 

på drivarspetsen samt kolvdämparen. Kontrollera 
även O-ringsatsen och byt den vid behov. 

F

  Démontez le piston. Controllez l’usure du bord 

du lame de coup et de l’amortisseur piston. Con-
trollez les O-rings et changez les en cas de be-
soin.


E

  Remove the cage. 


D

  Die Hülse demontieren.


Demontera hylsan. 


F

  Démontez la cage.


E

  Change both O-rings as indicated by the arrows. 


Beide mit Pfeile bezeichnete O-ringe wechseln.


Byt de båda O-ringarna enligt pilarna. 


Changez les deux O-rings indiqués par flèche.


Change the O-rings (1) – possible only the centre 
one – check the non-return seal (2) and clean the 
cylinder liner. 


Die O-ringe wechseln (1) – vielleicht nur den in 
der Mitte – die Rückschlagsdichtung (2) kontrol-
lieren und die Zylinderbüchse reinigen.


Byt O-ringarna (1) – evt. endast den mittersta – 
kontrollera backventilen (2) och gör rent cylin-
derfodret 


Changez les O-rings (1) – possiblement seule-
ment au milieu – controllez le joint non-retour (2) 
et nettoyez la chemise cylindre.


Change the O-ring inside the housing. 


Den O-ring im Gehäuse austauschen.


Byt O-ringen inuti huset. 


Changez l’O-ring dans le corps.


Grease all O-rings and sliding surfaces (Part Nr. 
184943). Assemble the driving parts as indicated 
in the picture. 


Alle O-ringe und Gleitfläche einfetten (Artikel Nr 
184943). Die Antriebsteile montieren wie im Bild 
angegeben.


Smörj in samtliga O-ringar och glidytor med fett 
(Artikel nr. 184943). Montera ihop drivarpaketet 
enligt vidstående bild. 


Graissez tous les O-rings et les surfaces coulis-
santes (No. de commande 184943). Assemblez 
les pièces motrices comme indiqué.


Enter the driver into the nozzle and push it down. 
Check that the piston and the driver move freely 
in the cylinder and in the nozzle. 

D

  Den Treiber in die Führung hineinstecken und 

herunter drücken. Kontrollieren daß der Kolben 
und der Treiber sich leicht im Zylinder und in der 
Führung bewegen.


Entra drivaren i drivarstyrningen och tryck ned 
drivarpaketet. Kontrollera att kolven och drivaren 
löper lätt i cylindern och styrningen. 

Introduisez la lame de coup dans la bouche et 
pressez  l’ensemble en bas. Vérifiez que le piston 
et la lame mouvent librement dans le cylindre et 
dans la bouche.


1  2 

KUDA PACKAGING

www.kuda-packaging.com
[email protected]

SERVIS A NAHRADNÍ DÍLY

+420 607 237 237

[email protected]

www.kuda-packaging.com
Содержание JK24-690

Страница 1: ...que JK24 690 118837 May 2001 Repair Instructions E Underhållsinstruktion S Reparaturanweisungen D Instruction d entretien F KUDA PACKAGING www kuda packaging com info kuda packaging com SERVIS A NAHRADNÍ DÍLY 420 607 237 237 servis josef kihlberg eu w w w k u d a p a c k a g i n g c o m ...

Страница 2: ...rsonne servant l outil toute personne travaillant avec l outil soit au courant de et obéissante à cette instruction et d autres instruc tions d usage et sécurité les instructions de sécurité prévues par les comités de sécurité et par les instances officielles soient respectées When studying these Repair Instructions consult also the tool s other technical documentation Vid studie av denna Underhål...

Страница 3: ... operatören och andra personer på arbetsplatsen bära ögonskydd Vid behov bör också hörselskydd och eventuell annan personlig skyddsutrustning användas F Faites attention à ce que les personnes se trouvant à proximité de l outil et ceux qui s en servent portent des lunettes de sécurité et toute autre protection nécessaire E Never use a defective tool Make sure that the trigger operates properly and...

Страница 4: ...gen är rätt dimensionerad för att undvika felaktig funktion på grund av för stort tryckfall min 6 mm En installationsinstruktion kan erhållas från tillverkaren Verktyget och slangen skall vara försedda med en anslutningsnippel som automatiskt avluftar verktyget när det kopplas bort F Raccordez l outil invariablement à l air comprimé avant de charger le magasin Pression d air maximum 7 bar Utilisez...

Страница 5: ...rning och om och var läckage förekommer F Analyse de malfunction et détermination si et ou l outil a des fuites E Remove the four screws holding the top cap D Die vier Schrauben des Deckels entfernen S Demontera de fyra skruvarna till locket F Eloignez les quatre vis du couvercle E Remove the cylinder liner cover D Den Zylinderbüchse Deckel entfernen S Lyft ur locket för cylinderfodret F Eloignez ...

Страница 6: ...hangez les O rings 1 possiblement seule ment au milieu controllez le joint non retour 2 et nettoyez la chemise cylindre E Change the O ring inside the housing D Den O ring im Gehäuse austauschen S Byt O ringen inuti huset F Changez l O ring dans le corps E Grease all O rings and sliding surfaces Part Nr 184943 Assemble the driving parts as indicated in the picture D Alle O ringe und Gleitfläche ei...

Страница 7: ...ör cylinderfodret F Montez le couvercle chemise de cylindre E Mount the top cap and tighten the four screws D Den Deckel montieren und die vier Schrauben anziehen S Montera locket och dra åt de fyra skruvarna F Montez le couvercle et serrez les quatre vis KUDA PACKAGING www kuda packaging com info kuda packaging com SERVIS A NAHRADNÍ DÍLY 420 607 237 237 servis josef kihlberg eu w w w k u d a p a ...

Страница 8: ...es Abzuges vorsichtig mit einem 1 8 mm Dorn herausklopfen S Knacka försiktigt bort spännstiftet till avtryckaren med ett 1 8 mm dorn F Frappez la goupille détente prudement avec un mandrin de 1 8 mm pour l éloigner E Loosen the valve with a 10 mm spanner D Das ventil mit einem 10 mm Schlüßel lösen S Lossa ventilen med en 10 mm nyckel F Dévissez la valve avec une clef 10 mm E Remove the entire valv...

Страница 9: ...alve package D Das Ventilpaket hereinführen S Entra ventilpaketet F Faites entrer l ensemble valve E Tighten the nut with a 10 mm spanner and put the trigger back in place D Die Mutter mit einem 10 mm Schlüßel festziehen and den Abzug wieder montieren S Drag åt muttern med en 10 mm nyckel och åter montera avtryckaren F Serrez l écrous avec une clef 10 mm et remontez le détente E In view of further...

Страница 10: ...e två gummi fjädrarna F Si la porte s ouvre trop facilement éloignez la goupille 1 enlevez le piston cliquet et remplacez les deux ressorts cliquet E Assemble the door and the front nozzle plate on the rear nozzle plate D Die Tür und die Vorderplatte auf der hinteren Führungsplatte zusammenbauen S Montera dörren och den främre drivarstyrningen på den bakre drivarstyrningen F Assemblez la porte et ...

Страница 11: ...rrez l écrou Tirez le ressort sous le siège d avant E Connect the pusher to the spring D Den Schieber an die Feder montieren S Montera frammataren till fjädern F Raccordez le poussoir et le ressort E Mount the lid from the front push the lock plunger in as indicated when the lid has to pass D Den Deckel von vorne montieren den Verriege lungskolben eindrücken wie gezeigt wenn der Deckel vorbei gehe...

Страница 12: ...e puis à haute vitesse E Install the tool on the work site and check that its hose has the proper dimension min D Das Gerät am Arbeitsplatz installieren und die Schlauchdimension prüfen min 6 mm S Anslut verktyget på arbetsplatsen och kontrollera att luftslangen har rätt dimension 6 mm F Installez l outil au lieu de travail et contrôlez la dimension propre du tuyau min 6 mm E Adjust the air pressu...

Страница 13: ...rsatz zu empfehlen Bestellungs Nr 184943 S Kontrollera att verktyget smörjs riktigtVerktyget skall smörjas medelst dimsmörjning Oljerekommendation för smörjapparat Beställningsnr 1 liter 184314 0 2 liter 733007 Inställning av smörjapparat 1 droppe 40 slag Verktygets glidytor har av tillverkaren belagts med Kluber Spezialfett Synthese Proba 270 eller med fett Dow Corning MS 4 Silicon Compound Dessa...

Страница 14: ...1 CZ JK Servisní linka 420 607 237 237 w w w k u d a p a c k a g i n g c o m ...

Страница 15: ...ítomní v prostoru sponkování hřebíkování nebo páskování musí nosit ochranné brýle Sešívačky obsahují mechanismus pro sevření spony Tento mechanismus může rozdrtit části těla např prsty Páskovačky mohou sevřít a rozdrtit části těla mezi pásku a produkt při utahování ZÁKAZ NEBEZPEČÍ ZAKOPNUTÍ Je zakázáno nechávat nářadí bez dozoru Pokud zařízení nepracuje nenechávejte je nabité sponami či hřebíky Je...

Страница 16: ...t používáno pod dohledem zodpovědné a obeznámené osoby Operátor a pracovník údržby obdrží pokyny odpovídající vybavení a přiměřený čas pro pravidelnou každodenní inspekci čištění a údržbu zařízení Nikdy nepoužívejte k pohonu nářadí kyslík hořlavé plyny CO2 páru nebo vysokotlaké nádoby protože mohou způsobit výbuch a vážná zranění Používejte pouze stlačený atmosférický vzduch který je čistý suchý a...

Страница 17: ...řebíku a nadměrně zabraňovat průniku materiálem Nesponkujte tvrdé a křehké materiály Nářadí připevňuje materiály k podkladu pomocí ocelové nerezové spony U tvaru nebo hřebíkem který je zatlačen pneumatickým mechanismem nářadí vysokou rychlostí skrz materiál Pokud nebudete používat nářadí dle návodu a pro předepsanou aplikaci hrozí vám Nebezpečí propíchnutí končetiny trupu hlavy atp Nebezpečí poško...

Страница 18: ...237 237 info kuda packaging com www kuda packaging com DOPRAVU ZAŘÍZENÍ NA SERVIS ZAJISTÍ ODBĚRATEL DODAVATEL OPRAVA VE VÝROBĚ Objednáváme servis dle tabulky Typ zařízení Sériové číslo V záruce Ano Ne Popis poruchy V Podpis Pozn Objednávku odešlete na adresu dodavatele poštou nebo emailem a kopii přiložte k zařízení w w w k u d a p a c k a g i n g c o m ...

Страница 19: ...33441 420 607 237 237 info kuda packaging com www kuda packaging com DOPRAVU SPONA ZAJISTÍ ODBĚRATEL DODAVATEL Objednáváme spony dle tabulky Objednací číslo Typ délka nohy Počet v tisících Poznámka V Podpis Pozn Objednávku odešlete na adresu dodavatele poštou nebo emailem a kopii přiložte k zařízení w w w k u d a p a c k a g i n g c o m ...

Страница 20: ...441 420 607 237 237 info kuda packaging com www kuda packaging com DOPRAVU ND ZAJISTÍ ODBĚRATEL DODAVATEL Objednáváme náhradní díly dle tabulky V Podpis Pozn Objednávku odešlete na adresu dodavatele poštou nebo emailem a kopii přiložte k zařízení Typ zařízení Sériové číslo Obj Číslo dílu Pozice v náčrtu Počet Ks w w w k u d a p a c k a g i n g c o m ...

Страница 21: ...Í SPONY KOMPLETNÍ ZÁKAZNICKÁ PODPORA KUDA PACKAGING sponkovací systémy JOSEF KIHLBERG AB Lidická 308 Dobřany 33441 Česká Republika INFOLINKA 420 607 237 237 WWW www josef kihlberg eu Email info josef kihlberg eu NÁKUP ON LINE www sesivacky cz www zosivacky sk w w w k u d a p a c k a g i n g c o m ...

Отзывы: