background image

12 – 

English

STARTING AND STOPPING

Check before starting

Inspect the working area. Remove any objects that could 
be thrown out.

Check the cutting attachment. Never use blades that are 
dull, cracked or damaged.

Check that the machine is in perfect working order. Check 
that all nuts and screws are tight.

Make sure the gear housing is lubricated correctly. See 
instructions under the heading Gear housing.

Check that the cutting attachment always stops when the 
engine is idling.

Only use the machine for the purpose it was intended for.

Make sure that the handle and safety features are in good 
working order. Never use a machine that lacks a part or 
has been modified outside its specifications.

All covers must be correctly fitted and undamaged before 
you start the machine.

Starting and stopping

Cold engine

Primer bulb:

 Press the air purge repeatedly until fuel begins 

to fill the bulb. The bulb need not be completely filled.

Choke:

 Set the choke control in the choke position.

Warm engine

Primer bulb:

 Press the air purge repeatedly until fuel begins 

to fill the bulb. The bulb need not be completely filled.

Starting

Hold the body of the machine on the ground using your left 
hand (CAUTION! Not with your foot!). Grip the starter handle, 
slowly pull out the cord with your right hand until you feel 
some resistance (the starter pawls grip), now quickly and 
powerfully pull the cord. 

Never wrap the starter cord around 

your hand

Push the choke control back to its original position as soon as 
the engine fires, and continue trying to start until the engine 
starts. 

CAUTION! 

 Do not pull the starter cord all the way out and do 

not let go of the starter handle when the cord is fully extended. 
This can damage the machine.

Stopping

The engine is switched off by moving the stop switch to the 
stop position.

!

WARNING! The complete clutch cover and 
gear housing must be fitted before the 
machine is started, otherwise the clutch may 
come loose and cause personal injury.

Always move the machine about 3 metres 
from the refuelling position before starting. 
Place the machine on a firm surface. 
Remember that the blades may start to move 
when the engine is started. Make sure the 
blades cannot come into contact with any 
object. Make sure that no unauthorised 
persons are in the working area, otherwise 
there is a risk of serious personal injury. The 
safety distance is 15 metres.

Содержание HT 2124

Страница 1: ...Operator s manual EPA Please read the operator s manual carefully and make sure you understand the instructions before using the machine ...

Страница 2: ...rstand the instructions before using the machine Always wear Approved hearing protection Approved eye protection Always wear approved protective gloves Wear sturdy non slip boots or shoes Other symbols decals on the machine refer to special certification requirements for certain markets Switch off the engine by moving the stop switch to the STOP position before carrying out any checks or maintenan...

Страница 3: ...STOPPING Check before starting 12 Starting and stopping 12 WORKING TECHNIQUES General working instructions 13 MAINTENANCE Carburetor 15 Muffler 15 Cooling system 16 Spark plug 16 Air filter 16 Gear housing 17 Cleaning and lubrication 17 Maintenance schedule 18 TECHNICAL DATA Technical data 19 FEDERAL EMISSION CONTROL WARRANTY STATEMENT YOUR WARRANTY RIGHTS AND OBLIGATIONS 20 WARNING Long term expo...

Страница 4: ... and that it will be your companion for a long time Think of this operator s manual as a valuable document By following its content using service maintenance etc the life span and the second hand value of the machine can be extended If you ever lend or sell this machine make sure that the borrower or buyer gets the operator s manual so they will also know how to properly maintain and use it Good l...

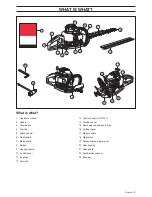
Страница 5: ...cap 5 Choke control 6 Front handle 7 Blade guard 8 Blades 9 Transport guard 10 Air filter cover 11 Air purge 12 Fuel tank 13 Lock for handle HT2124T 14 Throttle control 15 Spark plug cap and spark plug 16 Cylinder cover 17 Starter handle 18 Stop switch 19 Grease filler cap bevel gear 20 Gear housing 21 Hand guard 22 Combination spanner 23 Allen key ...

Страница 6: ...ry out the checks maintenance and service instructions described in this manual Some maintenance and service measures must be carried out by trained and qualified specialists See instructions under the heading Maintenance All covers and guards must be fitted before starting Ensure that the spark plug cap and ignition lead are undamaged to avoid the risk of electric shock WARNING The ignition syste...

Страница 7: ...d throttle lockout move freely and that the return springs work properly See instructions under the heading Start Start the hedge trimmer and apply full throttle Release the throttle trigger and check that the blades stop and remain stationary If the blades move when the throttle trigger is in the idle position then the carburettor idle setting must be adjusted See instructions under the heading M...

Страница 8: ...ng and servicing your machine Never use a machine that has a faulty muffler Regularly check that the muffler is securely attached to the machine If the muffler on your machine is fitted with a spark arrestor screen this must be cleaned regularly A blocked screen will cause the engine to overheat and may lead to serious damage WARNING Overexposure to vibration can lead to circulatory damage or nerv...

Страница 9: ...screw heads to slide sideways When the blades are correctly adjusted the play between the blades should be 0 2 0 4 mm measured at the screws The edges of the blades are too hard to be filed Dull blades should be sharpened using a grinder Replace the blades if they are bent or damaged Blade guard The blade guard A is intended to protect against any part of the body coming into contact with the blad...

Страница 10: ...cies can drastically affect the ratio of the mixture Gasoline CAUTION Always use a quality gasoline oil mixture with an octane rating of at least 87 octane RON MON 2 If your machine is equipped with a catalytic converter see chapter on Technical data always use a good quality unleaded gasoline oil mixture Leaded gasoline will destroy the catalytic converter Use low emission gasoline also known as ...

Страница 11: ...nk can cause operating problems Ensure that the fuel is well mixed by shaking the container before filling the tank WARNING The catalytic converter muffler gets very hot during and after use This also applies during idling Be aware of the fire hazard especially when working near flammable substances and or vapours WARNING Taking the following precautions will lessen the risk of fire Do not smoke o...

Страница 12: ...d not be completely filled Starting Hold the body of the machine on the ground using your left hand CAUTION Not with your foot Grip the starter handle slowly pull out the cord with your right hand until you feel some resistance the starter pawls grip now quickly and powerfully pull the cord Never wrap the starter cord around your hand Push the choke control back to its original position as soon as...

Страница 13: ...branches that can be thrown out during cutting Do not cut too close to the ground Stones and other objects can be thrown out Check the working area for foreign objects such as electricity cables insects and animals etc or other objects that could damage the cutting attachment such as metal items If any foreign object is hit or if vibrations occur stop the machine immediately Disconnect the HT lead...

Страница 14: ... Basic working techniques Work with a swinging action from the bottom upwards when trimming sides Adjust the throttle setting to suit the load When trimming a hedge the engine should always face away from the hedge Hold the machine as close to your body as possible to get the best balance Make sure that the tip does not touch the ground Do not rush the work but work steadily until all the branches...

Страница 15: ...s in the start throttle position Muffler CAUTION Some mufflers are fitted with a catalytic converter See chapter on Technical data to see whether your machine is fitted with a catalytic converter The muffler is designed to reduce the noise level and to direct the exhaust gases away from the operator The exhaust gases are hot and can contain sparks which may cause fire if directed against dry and c...

Страница 16: ...on cylinder Check that the spark plug is fitted with a suppressor Air filter The air filter must be regularly cleaned to remove dust and dirt in order to avoid Carburettor malfunctions Starting problems Loss of engine power Unnecessary wear to engine parts Excessive fuel consumption Clean the filter every 25 hours or more regularly if conditions are exceptionally dusty Cleaning the air filter Remo...

Страница 17: ...ls and lead to leakage of grease The grease in the bevel gear does not normally need to be changed except if repairs are carried out Cleaning and lubrication Clean any resin and plant residue from the blades using cleaning agent before and after using the machine Lubricate the blade bars with special grease before long periods of storage IMPORTANT Use only JONSERED replacement parts Use of other b...

Страница 18: ...e no fuel leaks from the engine tank or fuel lines X Check the starter and starter cord X Check that the vibration damping elements are not damaged X Clean the outside of the spark plug Remove it and check the electrode gap Adjust the gap to 0 5 mm 20 or replace the spark plug Check that the spark plug is fitted with a suppressor X Clean the machines cooling system X Clean or replace the spark arr...

Страница 19: ... muffler No No Speed regulated ignition system No No Ignition system Manufacturer type of ignition system Ikeda Ikeda Spark plug NGK BPMR 6Y NGK BPMR 6Y Electrode gap inch mm 0 03 0 7 0 03 0 7 Fuel and lubrication system Manufacturer type of carburetor Walbro Walbro Fuel tank capacity US pint litre 1 06 0 5 1 06 0 5 Weight Weight without fuel Lbs kg 11 2 5 1 11 4 5 2 Sound levels see note 1 Equiva...

Страница 20: ...each subsequent purchaser that the engine is free from defects in materials and workmanship which cause the failure of a warranted part for a period of two years WHAT IS COVERED REPAIR OR REPLACEMENT OF PARTS Repair or replacement of any warranted part will be performed at no charge to the owner at an approved Jonsered servicing dealer If you have any questions regarding your warranty rights and r...

Страница 21: ......

Страница 22: ... z RAo 5c z RAo 5c ...

Страница 23: ......

Страница 24: ... z RAo 5c 2007 01 30 z RAo 5c 1150337 95 ...

Отзывы: