background image

DP350 User's Manual


- 1 - 

Chapter 1 Preparation 


1.1 Unpacking and Checking 

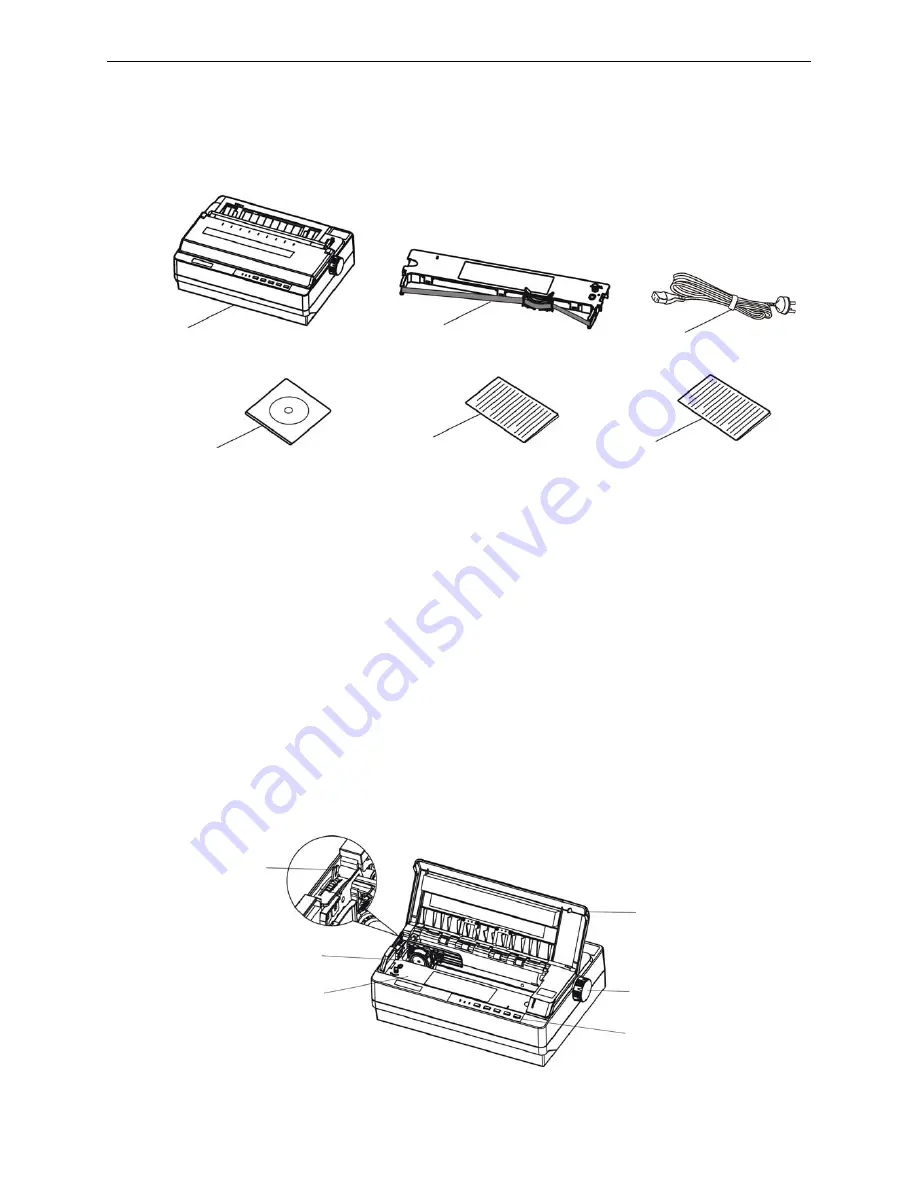
Check the following items in the packing box, if any of these items are missing, please contact your 
dealer. 


Caution: The fittings please refer the packing list. The packing style above is subject to change 

without notice. 


1.2 Dismantling the Protective Materials


1. Open the packing box, lift up the printer

2. Save all the original packing materials, so that it can be used when transport the printer. 
 

1.3 Main Parts of the Printer


Figure1-2 and figure1-3 shown are main parts of DP350. 


Figure1-2 main parts of the printer (front view) 

Paper feed knob


Ribbon cartridge


Print head


Printer upper cover

Control panel


Gap adjust lever 

A: Printer 

B: Ribbon cartridge JMR120


C: Power cord   

D: Driver CD (Including 

user's manual

 and driver)


E: Packing list 

F: Facility user’s guide 

Figure1-1 Unpacking list


A


F


C


B

D


E


Содержание DP350

Страница 1: ...User s Manual DP350 Dot Matrix Printer...

Страница 2: ...get a new one replaced Make sure the old one is far away from the printer so it can avoid someone who does not know the inside story getting damage 11 Do not use in locations subject to high humidity...

Страница 3: ...alling position through LOAD EJECT key on the control panel pull the paper select lever to the cut sheet position Insert the cut sheet from front to print If you want to use tractor paper again pull t...

Страница 4: ...7 1 10 Network Settings 9 1 10 1 Connecting Printer 9 1 10 2 Setting IP Address 10 1 10 3 Installing Printer Network Driver 12 Chapter 2 Control Panel Operations 20 2 1 Control Panel label 20 2 2 LED...

Страница 5: ...Restore the Default Settings 34 Chapter 4 Troubleshooting 35 4 1 Power Supply 35 4 2 Printing Problem 35 4 3 Paper Handling 37 4 4 Alignment Adjust Mode 38 Chapter 5 Printer maintenance 39 Appendix A...

Страница 6: ...Open the packing box lift up the printer 2 Save all the original packing materials so that it can be used when transport the printer 1 3 Main Parts of the Printer Figure1 2 and figure1 3 shown are mai...

Страница 7: ...n interruption in power can wipe out the information in your computer or printer memory If you place the printer on a stand follow these guidelines 1 Use a stand that supports at least 9 kg 19 lb 2 Ne...

Страница 8: ...ck into place shown as figure 1 6 7 Turn the ribbon tighten knob in the direction of the arrow to remove any slack from the ribbon so it is easier to install 8 Slide the print head from side to side s...

Страница 9: ...round properly 1 7 Printer Self test Function The built in self test function demonstrates that the printer is working properly You can run the test with either tractor paper or cut sheets this sectio...

Страница 10: ...4 If it prints correctly go on to the next section 1 8 Connecting the Printer to Your Computer The printer configures with a parallel interface two USB interfaces a serial interface or an Ethernet in...

Страница 11: ...he connector Shown as figure 1 13 2 Plug the other end of the cable into the computer s parallel interface and make sure it is connected fast 1 8 2 Connecting to the USB Interface 1 Plug the USB cable...

Страница 12: ...ive CD into the CD ROM Install driver by the following way Auto install way Double click the file Setup exe in the driver disc install driver by the following direct Note Auto install just run in the...

Страница 13: ...come out a window of Found New Hardware Wizard choose Install from a list or specific location Advanced click Next 3 Come out a window of Add New Hardware Wizard Windows operation choose Don t search...

Страница 14: ...ter USB driver process is installed successfully The installing steps of USB printer driver 1 Click Start Settings Printers 2 Click Add Printer then it will show a window of Add Printer Wizard click N...

Страница 15: ...arching automatically and show appearance listing a printer in the main interface if found The time is counting down in the progress bar 10s in total and the search will finish as soon as the time is...

Страница 16: ...d MAC address What s more the assign mode dynamic static is noted behind the IP address 1 Correlative description for IP address settings In order to search and set printer s IP address conveniently f...

Страница 17: ...e network fill 255 255 255 255 in the Default gateway IP address and Subnet Mask should obey the assigning rules of local LAN Ethernet please enquire the administrator of networks which the printer co...

Страница 18: ...lect direct carefully Such as select local or Network Printer then click next 4 Come out a window of Select the Printer port select a port you want your printer to use For example select Create a new...

Страница 19: ...Additional Port Information Required select Custom in the Device Type and then click Settings 8 Come out a window of Port Settings Affirm that Port name and Printer name or IP address are correct Pro...

Страница 20: ...WIN2000 XP Vista Win7 that you can find a file named DP350 inf click open then click OK then return to the window install printer software click next 13 Follow the direct click next gradually till th...

Страница 21: ...of Add Standard TCP IP Printer Port Wizard click Next 6 Come out a window of Add a port import the IP address reported by the Setting printer s IP address in the Printer name or IP address column Take...

Страница 22: ...ipment style then click setting Come out a window of Additional Port Information Required select Custom in the Device Type then click settings 8 Come out a window of Port Settings Affirm that Port nam...

Страница 23: ...ext 10 Come out a window of Completing the Add Standard TCP IP Printer Port Wizard click Finish 11 Return to Printer Ports click Close 12 Return to Properties make sure the network port is selected cl...

Страница 24: ...DP350 User s Manual 19...

Страница 25: ...er will feed the paper one line Alternatively hold the LF FF button down the printer will feed one page of tractor paper or eject the cut sheet paper TEAR In the tractor paper mode in standby or offli...

Страница 26: ...s at the tear position in the offline mode press ONLINE button the printer will go back to the printing home position of current page or the next page 2 4 2 In the Cut Sheet Mode LF FF If the paper is...

Страница 27: ...from 18 60 inch to 60 60 inch base on default position set by the factory The adjusted range of tear position is from 15 60 inch to 15 60 inch base on default position set by the factory 2 4 5 Feed Pa...

Страница 28: ...it s better not to use it 2 7 The Gap Adjust Lever The gap adjust lever lets you specify the correct setting for your printing material It is factory set for standard office paper POSITION PAPER TYPE...

Страница 29: ...thicker than the general paper it needs the bigger print force printing past or at the edge of these papers can damage the print head Please make sure the printing contents are all within the printabl...

Страница 30: ...sition according to the steps of micro adjust function if necessary Note Don t feed the paper with paper feed knob or it will influence the paper not feeding properly 3 1 2 Loading Tractor Papers If t...

Страница 31: ...o the right of the position marked Push the right handle of the tractor back to lock it in place Then slide the left paper guide to match the width of your paper but do not lock it Move the paper supp...

Страница 32: ...or paper to the edge of the printer cover so that you can tear off easily Note Set the auto tear off function on in the Printer Setting Mode Otherwise the printer does not feed the perforation to the...

Страница 33: ...asily peel off the backing and jam the printer If a label does become stuck in the printer contact your dealer 3 1 5 Envelopes The method of loading envelopes is basically the same with the cut sheet...

Страница 34: ...Out indicator blink it can be indicated that there is paper out 2 Set the paper select lever to the proper position If in cut sheet mode the paper select lever should in the cut sheet position otherw...

Страница 35: ...TIN AM KOREA LEGAL HOLAND TURKEY CHARACTER SET ITALICS CODE PAGE MULTL PORTUGAL GANADA NORWAY EAST EURO CYRILLIC RUSSIAN HUNGARY KAMENICKY TURKEY ICELAND BULGARIA MAZOVIA GRK 437 GRK 851 GRK8859 7 GRK...

Страница 36: ...in FILLED ONLINE Return to upper menu Hold on pressing ONLINE key will return to main menu directly TEAR Save and exit the setup menu system 3 Give up the settings just modified just turn off the pri...

Страница 37: ...u can also click Set All Items after setting all parameters After clicking Set All Item or Set Item the parameter s instruction will be sent to the printer 8 The printer s parameter settings are chang...

Страница 38: ...default item is auto the printer prints characters bidirectionally while prints graphics unidirectionally The print direction command is effect If auto is set the command controlling the print directi...

Страница 39: ...are the same with those of the computer 26 PIN TEST Select broken pin mode The default setting is every root and printed needle is live When the printer is printing if user finds out broken pin pleas...

Страница 40: ...outlet 2 If the electrical outlet is controlled by an outside switch or automatic timer use another outlet 3 Plug another electrical device such as a lamp into the outlet to determine whether the out...

Страница 41: ...cters or graphics Phenomenon 1 A line of dots is missing in the printout Solutions The print head may be damaged Stop printing and contact your dealer or a specified Jolimark service center to have th...

Страница 42: ...cations in the Appendix z Tractor paper does not feed properly Phenomenon 1 The tractor does not feed the paper Solutions 1 Check that the paper select lever is pulled forward to the tractor paper pos...

Страница 43: ...then adjust the alignment following the steps below 1 Turn on the printer make sure the printer is paper in then turn off the printer 2 In the online mode press and hold on the LOAD EJECT key and TEAR...

Страница 44: ...cloth first and then add proper lube NYE180 lube of NYE Company is recommended move print head back and forth to make lube scattered Cleaning the form feed path Wipe off wastepaper clean dirt and dus...

Страница 45: ...253 ARAB NLS ARAB EXT WIN LAT1 WIN LAT2 ISL LTN1 ISO LTN2 TUR8859 9 ISO LTN9 KBL LATIN 7 ASCII Draft Roman Sans Serif Courier Prestige Script OCR B OCR A Orator Fonts set Chinese GB18030 Song Ti Bar c...

Страница 46: ...haracter compress printing Special function Automatic Pin Break Compensation Automatic Pin Rotation Replacement Automatic Emulation Match Online Parameter Setting Physical dimensions 384 width 280 dep...

Страница 47: ...ollowing characteristics Baudrate bps 1200 bps 2400 bps 4800 bps 9600 bps 19200 bps selectable Word length 7 or 8 bit selectable Start bit 1 bit Parity bit Odd even or none selectable Stop bit 1 bit H...

Страница 48: ...rgin is 3 0 mm However the maximum printable width is 203 2 mm 8 0 inches C The minimum bottom margin 9 0 mm 0 35 inch Pin No Signal Direction Description 1 Frame Ground FG Printer s chassis ground 2...

Страница 49: ...ser s Manual 44 Tractor paper A The minimum top and bottom margin above and below the perforation are 8 0mm B The minimum left and right margins are 13 0 mm The maximum printable width is 203 2 mm 8 0...

Страница 50: ...Set Absolute Horizontal print position 18 ESC Set Relative Horizontal print position 19 ESC U Define Unit 20 ESC V Set Absolute Vertical Print Position 21 ESC v Set Relative Vertical Print Position 2...

Страница 51: ...hinese character 51 FS r Select demisemi size mode for Chinese character 52 FS Select Chinese character print mode 53 FS v Select Cancel form connect line 54 FS k Select Chinese font 55 FS Y Select Ch...

Страница 52: ...91 ESC S n Select Superscript Subscript Mode Font enhancement 92 ESC T Cancel Superscript Subscript Mode 93 ESC C Set Form Length in Lines 94 ESC C NUL Set Form Length in Inches 95 ESC C Set Form Leng...

Страница 53: ......

Отзывы: