background image

www.joinwit.com 


4-1 


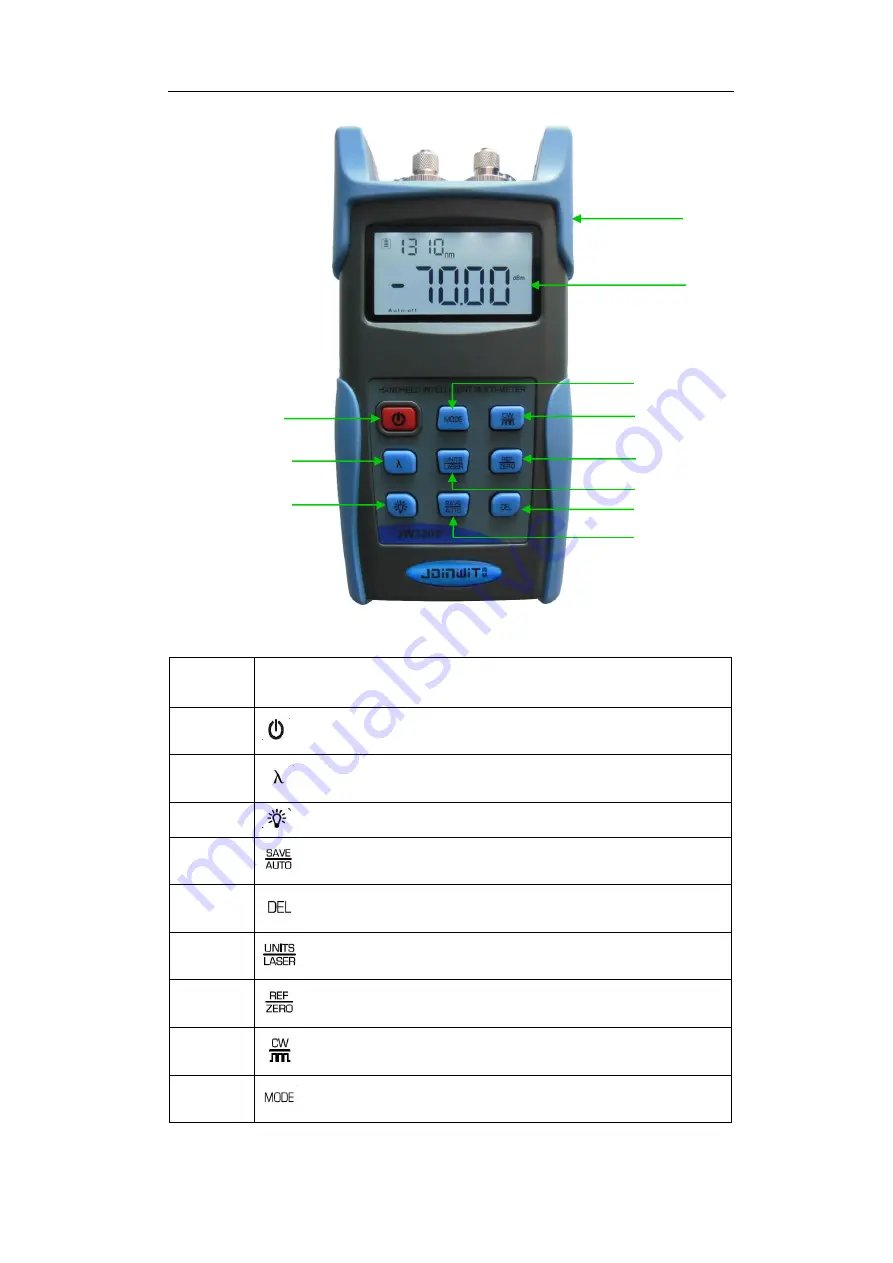
Function Introduction 


Turn on or off the meter


Switching wavelength under test


Turn on or off the backlight


data testing storage\Viewing; automatic switching of source wavelength


delete the current data record


unit change;turn on or off the source output


relative value measurement;system is set to zero 


change the source output frequency 


change the instrument function mode 


(2) 

(1) 

(3) 

(4) 

(5) 

(10) 

(9) 

(8) 

(7) 

(6) 

(11) 

Содержание JW3209 Series

Страница 1: ...n this manual belong to Shanghai Joinwit Shanghai Joinwit has the right of the manual interpretation Trademarks All trademarks mentioned in this manual are registered property of Joinwit Explanation The content of this manual is subject to Joinwit s explanation ...

Страница 2: ...cifications 2 iii Technical Specifications 3 iv Instrument Introduction 4 5 v Instructions for Use 5 19 vi Troubleshooting 19 vii Care and Maintenance 19 20 viii Quality Assurance 20 Attachment 1 Product Warranty Card 21 Attachment 2 Warranty Conditions 22 ...

Страница 3: ...twork telecommunication network and cable television Features Easy mode switching function Stable Output light Automatic switching function of the internal source wavelength Detection of the frequency light USB data communication storage uploading and for power supply Data Storage is up to 1000 Providing the real time data reading to be embedded in system Applications Maintenance of telecommunicat...

Страница 4: ...al Output Power dBm 5 customizable Stability dB 30min 20 0 1dB Modulation frequency Hz CW 270Hz 1KHz 2KHz Other parts Power supply 3 AA 1 5Vbattery Mini USB 5Vadapter Auto off time min 10 Battery continuous operation time h Source ON 50 source off 200 Communication Interface Mini USB Working temperature 10 60 Storage temperature 25 70 size mm 175 90 44 5 weight g not including battery 265 Notes 65...

Страница 5: ...ion 1 JW3209 instrument 1pc 2 instructions 1copy 3 Data disc 1pc 4 Mini USB data cable 1pc 5 5V USB adapter 1pc 6 1 5V Alkaline Battery 3pcs 7 Cleaning Swabs 1pack 8 Soft Oxford cloth pack 1pc 9 certificate 1pc iv Instrument Introduction 13 12 ...

Страница 6: ... or off the backlight data testing storage Viewing automatic switching of source wavelength delete the current data record unit change turn on or off the source output relative value measurement system is set to zero change the source output frequency change the instrument function mode 2 1 3 4 5 10 9 8 7 6 11 ...

Страница 7: ...o off sign after turning on if no other operations within 10mins the instrument will be off automatically short press the auto off will be cancelled When using external USB adapter for power supply the instrument will have no auto off function image 5 1 Image 5 1 After turning on the instrument comes into power meter mode automatically image 5 2 we can press button to come to source mode image 5 3...

Страница 8: ...reference value the instrument comes to relative power measurement and the top right corner of the screen will show Ref And the set dBm value image 5 5 The relation of Relative power value absolute power value and reference value Relative power value absolute power value reference value Image 5 5 Long press button for about 5 seconds ZERO function will be started The set reference value Relative p...

Страница 9: ...power meter mode SAVE function will respond Data storage short press the button to save the current test data press button for once the screen will show storage serial number press again to confirm saving and exit image 5 7 Image 5 7 Date View long press button comes to data view interface then short press button we can have a reverse look at the data recording Again long press button to exit imag...

Страница 10: ...er internal source wavelength 2 button turn on or off the laser output in the source image 5 9 Image 5 9 3 button After turning on the laser in the source module press the button to come to 0HZ 270HZ 1000HZ 2000HZ in turn image 5 10 Image 5 10 4 button in the source mode open or close the automatic following switching function of the source output wavelength image 5 11 1 ...

Страница 11: ...dule cannot follow automatically to change the wavelength and also no optical power output 3 Backlight control function With the instrument on press button to open or close the backlight 4 Battery power display 1 if the battery icon becomes empty it means the battery is to be exhausted and reminds the user to replace the battery in time image 5 12 2 The user can use the attached USB adapter for po...

Страница 12: ...hoose 1310nm wavelength in the standard power meter and read the absolute optical power value for example we can set it for A Removed from the detecting port of the standard optical power meter patch cord is inserted to the detecting port of the calibrated instrument power meter Then change the wavelength in the calibrated optical power meter to 1310nm Press and to increase or decrease the absolut...

Страница 13: ...ge 5 16 Double click the icon image 5 17 appears Image 5 17 click INSTALL After a moment image 5 18 appears Image 5 18 Click OK and exit the installation interface Driver installation has not been completed at this time please continue the operation below Connect the instrument and the computer by USB data cord Then open the instrument to appear image ...

Страница 14: ...n the instrument and the computer Open device manager right click My Computer to select properties Then select the hardware tab on the system properties interface And then to click the device manager button in the port COM and LPT column you can see the selected box in the image 5 22 which indicates the successful installation If no selected box below the port COM and LPT as in the image 5 23 it m...

Страница 15: ...it com 13 Image 5 22 Image 5 23 After the successful driver installation you can turn off the instrument and disconnect the USB 7 2 Instruction for the Software Use 1 Open the PC software to show the image 5 24 ...

Страница 16: ...he computer by a USB cable and in the state of being switched on In the port COM and LPT column you can see the port used by the instrument is COM4 image 5 25 Image 5 25 So when to select the software port you can click the drop down menu to choose COM4 image 5 26 ...

Страница 17: ...d now you can start the communication between the instrument and computer image5 28 Image 5 27 Image 5 28 2 The data processing function use First fill in the basic information including the testing person instrument type and so on Image 5 29 Image 5 29 Then click Upload Data button the data saved in the instrument can be uploaded to the computer and are displayed in the data area image 5 30 ...

Страница 18: ...ect button to delete the selected data as in the image 5 31 and 5 32 and also the corresponding data stored in the meter are also deleted Image 5 31 Image 5 32 Click the Delete all button to appear the Delete all box in the image 5 33 click OK to delete all the data and also empty the stored data in the meter If you click Cancel the situation is just the opposite ...

Страница 19: ... 5 33 Click the Save or Print button to appear the sheet in the image 5 34 The sheet can be edited saved printed and etc Click button to appear save box in the image 5 35 You can operate the file name save path etc Image 5 34 ...

Страница 20: ...e optical power value in the instrument power meter module needs calibration first to choose the needed wavelength in the Wave Selection and then to fill in the absolute optical power value in the blank edit box Next to click the Power ADJ button is ok image 5 36 Image 5 36 4 Time setting When you need to set the time on the meter you can click the Get Time button Then the system will appear the c...

Страница 21: ...ng port is severely polluted Using the special cotton swabs to clean the port The instrument can t be turned on after the USB adapter connection Mini USB cable is damaged USB adapter is damaged Change Mini USB cable Change to 5V USB adapter Others please contact the company after sales or technicians to solve vii Care and Maintenance 1 Keep the sensor port clean from pollution not use dirty and no...

Страница 22: ...ee the solutions in the troubleshooting Then again the problem remains please contact the company marketing department and the agents around instead of opening the instrument by yourself 3 If the quality failure appears the instrument will be repaired or replaced for free This promise is only valid in the condition that the instrument is properly used and has no damage JW3209 warranty does not cov...

Страница 23: ...hase date User name Tel Fax Address Zip code E mail Stamp Please keep this part Cut down the below part and send is to us Cut along the dotted line and send it back to our company Paroduct model prduct serial number purchase date User name Tel Fax Address Zip code E mail Note Please send it to us within one month after buying otherwise it s not valid ...

Страница 24: ...ered or unclear filling in 3 Using under non normal conditions such as man made damage high temperature pressure humidity Normally a certain maintenance fee is charged based on different situations 4 Failure or damage caused not by the product quality problem 5 If the user doesn t operate the instrument according to the instructions and written precautions then the failure or damage occurs iii Our...

Отзывы: