INSTALLATION
Installation must be carried out by a licensed plumber in compliance with the Plumbing Code of Australia..
Check local and national building regulations before installation to ensure the below methods comply with
the relevant codes.
Tools required for installation: Silicone Gun, Spirit Level, Tape Measure, Pencil, Adjustable Spanner.
1. Inspect bath thoroughly before installation. Claims for defects and/or damage must be made before
installation commences.
2. Place bath in intended position against the wall and mark out position on the finished floor.
3. Check level by placing spirit level across the width and length of bath, then adjust feet to suit.
Ensure the bath is fully supported on all feet.
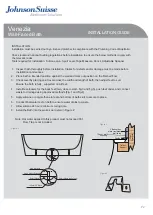
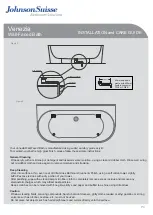
4. Install feet-lockers for the back feet (two, close to wall - fig.3 and fig.5), push feet under, and connect
waste to drainage using approved methods [Fig.1 and Fig.4].
5. Apply silicone or polyurethane to feet and bottom of bath skirt to secure to place.
6. Conduct final water test on bath to ensure water drains to waste.
7. Allow silicone 24 hours minimum curing time.
Note: Hot water applied to this product must not exceed 55
o
C.
Floor Trap is not included.
Plug & Waste
Plug & Waste Extension
Smart Waste rubber seal
Smart Waste
o
100 mm 90 Elbow
Figure 1
INSTALLATION GUIDE
Venezia
Wall-Faced Bath
Villaboard or
water resistant
wall lining
Sealant
Tiles or wall
sheeting
W
all
Structure
Figure 2
Install the Bath into the wall as per detail in Figure 2.
8.
Timber
Support
Figure 3
P.2


