8
©2013 Johnson Level & Tool - Rev. 2
8. Self-Check & Fine Calibration
IMPORTANT:
It is the responsibility of the user to verify the
calibration of the instrument before each use.
Re-calibration can be performed as described below:
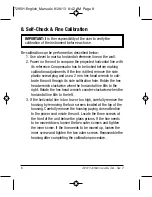
1. Use a level to mark a horizontal reference line on the wall.
2. Power on the unit to compare the projected horizontal line with
its reference. Compensator has to be locked before making
calibration adjustments. If the line is tilted, remove the side
plastic screw/plug and use a 2 mm hex head wrench to cali-
brate the unit through its side calibration hole. Rotate the hex
head wrench clockwise when the horizontal line tilts to the
right. Rotate the hex head wrench counter-clockwise when the
horizontal line tilts to the left.
3. If the horizontal line is too low or too high, carefully remove the
housing by removing the four screws located at the top of the
housing. Carefully remove the housing paying close attention
to the power cord inside the unit. Locate the three screws at
the front of the unit below the glass prisms. If the line needs
to be moved down, loosen the two outer screws and tighten
the inner screw. If the line needs to be moved up, loosen the
inner screw and tighten the two outer screws. Reassemble the
housing after completing the calibration procedure.
7295H-English_Manuals 8/28/13 8:42 AM Page 8


