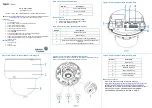
Installing the camera onto a wall or ceiling
1.
Use the T20 security key to remove the three screws on the dome cover (2)
(Figure 1).
2.
Use a screw driver to remove the safety lanyard screw that is connecting the
dome cover to the camera.
Note:
The dome cover is now completely
disconnected from the camera.
3.
Insert all cables through one of the waterproof rubbers:
a) if you are using the three hole waterproof rubber then pierce three holes
as per the three circles on the rubber, insert the cable through the three
rubber holes and then terminate the cable.
OR
a) if you are using the one hole waterproof rubber then pull the rubber pin
to make the cable hole, insert the terminated cable into the insert tool
and then pull the insert tool through the hole.
4.
Hold the guide pattern sticker up to the surface and drill four 6mm holes and
if you are
not
using the cable side entry hole on the bottom case then cut out
a cable entry hole on the surface as per the guide pattern.
Note:
If you are not using the cable side entry hole then insert the cable
cover.
5.
Use a hammer to insert the four screw anchors (1) (Figure 8) into the holes
6.
Hold the camera bottom case (2) (Figure 8) up to the surface and align the
four 6mm holes on the surface with the four holes in the bottom case
(remove the rubber inserts in the bottom case first).
7.
Insert the four TP 32mm screws (3) (Figure 8) and securely attach the bottom
case to the surface.
8.
Pull the camera power cables through the cable hole on the surface or the
side entry hole on the bottom case.
9.
Hold the camera (4) (Figure 8) up to the bottom case and connect the cables
to their respective ports on the camera.
10. Insert the camera into the bottom case and use a T20 security key to
securely attach the camera to the bottom base with the three T10 screws.
Figure 4
Security
Installing the camera into a recess ceiling
1.
Hold the guide pattern sticker up to the ceiling (1) (Figure 4) and cut out a
125mm hole.
2.
Use the T20 security key to remove the three screws on the dome cover (2)
(Figure 1).
3.
Use a screw driver to remove the safety lanyard screw that is connecting the
dome cover to the camera.
Note:
The dome cover is now completely
disconnected from the camera.
4.
Place the camera power cables through the hole in the ceiling and the metal
cover (2) (Figure 4).
Figure 4
Installing the camera in to a recess ceiling (continued)
5.
Connect the cables to their respective ports on the camera.
6.
Align the two screws on the metal cover (1) (Figure 5) with the two holes on
the camera and use a screw driver to securely attach the metal cover to the
camera.
Figure 5
7.
Push the camera cable back into the hole in the ceiling and hold the camera
up to the hole in the ceiling.
8.
Use a cross screw driver and turn both captive screws (1) (Figure 6) on the
camera clockwise to extend out the locking arms (2) (Figure 6), then rotate
the two captive screws anti-clockwise until the locking arms sit securely to the
ceiling.
Installing the camera in to a recess ceiling (continued)
Figure 6
9.
Adjust the camera lens position as follows. See Figure 7.
Pan Adjustment (1):
Rotate the lens base until you are satisfied with
the field of view.
Tilt Adjustment (2):
Tilt the eye-ball assembly as needed.
Note:
Limitation for the two axes position: Pan range = ±380° /
Tilt range = 15°
~
90°.
Installing the camera in to a recess ceiling (continued)
Figure 7
10. Insert the dome cover safety lanyard screw into the camera and securely
attach the dome cover to the camera.
11. Hold the dome cover up to the camera and align the three screws in the
dome cover with the three holes on the camera.
12. Use the T20 security key to securely attach the three screws to the camera.
Installing the camera onto a wall or ceiling (continued)
11. Adjust the camera lens position as per step 9 in the
Installing the camera in
to a recess ceiling
procedure.
12. Screw the safety lanyard screw into the camera so that the dome cover is
attached to the camera.
13. Hold the dome cover (5) (Figure 8) up to the camera and align the three
screws in the dome cover with the three holes on the camera.
14. Use the T20 security key to securely attach the three screws to the camera.
Figure 8


