background image

5407935-UUM-D-1119


2

Johnson Controls Ducted Systems

Read all sections of this manual and keep the man-
ual for future reference.

PRODUCT DESCRIPTION

Content

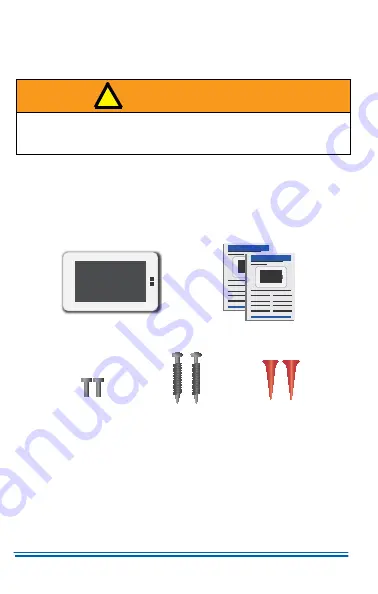
The following figure shows the items in the Hx3™ Touch Screen Ther-
mostat box: 

 WARNING

Cancer and Reproductive Harm – 

www.P65Warnings.ca.gov

 Figure 1: 

Content Overvie

w

!

Thermostat

 Mounting Screws

User and Installer

Manuals

Thermostat

Retaining Screws

Drywall Anchors

A0975-001

Содержание Hx3 S1-THXU430W

Страница 1: ...ERMOSTAT APP Registration and Login Wi Fi Connectivity 2 2 4 5 7 8 9 11 12 13 14 15 16 17 18 24 25 25 27 Locations Screen App Home and Secondary Home Screens MANAGING DEALER ACCESS Using the Tips Screen Granting Dealer Access Revoking Dealer Access APP SETTINGS Programmable Schedule Management Location Room and Dealer Away Mode Notifications AMAZON ALEXA SETUP Using Alexa in Celsius Alexa Skill Vo...

Страница 2: ...uture reference PRODUCT DESCRIPTION Content The following figure shows the items in the Hx3 Touch Screen Ther mostat box WARNING Cancer and Reproductive Harm www P65Warnings ca gov Figure 1 Content Overview Thermostat Mounting Screws User and Installer Manuals Thermostat Retaining Screws Drywall Anchors A0975 001 ...

Страница 3: ...ools required for installing the Hx3 Touch Screen Thermostat It is best practice that a qualified technician performs the installation Figure 2 Tools for Installation Screwdriver Pencil Level Wire Strippers Drill Hammer 7 32 Drill Bit Plaster 3 16 Drill Bit Drywall A0976 001 ...

Страница 4: ...sensor detects user presence Near Field Communi cation NFC function ality Used for passive active limited data transfer Wi Fi connectivity Supports 802 11 a b g n standards and utilizes a Broadcom chipset Cloud connectivity Apple iOS and Android app available for user smartphone or tablet control Optimized installation Spring loaded connectors that accept 16 24 AWG wire A screwdriver is not requir...

Страница 5: ...controls or keys To prevent damage to the ther mostat always tap keys with your fingertip Figure 3 Thermostat Controls A1189 001 Cool Heat Auto Emergency Heat Heat pump only Humidity Fan Filter MAX Heat MAX MAX Cool MAX Date Advanced Settings Banner Backlight Log Clean Screen Comfort Cancel Away Home Off Settings Adv Auto Away Mode Backlight Banner 72 Cancel Cool Date 14 Log Filter Fan Humidity He...

Страница 6: ...th to clean the screen Use water or household glass cleaner Do not use abrasive cleansers A1190 001 Schedule Cancel Hold Schedule Time Reset PIN Enable PIN Edit Toggle Fwd Back Settings General PIN Disable Schedule Edit Schedule Settings Time Edit General Service Settings Service SVC Settings Hold Cancel Settings Reset Software System Software Status Status Schedule PIN System Save Save ...

Страница 7: ... screens may differ slightly depending on your heating and or cooling system and the display settings of the thermostat Figure 5 Home Screen Swipe LEFT to reach the Secondary Home Screen Cool To Settings Auto Wi Fi Signal Settings Room Temperature Cool Set Point Page Indicator Up Down Arrows Mode Status Banner Information Heat Set Point Home A1191 001 ...

Страница 8: ...tings screen Activate Max Heat mode or Max Cool mode View and edit Humidity settings if enabled Choose Home mode or Away mode For a quick reference guide to the Secondary Home screen see Figure 6 To return to the Home screen swipe right or tap Home Figure 6 Secondary Home Screen A1192 001 Away Away 12 31 17 11 14AM º 72 Fan Humidity MAX MAX Settings Max Cool Set Point Max Heat Set Point Humidity F...

Страница 9: ...ing operation occurs Heat mode Use this mode for heating Cool mode Use this mode for cooling Auto mode Use this mode for automatic heating and cooling Figure 7 Home and Mode Status Icons Home Icons 68 68 72 72 Heat Cool Heat Auto Cool Off Mode Status Icons Mode Settings Off Cool Auto Emergency Heat Cool Heat Heat Auto Mode E E Heat Schedule Cancel Hold Hold Cancel A1193 001 ...

Страница 10: ...ng Max Heat Mode and Max Cool Mode On the Secondary Home screen see Figure 6 you can tap the Max Heat icon or the Max Cool icon to run equipment at maximum capacity for 10 minutes or until the temperature increases or decreases by 10 F respectively Figure 8 Auto Mode Figure 9 Max Heat Mode and Max Cool Mode Auto Heat Cluster 68 Auto Cool Cluster 72 72 68 Heat Setpoint Cool Setpoint HEAT TO COOL TO...

Страница 11: ...rmostat setting 1 On the Home Screen or the Secondary Home screen tap the Set tings icon 2 Tap the relevant icons to view or edit settings For example tap the General icon and then tap the Time icon to change the time the ther mostat displays 3 To return to the Settings screen swipe left or right Figure 10 Settings Icons Comfort General System Humidity if enabled Advanced Settings Status Fan Clean...

Страница 12: ...ttings 2 On the thermostat Secondary Home screen tap the Home icon See Figure 6 The setpoints change to the Away setpoints on the thermo stat and the app The Away and Cancel Hold icons are visible on the Home screen of the thermostat and the app 3 To disable tap the Away icon on the thermostat or app Alternatively tap any setpoint the Cancel Hold icon or an Up Down arrow The setpoints change to th...

Страница 13: ...n arrows To choose the Humidify or Dehu midify setting tap the Humidity icon Auto mode automatically sets the Humidity setpoint based on indoor and outdoor temperatures NOTICE Auto mode requires an outdoor sensor If condensation appears on your windows lower the Humidity setpoint or switch to Auto mode HUMIDITY HUM AUTO DEHUM AUTO AUTO Dehum Humidity Auto Manual Mode A1197 001 HUM MANUAL DEHUM MAN...

Страница 14: ...fan options see Figure 14 Figure 13 Fan Screen Figure 14 Fan Options CFM Percentage Applies to Communi cating Systems Only The blue Up Down arrows and CFM percentage only appear if the following apply The fan operation is NOT in Auto mode You are using communicating indoor equip ment Fan Up Down Arrows A1199 001 Settings RUN FAN ALWAYS RUN FAN 15 MINUTES PER HOUR RUN FAN 30 MINUTES PER HOUR RUN FA...

Страница 15: ... tap the General icon then tap the PIN Enable icon 3 On the Lockout screen tap the Enable icon See Figure 15 4 On the Set Pin screen select a 3 digit PIN Your PIN selection appears in the banner area See Figure 17 5 Tap Save Your thermostat is now set to locked 6 To edit or disable the PIN on the Lockout screen tap the Edit PIN icon or the Disable icon See Figure 16 Figure 15 Lockout Disabled Figu...

Страница 16: ... tap the Banner icon 2 On the Banner screen use the yellow scroll bar to view all of the available options 3 Tap the buttons to enable or disable banner information When a set ting is enabled a check mark is displayed Figure 18 Banner Information Figure 19 Banner Information DATE TIME OUTDOOR TEMP FAN STATUS HUMIDITY Scroll Bar Banner Information A1202 001 A1203 001 OFF DELAY APP ACTIVE ...

Страница 17: ...e the thermostat go to the Advanced Settings screen See Figure 20 When you select an entry from the list of advanced settings a selection screen similar to the one shown in Figure 21 displays Figure 20 Advanced Settings Figure 21 Advanced Settings Sound A1204 001 A1205 001 Cancel Save ...

Страница 18: ...ivates when the thermostat sensor detects user presence Prox Sensitivity Allows you to adjust the sensitivity of the proxim ity feature The default setting is medium and you can change this to high or low High sensitivity increases the detection range of the thermostat sensor Daylight Savings Allows you to enable or disable Daylight Sav ings The default setting is enabled Wireless Allows you to en...

Страница 19: ...to as day parts in this document When you select Programmable mode the default schedule is displayed on the Schedule screen You can edit the default schedule as required using the Edit Schedule screen Non Programmable This means that the thermostat runs in a simplified mode that satisfies the selected heating or cooling set points In this mode the Edit Schedule icon does not appear because the sch...

Страница 20: ...hoose one of the following options Until Cancelled Overrides the schedule until you tap the Cancel Hold icon Next Event Overrides the schedule until the next event occurs that is the next day part Hours 1 12 Overrides the schedule for the number of hours specified Figure 23 Schedule Settings Screen Figure 24 Schedule Settings Screen OVERRIDE SETTINGS NEXT EVENT UNTIL CANCELLED Scroll Bar A1207 001...

Страница 21: ...s Tap the Cancel Hold icon to revert the system to the set schedule The Cancel Hold icon disappears Figure 25 Schedule Screen Default Schedule Figure 26 Edit Schedule Screen Hold Cancel 10 00pm Sleep 82º 62º 06 00pm Return 78º 70º 08 00am Leave 85º 62º 06 00am Awake 78º 70º MONDAY Default Events Copy Day Part Selection Area Example A1209 001 A1210 001 MONDAY AWAKE 00 6 70º 78º AM Cancel Save Fan ...

Страница 22: ...t steps 1 3 to edit the day parts in each day as required On the Edit Schedule screen the Up Down arrows change color based on the selected option Red for heat Blue for cool Green for time The following options are available on the Schedule screen Copy Allows you to copy the scheduled day to any other day of the week See Figure 27 Events Allows you to choose whether the schedule contains 4 day par...

Страница 23: ...ohnson Controls Ducted Systems 23 Figure 28 Events Screen Figure 29 Schedule Screen 2 Day Part A1212 001 Day Part 4 Cancel Save EVENTS MONDAY A1213 001 08 00am Leave 85º 62º 06 00am Awake 78º 70º MONDAY Default Events Copy ...

Страница 24: ...Strength icon in the banner area On the Wireless Status screen you can check Wi Fi connectivity information You can also disconnect from a Wi Fi net work if required To do so tap Disconnect Figure 30 Wireless Status Screen NOTICE Your HVAC system and thermostat will operate if the Wi Fi connection is lost Only Hx Thermostat app usage and software updates are affected when offline Green Connected R...

Страница 25: ...r your email address and choose a password See Figure 32 The password must contain a minimum of 8 characters including a lowercase letter an uppercase letter and a number or special character 3 In the email verification dialog box tap OK 4 Check your smart device email inbox for the confirmation email See Figure 33 5 Review and follow the link Tap OK to confirm your email Figure 31 Login Signup Sc...

Страница 26: ...fferent email account to the thermostat the original email account is no longer paired to the thermostat for remote access Figure 33 Verification Link Email NOTICE You will NOT be able to confirm your Hx Thermostat app account if you open the confirmation email link from your PC laptop or Mac Thank you for choosing Hx Thermostat Using your smart phone or tablet click on the link provided below to ...

Страница 27: ... Wi Fi Connectivity You must complete wireless setup to connect the thermostat to a Wi Fi network Part 1 Prepare for Wireless Setup 1 Ensure that your smart device is connected to Wi Fi 2 Ensure that the Locations screen is visible on your smart device See Figure 35 Figure 34 Login Screen Figure 35 Locations NOTICE If your Wi Fi router is a dual band router confirm that your smart device is connec...

Страница 28: ... QR code Manual Setup Without a QR Code 1 Tap Or Enter Code Manually at the bottom of the app 2 Enter the 12 digit alphanumeric SSID displayed on the thermostat Wireless Status screen The SSID is case sensitive See the SSID example highlighted in Figure 37 Figure 36 Wireless Status Screen NOTICE If your smart device does not scan the QR code or the QR code is not visible follow the instructions in...

Страница 29: ...Enter the room name for example Living room The room name that you choose is displayed in the banner area of the app Home and Secondary Home screens Wireless setup is now complete You can navigate through the tutorial provided or tap the three bar menu icon to return to the Locations screen Figure 37 SSID Example NOTICE You MUST connect the thermostat to the 2 4 GHz frequency on dual band routers ...

Страница 30: ...in Figure 40 the following menu options are available Locations Brings you to the Locations screen Tutorial Provides information about app icons the Home and Secondary Home screens settings and the display of faults IMPORTANT If the smart device fails to connect on the thermostat Wireless Status screen tap the Wi Fi icon tap Disconnect and repeat steps 1 4 NOTICE The smart device might be connecte...

Страница 31: ...ce and you also have one in a guest house or vacation home you can use the Locations screen to manage both thermostats If you have multiple thermostats you can display all of them on the Loca tions screen However you can also opt to add a thermostat to an exist ing location This is useful for example if you have multiple thermostats within the same residence and you want to group them together Whe...

Страница 32: ...for the thermostat You can use the Secondary Locations screen to do the following Add more thermostats to the Secondary Locations screen To do so tap Plus and follow the steps in the Wi Fi Connectivity sec tion to connect the thermostat to a Wi Fi network Access the app Home screens for the thermostats displayed To do so tap the location name of a thermostat Edit the location name Delete the locat...

Страница 33: ...me as required The edited name is displayed on the Locations screen To delete the location 1 On the Locations screen tap the location name for example Home 2 On the Secondary Locations screen tap the gear icon in the upper left corner See Figure 41 3 Tap Delete Location 4 Tap Yes Delete this Location to confirm you want to delete the location The location is removed from the Locations screen Note ...

Страница 34: ...ft or right To refresh the screen swipe down in the area indicated by the arrow shown in Figure 42 until the spinning refresh icon appears Tap the Settings icon to access and manage the app settings Some of these settings are specific to the app and differ from the thermostat set tings for example the Geo Fencing setting Other settings such as Away mode work in a similar way in the app and the the...

Страница 35: ...es an overview of the different permission levels You can use the Manage Dealer Access screen to view and revoke dealer access as needed If you have not given a dealer access to your system the Manage Dealer Access screen displays the text No Shared Thermostats See Figure 44 If you have granted a dealer access to your system the Man age Dealer Access screen is populated with this information See F...

Страница 36: ...ler Access screen tap the Tips icon to access the Tips screen See Figure 44 The Tips screen helps you to understand Installer Diagnostic and Status role permissions Access duration permanent and temporary The icons relating to specific roles and access durations Figure 46 Tips Screen A1019 001 ...

Страница 37: ...ust use your smart device to open this link You can not review the dealer access options if you open the link using your PC laptop or Mac When you select the link the Grant Dealer Access screen appears On this screen you can change the role type duration and locations as needed and grant access to the dealer Figure 47 Grant Dealer Access Status Installer Diagnostic Tips Icon Refer to the Tips Scre...

Страница 38: ...rmostat Delete Thermostat Faults System Log Service Reminders Geo Fencing Off Setpoints Ü Ü Dealer Information Room name Living room Location Beach House NOTIFICATIONS Schedule Hold Length Schedule Programmable Settings Back AWAY MODE Min 63 15 Max Humidity Threshold Temperature Threshold Min Ü Ü Max Programmable Select On or Off Humidity Threshold Select On or Off Temp Threshold Select On or Off ...

Страница 39: ...adjust the schedule 1 On the app Home screen tap the Settings icon then tap Schedule 2 On the Schedule screen swipe left or right to navigate to the day of the week you want to edit for example Tuesday See Figure 49 3 Tap the day part you want to edit for example Tuesday Awake See Figure 49 The Edit Schedule screen appears 4 Tap the setpoint time hour and minute period AM PM or fan for editing See...

Страница 40: ...ollowing options are available on the Schedule screen Default Allows you to reset the schedule to the default schedule See Figure 49 Events Allows you to choose whether the schedule contains 4 day parts or 2 day parts The default is 4 day parts See Figure 51 Copy Allows you to copy the scheduled day to any other day of the week See Figure 52 Figure 51 4 Day Part Option Figure 52 Copy Option A1223 ...

Страница 41: ...o select the required setpoint or tap Reset tap Save and return to settings 2 On the app Secondary Home screen tap the Home icon See Figure 54 The setpoints change to the Away setpoints on the app and the thermostat The Away and Cancel Hold icons are visible on the Home screens of the app and thermostat See Figures 55 and 56 3 To disable tap the Away icon on the app or thermostat Alternatively tap...

Страница 42: ...s automatically enabled and the setpoints change to the Home setpoints NOTICE You must enable Locations and Notifications on your smart device for the Geo Fencing feature to function The Geo Fencing screen may vary between smart devices Figure 57 Geo Fencing Tap here to check your Settings When you leave the region a notification will be sent to you to set Away Mode When you enter the region Home ...

Страница 43: ...dity Threshold toggle but tons to enable or disable the temperature and humidity thresholds See Figure 60 Tap the Min setpoint or Max setpoint that you want to adjust use the Up Down arrows to select the required setpoint and tap Save Alternatively you can tap Reset A push notification is sent to alert you if the indoor temperature or humidity goes above or below the range you have specified Figur...

Страница 44: ...with Alexa 4 Add the thermostat in one of the following ways Say Alexa discover my devices OR In the Smart Home section in the Alexa app tap Discover Devices Using Alexa in Celsius If required you can use degrees Celsius rather than degrees Fahrenheit as the unit of temperature in Alexa To do so 1 From the smart device in the Alexa app tap Settings 2 Locate and select Celsius as the unit of temper...

Страница 45: ...ees Decrease device temperature Alexa decrease the Room Name temperature by number degrees Alexa lower the Room Name temperature by number degrees Alexa cool down Room Name by number degrees Alexa decrease the Room Name temperature to number degrees Alexa decrease the temperature to number in the Room Name Alexa decrease the temperature to number degrees in the Room Name Turn device fan off Alexa ...

Страница 46: ... smart device Swipe left or right to view all screens Note these tips Modes Tap to view the Heat Cool and Auto modes for example Setpoints To increase and decrease the temperature tap the required setpoint and turn the Digital Crown on the Apple Watch Multiple Locations In the app tap and hold the face of the watch A Devices screen appears Tap the Devices screen and the list of thermostats appears...

Страница 47: ... and national codes and the product or residence must not be removed from its place of original instal lation This warranty does not apply to any unit sold over the Internet by telephone or other electronic means unless the dealer that buys or sells a unit over the Internet by telephone or other electronic means also installs the unit In the absence of a recorded Warranty Registration Card the war...

Страница 48: ...r and evaporator 12 Damages resulting from I freezing of condenser water or condensate II inadequate or inter rupted water supply III use of corrosive water IV fouling or restriction of the water circuit by foreign material or like causes 13 Damages caused by improper parts components or accessories not suitable for use in or with the unit For a list of parts that are known to be compatible please...

Отзывы: