background image

12

All Rights Reserved. 2018

immediately


check


for


leaks


if


you


smell


gas

although


gas


connections


on


the


oven


are


leak


tested


prior


to


shipment

a


complete


test


should


be


performed


after


installation


due


to


possible


mishandling


during


shipping


or


installation

periodic


checks


are


also


recommended

before


starting


the


test


extinguish


all


open


flames

do


not


smoke


while


performing


test

.

leak


testing


do


not


use


an


open


flame


to


test


for


leaks

.

You will need a spray bottle, a brush or a rag. For LP units using a 20-pound cylinder, a full cylinder should 

be used.

Homeowners should only check for leaks on the gas connections that are external to the oven. If the 

valves or other internal connections need to be checked, please call a qualified technician or JohnMichael 

Kitchens Customer Service at 1.877.799.3199

conducting


the


test


Begin by making a soap solution of one part liquid dish soap and one part water.

Make sure both oven control valves are in the OFF position. Turn the gas supply ON. Use a spray bottle, 

brush or rag to apply the mild soap solution to all connections from the supply line or LP cylinder to the 

connection on the back of the oven. Check all connections. 

Soap bubbles will appear at any connections with a leak. Turn OFF the gas supply and tighten any leaky 

connections. Recheck by applying more of mild soap solution.

IMPORTANT NOTE: 

do


not


use


the


oven


unless


all


connections


have


been


checked


for


leaks

.

Содержание Fuel Outdoor Pizza Oven

Страница 1: ...All Rights Reserved 2014 SkyVue OUTDOOR PIZZA OVEN INNOVATIVE DESIGN CREATES CULINARY PERFECTION ...

Страница 2: ...proper assembly operation and care of your product by following this manual s outline of instructions it will ensure that you safely enjoy your pizza oven for many years to come for more information about accessories for this product please visit our website at johnmichaelkitchens com if you ever have any questions about operating or caring for your fuel pizza oven please feel free to contact our ...

Страница 3: ...er building or any type of enclosed area warning Failure to follow the information in owner s manual may result in fire or explosion causing property damage personal injury or death Read and follow all warnings and instructions before assembling and using your Fuel Outdoor Pizza Oven important note This appliance is not intended to be installed in or on a boat or recreational vehicle IMPORTANT Dam...

Страница 4: ......

Страница 5: ...RATION 6 LP TANK INFORMATION 8 GAS REQUIREMENTS 10 LEAK TESTING 12 PIZZA OVEN LOCATION 13 PIZZA OVEN ASSEMBLY 14 CONTROLS 15 BEFORE COOKING 16 LIGHTING YOUR PIZZA OVEN 18 BURNER ADJUSTMENTS 20 VALVE ADJUSTMENTS 25 COOKING WITH YOUR PIZZA OVEN 26 GENERAL TIPS 27 table of contents ...

Страница 6: ...ay special attention when you are lighting the oven and be aware of which burner you are attempting to light Always be sure you are pushing the ignition button on side of oven when you attempt to light each burner Always light the oven with the doors open to be able to get a clear view of the flames While you can preheat the oven with the doors closed always be cautious of the areas surrounding th...

Страница 7: ...ruct you in its operation so that you can shut off the gas to the oven If you smell gas there could be a problem with the gas installation to the oven If the gas connections are not perfectly sealed you can have a small leak resulting in the faint smell of gas If you think you may have a leak close the gas supply shut off valve and call a qualified technician to locate and resolve the leak safe op...

Страница 8: ...to anything other than the fuel source indicated on the serial plate Factory conversion kits are available for switching fuel sources Contact John Michael kitchens or an authorized dealer for details Conversion kit installation must be done by a qualified technician The LP gas cylinder must include a collar to protect the cylinder valve from damage Ensure proper ventilation of the cylinder The cyl...

Страница 9: ...he oven NEVER STORE YOUR LP TANK INDOORS Cylinders must be stored outdoors out of the reach of children and must not be stored in a building garage or any other enclosed area The pressure regulator and hose assembly supplied with the oven must be used Replacement pressure regulators and hose assemblies must be the type specified by John Michael Kitchens For replacement parts contact John Michael K...

Страница 10: ...ose assembly connects to the oven using a 0 5 npt male with a 0 375 flare adapter both included OPERATING PRESSURE 11 0 W C PIZZA OVEN BTUs 34 880 TOTAL BTU HR IMPORTANT NOTE After connecting a fresh LP tank you may need to purge air from the system Before lighting open the main valve on the tank IMPORTANT NOTE Always close the main valve on the tank before disconnecting or transporting the tank T...

Страница 11: ... to local codes In the absence of local codes the installation and all parts should conform to the National Fuel Gas Code ANSI Z223 1 NFPA 54 or Natural Gas and Propane Installation Code CSA B149 1 All pipe sealants must be an approved type IMPORTANT NOTE The installer must ensure proper delivery of gas to the oven or it will not operate properly Diameter and length of the gas supply pipe may limi...

Страница 12: ...nnections that are external to the oven If the valves or other internal connections need to be checked please call a qualified technician or JohnMichael Kitchens Customer Service at 1 877 799 3199 conducting the test Begin by making a soap solution of one part liquid dish soap and one part water Make sure both oven control valves are in the OFF position Turn the gas supply ON Use a spray bottle br...

Страница 13: ...ot place the oven where it is likely to be bumped into or touched Do not place the oven on any surface that allows the oven to slide easily or change position Never place the oven where the gas hose creates a safety hazard Tripping over an exposed gas hose may create a gas leak and or pull the oven off the counter while creating other serious safety hazards Do not place the oven in a building bree...

Страница 14: ...n Once this is removed it can be placed aside till the end of the process Be careful not to place the top on a surface where it can damage it easily Wide Cooking Stones x2 Top Cooking Stone Door Glass x2 Side Glass x2 Pizza Peel Pizza Screen Articulated Peel pizza oven package parts list The following parts come standard with your pizza oven if the listed are not included with your pizza oven plea...

Страница 15: ...alled after all the other internal parts have been installed to prevent accidental damage 5 The Crumb Tray should be inserted just below the front base lip of the pizza oven Look under the front lip to find the slot and insert the crumb tray 6 At this point the stainless steel top cover can be reinstalled and you have completed the assembly of your pizza oven assembly parts guide Side Glass Top Co...

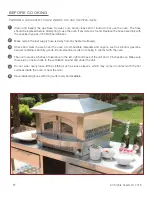
Страница 16: ... burner control knob Controls the height of the flame on the burner at the rear of the cooking deck On HIGH this flame is visible above the Cooking Deck lower burner viewport Allows visual confirmation of lower burner s flame This port is also used as the manual ignition port for manual lighting procedure SEE LIGHTING YOUR OVEN Page 19 a b c a b c ...

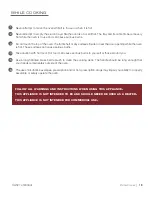
Страница 17: ... heated surface s Check and clear the area near the oven of combustible materials and vapors such as alcohol gasoline aerosol containers and dry goods Route electrical cords from being in contact with the oven The oven requires 6 inches of clearance to the left right and back of the unit and 12 inches above Make sure there are no obstructions to the ventilation around and under the unit Do not wea...

Страница 18: ...aces can cause serious burns Take caution with hot food Hot food can cause serious burns to yourself or those around you Use a long handled brass bristle brush to clean the cooking deck The handle should be long enough that your hands remain safely outside of the oven The use of alcoholic beverages prescription and or non prescription drugs may impair your ability to properly assemble or safely op...

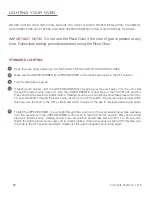
Страница 19: ...RNER control knob to the HIGH START position Press and hold the electronic ignition button Clicking should occur and ignition should take place within 15 to 20 seconds Watch through the lower burner view port to confirm ignition If the burner does not light within this time turn the knob to the OFF position and wait 5 minutes for the gas to dissipate before trying again To light the UPPER BURNER y...

Страница 20: ...5 to 20 seconds Watch through the lower burner view port to confirm ignition If the burner does not light within this time turn the knob to the OFF position and wait 5 minutes for the gas to dissipate before trying again To light the UPPER BURNER insert a paper match into the clip on the end of the provided manual ignition wand and light the match Insert the match end of the wand through the main ...

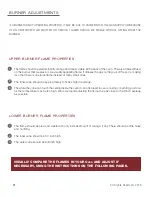
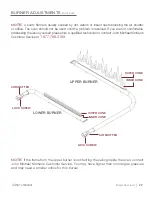
Страница 21: ...tead of many small ones The inner cone should be approximately 3 inches high in average The while the cone can touch the ceiling inside the oven it can often lead to over cooking or burning your food as the temperature may be too high We reccomend adjusting the flame to be as close to the 3 inch average as possible The flame should be blue and stable with only a small amount of orange if any There...

Страница 22: ...ing the issue yourself please hire a qualified technician or contact John Michael Kitchens Customer Service at 1 877 799 3199 note if the flame from the upper burner is contacting the ceiling inside the oven contact John Michael Kitchens Customer Service You may have higher than normal gas pressure and may need a smaller orifice for this burner LOWER BURNER UPPER BURNER OUTER CONE OUTER CONE LOCK ...

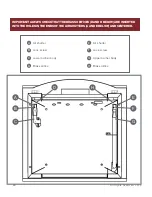
Страница 23: ...urner body Brass orifice Air shutter Lock screw Upper burner body Brass orifice H D F B G C E A IMPORTANT ALWAYS CHECK THAT THE BRASS ORIFICES D AND H BELOW ARE INSERTED INTO THE HOLES IN THE ENDS OF THE AIR SHUTTERS A AND E BELOW AND CENTERED A E B F C G D H ...

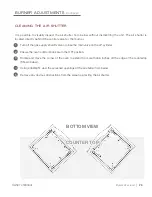
Страница 24: ... gas supply shutoff valve or close the main valve on the LP cylinder Ensure the oven control knobs are in the OFF position Rotate and move the corner of the oven to extend no more than 6 inches off the edge of the countertop Shown below Using a flashlight view the screened openings of the air shutter from below Remove any obvious obstructions from the screen protecting the air shutter 1 3 4 5 2 cl...

Страница 25: ...and with the oven control knobs in the OFF position turn on the gas supply valve or open the main valve on the LP cylinder Light the burner using the lighting steps on page 18 ONLY LIGHT THE BURNER TO BE ADJUSTED Rotating the air shutter adjust the amount of air entering the venturi For a lifting flame slowly close the air shutter until the flame no longer lifts from the burner For a sooty flame s...

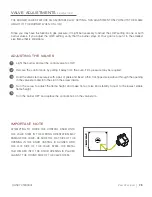
Страница 26: ...he valve stem Since you may have fluctuations in gas pressure it might be necessary to adjust the LOW setting on one or both burner valves If you adjust the LOW setting verify that the burner stays lit Your goal is to set it to the smallest size flame that is still stable 1 3 4 5 2 adjusting the valves the burner valves feature an adjustable low setting this adjustment only affects the flame heigh...

Страница 27: ...f the above and below accessories are offered in our Pizza Maker s Tool Kit at johnmichaelkitchens com preheating You can preheat the oven with the doors closed but be cautious of how hot the areas surrounding the door handles may get It is recommended to wear insulated gloves when opening and closing the doors while oven is in use The Oven is ready to cook in as little as 20 minutes however we re...

Страница 28: ...and the lower burner is LOW or OFF the oven cooks at a very low and slow speed Temperatures can be as low as 300ºF MEDIUM CRUST PIZZA Crust formed to 1 4 thick Suggested Upper burner setting MEDIUM Suggested Lower burner setting LOW Cook for approximately 8 minutes Rotate pizza 3 to 4 times during cooking DEEP DISH PIZZA Use heavy gauge aluminum pizza pan Suggested Upper burner setting MEDIUM Sugg...

Страница 29: ...johnmichaelkitchens com 877 799 3199 ...

Отзывы: