background image

39

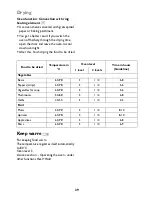
Drying

Oven function: Convection with ring 
heating element

Use oven shelves covered with greaseproof 
paper or baking parchment.

You get a better result if you switch the 
oven off halfway through the drying time, 
open the door and leave the oven to cool 
down overnight.

After this, finish drying the food to be dried.


Keep warm

For keeping food warm.
The temperature regulates itself automatically 
to 80 °C.
Oven level: 3
also see section  - Operating the oven - under 
other functions Heat+Hold.

Food to be dried

Temperature in 

°C

Oven level

Time in hours 

(Guideline)

1 level

2 levels

Vegetables 

Beans

60-

70


3

4

6-8

Peppers (strips)

60-

70


3

4

5-6

Vegetables for soup

60-

70


3

4

5-6

Mushrooms

50-

60


3

4

6-8

Herbs

40-50

3

1 / 4

2-3

Fruit

Plums

60-

70


3

4

8-10

Apricots

60-

70


3

4

8-10

Apple slices

60-

70


3

4

6-8

Pears

60-

70


3

4

6-9

Содержание JLBIOS608

Страница 1: ...JLBIOS608 Built in oven User information ...

Страница 2: ...afety This oven is designed to be operated by adults Do not allow children to play with or near the oven Never leave children unsupervised when the appliance is in use Safety whilst using People including children who because of their physical sensory or mental capabilities or their inexperience or ignorance are not able to use the device safely should not use this device without supervision or in...

Страница 3: ...h handling especially around the edges of the front panel can cause the glass to break Do not store flammable materials inside the oven These could ignite when the oven is switched on Do not store moist foods inside the oven This could damage the oven enamel After switching off the cooling fan do not keep uncovered dishes in the oven Mois ture may condense in the oven interior or on the glass door...

Страница 4: ...nt for the recycling of electrical and electronic equipment By ensuring this product is disposed of correctly you will help prevent poten tial negative consequences for the envi ronment and human health which could otherwise be caused by inappro priate waste handling of this product For more detailed information about recycling of this product please contact your local council your household waste...

Страница 5: ...als table 32 Roasting 33 Table Meat roasting casseroles 34 Table Roasting casseroles au gratin 35 Low temperature cooking 36 Table Low temperature cooking 36 Grill sizes 37 Grilling table 37 Defrosting 38 Defrosting table 38 Drying 39 Keep warm 39 Making preserves 40 Cleaning and care 41 Outside of the appliance 41 Oven interior 41 Accessories 41 Oven shelf runner 42 Cleaning the oven shelf runner...

Страница 6: ...6 Description of the appliance General overview Control panel Full glass door Control panel Door handle Oven display Oven function buttons ...

Страница 7: ... accessories Oven shelf For dishes cake tins and items for roasting and grilling Grill set Grill Roasting pan shelf for roasting and grilling Roasting pan For baking and roasting or for collecting fat Top heat and heating elements Oven lighting Fan heating element Fan Bottom Heat Shelf positions Oven shelf runners removable ...

Страница 8: ... the time of day set The appliance is now ready to use Initial cleaning Before using the oven for the first time you must clean it 1 Important Do not use sharp abrasive cleaning agents These could damage the surface 3 For metal fronts use normal commer cially available cleaning agents 1 Open door The oven light illuminates 2 Remove all accessories and the shelf sup port rails and clean with warm w...

Страница 9: ... long the oven has been operating This display can only be seen if none of the clock func tions Minute timer Cooking duration or End of cooking are set The oven light switches on as soon as an oven function is selected When the selected temperature is reached an audible signal sounds Switch off the oven using the On Off button Selection buttons Temperature Clock Oven function selection Clock funct...

Страница 10: ... while the oven is working Changing the oven temperature Press the or button to raise or lower the temperature The setting changes in steps of 5 C Checking the temperature Press the and buttons at the same time The current oven temperature appears in the temperature display 3 The temperature check does not work with oven functions with suggested temperatures that cannot be adjusted such as e g Low...

Страница 11: ... the fan continues to run to cool the ap pliance down then switches itself off automatically 3 Heat indicator Warming up indicator When the oven function has been switched on the bars that slowly light up one after the other indicate how far the oven has heated up Residual heat indicator When the oven has been switched off the bars that are still lit indicate the re sidual heat remaining in the ov...

Страница 12: ...tional If necessary change the suggested temperature 2 Press the Fast heat up button The bars flashing one after another show that Fast heat up is operating When the temperature set is reached the bars of the heat indicator light up An audible signal sounds The oven now continues heating according to the pre set oven function and temperature You can now place the food in the oven 3 The Fast heat u...

Страница 13: ...Conven tional Low temperature cooking For preparing especially tender succulent roasts Conventional For baking and roasting on one oven level Rotitherm For roasting larger joints of meat or poultry on one level The function is also suitable for gratinating and browning Dual grill For grilling flat food items in large quantities and for toasting Grill For grilling flat food items placed in the midd...

Страница 14: ... the oven shelf is an additional device to prevent cookware from slipping Inserting the oven shelf and roasting pan together Lay the oven shelf on the roasting pan Insert the oven shelf and the roasting pan on the telescopic runners of the selected oven level so that the two holes of the roasting pan engage on the front retaining pins on the tele scopic runners 3 To make it easier to insert the in...

Страница 15: ...y underneath The grill tray rests in the roasting pan Push the roasting pan between the guide bars of the selected oven level 3 For roasting larger joints of meat or poultry on one oven shelf Inserting the grill tray on top The grill tray rests on the roasting pan Push the roasting pan between the guide bars of the selected oven level 3 For grilling flat food items in large quan tities and for toa...

Страница 16: ...functioning of the oven Cooking duration To set how long the oven is to be in use End of cooking To set when the oven is to switch off again Time To set change or check the time See also section Before Using for the First Time Clock Cook time End time Operating time Clock Functions Time display Selection buttons Clock Functions ...

Страница 17: ... on in order to set the clock func tion By pressing and at the same time the time set can be reset 3 Checking the time set or remain ing Press the Time functions button repeat edly until the appropriate clock func tion flashes and the time set or remaining is displayed 2 Using residual heat with the Cook ing duration and End of cooking clock functions When the Cooking duration and End of cooking c...

Страница 18: ...ton set the desired countdown After about 5 seconds the display shows the time remaining Minute timer lights up When 90 of the time set has elapsed a signal sounds When the time has elapsed a signal sounds for 1 minute 00 00 and Minute timer flash To stop the flashing and the audible signal Press any button ...

Страница 19: ...peatedly until Cooking duration flashes 3 Using the or button set the desired cooking time Cooking duration lights up When the time has elapsed 00 00 and Cooking duration flash A signal sounds for 2 minutes The oven switches itself off To stop the flashing and the audible signal Press any button ...

Страница 20: ... of cooking flashes 3 Using the or button set the desired switch off time End of cooking lights up and the switch off time is displayed When the time has elapsed 00 00 and End of cooking flash A signal sounds for 2 minutes The oven switches itself off To stop the flashing and the audible signal Press any button ...

Страница 21: ... Using the Cooking duration function set the time required for cooking the dish e g 1 hour 3 Using the End of cooking function set the time at which the dish is to be ready e g at 14 05 Cooking duration and End of cooking light up The oven switches itself on automatically at the time calculated e g at 13 05 When the set Cooking duration has elapsed a signal sounds for 2 minutes and the oven switch...

Страница 22: ...lock functions Cooking duration or End of cooking nor any oven functions are set 1 Press the Time functions button repeatedly until Time flashes 2 Using the or button set the current time After approx 5 seconds the clock stops flash ing and the clock displays the time of day set The appliance is now ready to use ...

Страница 23: ...ppliance using the On Off button 2 Press the Time functions button and the button at the same time until the display is visible again Child safety device The appliance cannot be switched on when the child safety device is activated Activating the child safety device 1 If necessary switch on the appliance using the On Off button No oven function must be selected 2 Press and hold the Time functions ...

Страница 24: ...Hold function keeps your prepared dish warm for 30 minutes after the baking or roasting process is completed This is helpful for example if your guests are late Pre condition for Heat Hold Set temperature is above 80 C Switching on Heat Hold 1 Set clock functions Cooking duration and or End of cooking 2 Press the Time functions button repeatedly until the symbol Keep warm appears in the display 3 ...

Страница 25: ...r Convection with ring heating element bright metal tins are also suita ble Oven levels Baking with Conventional is possible on one oven level With Convection with ring heating element you can bake on up to 3 baking trays at the same time 1 baking tray e g oven level 3 1 cake tin e g oven level 1 2 baking trays z g oven levels 1 and 3 3 baking trays oven levels 1 3 and 5 ...

Страница 26: ...ra ture the first time and then if necessary for example if a deeper browning is required or baking time is too long selecting a higher temperature If you cannot find the settings for a particu lar recipe look for the one that is most sim ilar If baking cakes on baking trays or in tins on more than one level baking time may be ex tended by 10 15 minutes Moist recipes for example pizzas fruit flans...

Страница 27: ...onvection with ring heating element 1 160 1 10 1 30 Apple pie 2tins Ø20cm diagonally off set Conventional 1 180 1 10 1 30 Savoury flan e g quiche lorraine Convection with ring heating element 1 160 180 0 30 1 10 Cheesecake Conventional 1 170 190 1 00 1 30 Cakes pastries breads on baking trays Plaited bread bread crown Conventional 3 170 190 0 30 0 40 Christmas stollen Conventional 3 160 1801 0 40 ...

Страница 28: ... whirls Convection with ring heating element 3 140 0 20 0 30 Viennese whirls Conventional 3 1601 0 20 0 30 Biscuits made with sponge mixture Convection with ring heating element 3 150 160 0 15 0 20 Pastries made with egg white meringues Convection with ring heating element 3 80 100 2 00 2 30 Macaroons Convection with ring heating element 3 100 120 0 30 0 60 Biscuits made with yeast dough Convectio...

Страница 29: ...ry streusel cake 1 3 140 160 0 30 0 60 Biscuits small cakes pastries rolls Short pastry biscuits 1 3 1 3 5 150 160 0 15 0 35 Viennese whirls 1 3 1 3 5 140 0 20 0 60 Biscuits made with sponge mixture 1 3 160 170 0 25 0 40 Biscuits made with egg white meringues 1 3 80 100 2 10 2 50 Macaroons 1 3 100 120 0 40 1 20 Biscuits made with yeast dough 1 3 160 170 0 30 0 60 Puff pastries 1 3 170 1801 0 30 0 ...

Страница 30: ...shorter baking time Cake browns unevenly Oven temperature too high and baking time too short Set a lower oven temperature and a longer baking time Mixture is unevenly distributed Spread the mixture evenly on the baking tray Cake is not done within the baking time given Temperature too low Use a slightly higher oven setting Desserts Convection with ring heating element Time Shelf position Tempera t...

Страница 31: ...0 50 60 Unleavened bread 1 250 2701 10 20 Puff pastry flan 1 160 1801 40 50 Flammekuchen Pizza like dish from Alsace 1 250 2701 12 20 Piroggen Russian version of calzone 1 180 2001 15 25 Dish Oven function Shelf position Temperature C Time Hours mins Pasta bake Conventional 1 180 200 0 45 1 00 Lasagne Conventional 1 180 200 0 25 0 40 Vegetables au gratin1 Rotitherm 1 160 170 0 15 0 30 Baguettes to...

Страница 32: ...ns as per manufactur er s instructions Chips1 300 600 g Rotitherm 3 200 220 as per manufactur er s instructions Baguettes Conventional 3 as per manufactur er s instructions as per manufactur er s instructions Fruit flans Conventional 3 as per manufactur er s instructions as per manufactur er s instructions 1 Comments Turn chips 2 or 3 times during cooking ...

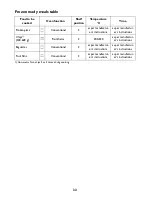
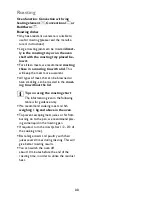
Страница 33: ...t can be browned or have crackling can be roasted in the roast ing tin without the lid 3 Tips on using the roasting chart The information given in the following table is for guidance only We recommend cooking meat and fish weighing 1 kg and above in the oven To prevent escaping meat juices or fat from burning on to the pan we recommend plac ing some liquid in the roasting pan If required turn the ...

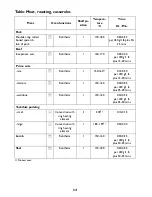
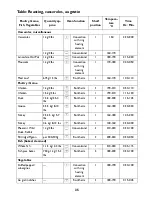
Страница 34: ... cuts rare Rotitherm 1 150 1601 0 15 0 20 per 450 g 1 lb plus 15 20 mins medium Rotitherm 1 150 160 0 20 0 25 per 450 g 1 lb plus 25 25 mins well done Rotitherm 1 150 160 0 30 0 35 per 450 g 1 lb plus 25 30 mins Yorkshire pudding small Convection with ring heating element 3 2001 0 10 0 15 large Convection with ring heating element 1 180 1901 0 30 0 40 Lamb Rotitherm 1 150 160 0 30 0 35 per 450 g 1...

Страница 35: ...erm 3 190 210 0 50 1 10 Chicken 1 5 kg 3 lbs Rotitherm 1 190 210 1 15 1 30 Duck 1 5 2 kg 3 5 4 lbs Rotitherm 1 180 200 1 15 1 45 Goose 3 5 5 kg 8 10 lbs Rotitherm 1 160 180 2 30 3 30 Turkey 2 5 3 5 kg 5 7 lbs Rotitherm 1 160 180 1 45 2 30 Turkey 4 6 kg 8 13 lbs Rotitherm 1 140 160 2 30 4 00 Pheasant Wild Duck Rabbit 1 kg 2 lbs Conventional 3 210 220 0 30 1 00 Partridge Pigeon per 300 500g Rotither...

Страница 36: ...mended for larger pieces of meat e g fillet of beef 3 When using the oven function Low temperature cooking always cook dishes uncovered without a cover 1 Sear the meat in a pan over a very high heat 2 Place meat in a roasting dish or directly on the oven shelf with a tray underneath to catch the fat 3 Place in the oven Select oven function Low temperature cooking change the tem perature if necessa...

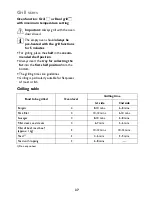
Страница 37: ...ecting the fat into the first shelf position from the bottom The grilling times are guidelines Grilling is particularly suitable for flat pieces of meat or fish Grilling table Food to be grilled Oven level Grilling time 1st side 2nd side Burgers 4 8 10 mins 6 8 mins Pork fillet 4 10 12 mins 6 10 mins Sausages 4 8 10 mins 6 8 mins Fillet steaks veal steaks 4 6 7 mins 5 6 mins Fillet of beef roast b...

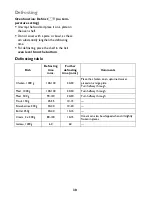
Страница 38: ...om Defrosting table Dish Defrosting time mins Further defrosting time mins Comments Chicken 1000 g 100 140 20 30 Place the chicken on an upturned saucer placed on a large plate Turn halfway through Meat 1000 g 100 140 20 30 Turn halfway through Meat 500 g 90 120 20 30 Turn halfway through Trout 150g 25 35 10 15 Strawberries 300g 30 40 10 20 Butter 250g 30 40 10 15 Cream 2 x 200g 80 100 10 15 Cream...

Страница 39: ...ied Keep warm For keeping food warm The temperature regulates itself automatically to 80 C Oven level 3 also see section Operating the oven under other functions Heat Hold Food to be dried Temperature in C Oven level Time in hours Guideline 1 level 2 levels Vegetables Beans 60 70 3 1 4 6 8 Peppers strips 60 70 3 1 4 5 6 Vegetables for soup 60 70 3 1 4 5 6 Mushrooms 50 60 3 1 4 6 8 Herbs 40 50 3 1 ...

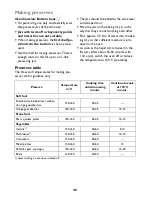
Страница 40: ...sufficient moisture is pro duced in the oven As soon as the liquid starts to pearl in the first jars after about 35 60 minutes with 1 litre jars switch the oven off or reduce the temperature to 100 C see table Preserves table The times and temperatures for making pre serves are for guidance only Preserve Temperature in C Cooking time until simmering in mins Continue to cook at 100 C in mins Soft f...

Страница 41: ...down Cleaning The catalytic coated walls are self cleaning They absorb splashes of fat whilst the oven is operating To aid this self cleaning process we recom mend that you heat up the oven at regular in tervals without placing food inside 1 The oven light will switch on automatically when the oven door is opened 2 Remove all slide in parts from the oven 3 Wipe the floor of the oven clean with war...

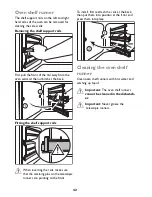
Страница 42: ...he shelf support rails 1 When inserting the rails make sure that the retaining pins on the telescopic runners are pointing to the front To install first reattach the rails at the back then put them into position at the front and press them into place Cleaning the oven shelf runner Clean oven shelf runners with hot water and washing up liquid 1 Important The oven shelf runners cannot be cleaned in ...

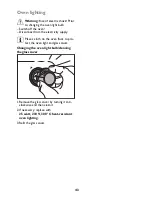
Страница 43: ...the electricity supply 3 Place a cloth on the oven floor to pro tect the oven light and glass cover Changing the oven light bulb cleaning the glass cover 1 Remove the glass cover by turning it anti clockwise and then clean it 2 If necessary replace with 25 watt 230 V 300 C heat resistant oven lighting 3 Refit the glass cover ...

Страница 44: ...will go 2 Undo the clamping levers A on both door hinges fully 3 Close the oven door as far as the first posi tion approx 45 4 Take hold of the oven door with a hand on each side and pull it away from the oven at an upwards angle Take care It is heavy 3 Lay the oven door with the outer side facing downwards on something soft and level for example a blanket in or der to prevent scratches ...

Страница 45: ... side and hold at an angle of approx 45 Position the recesses on the bottom of the oven door on the hinges on the oven Let the door slide down as far as it will go 2 Open the oven door as far as it will go 3 Fold up the clamping levers A on both door hinges back into their original positions 4 Close the oven door ...

Страница 46: ...g levers A on both door hinges fully 3 Close the oven door as far as the first posi tion approx 45 4 Take hold of the door trim B on the upper edge of the door at both sides and press in wards to release the clip seal Then remove the door trim by pulling it upwards 5 Take hold of the door glass panels on their upper edge one after the other and take them out of the guide by pulling them up wards C...

Страница 47: ...smaller panel first then the larger panel 2 Take hold of the door trim B at each side position it on the inside edge of the door and plug the door trim B into the upper edge of the door 3 On the open side of the door trim B there is a guide bar C This must be pushed between the outer door panel and the guide corner D The clip seal E must be snapped in 3 Open the oven door as far as it will go ...

Страница 48: ...48 4 Fold up the clamping levers A on both door hinges back into their original positions 5 Close the oven door ...

Страница 49: ...roblem Possible cause Remedy The oven does not heat up The oven has not been switched on Switch the oven on The clock has not been set Set the current time on the clock The required settings have not been set Check the settings The oven s automatic cut out has been triggered See Automatic cut out The house wiring fuse in the fuse box has tripped Check fuse If the fuses trip several times please ca...

Страница 50: ...load in compliance with the current regulations The switch must not break the yellow and green earth cable at any point Important After installation and connecting the cable must be placed so that it cannot at any point reach a temperature of more than 50 C above the ambient temperature Before the oven is connected check that the main fuse and the domestic installation can support the load and tha...

Страница 51: ...on is to be set up so that the appliance can be isolated from the mains with a minimum 3mm all pole contact separation Suitable separation devices include e g cut outs fuses screw fuses are to be taken out of the holder RCD s and contactors Anti shock protection must be provided by the installation The built in unit must meet the stability re quirements of DIN 68930 Built in ovens and built in coo...

Страница 52: ...52 ...

Страница 53: ...53 ...

Страница 54: ...54 ...

Страница 55: ...f the appliance So that you always have these numbers at hand we recommend you to make a note of them here Mod PNC S N Your appliance is covered by a 3 year parts and labour guarantee see separate details given at point of sale Please retain your purchase re ceipt safely for the service engineer to verify the purchase details Spare parts This product should be serviced by any au thorised service e...

Страница 56: ...John Lewis Partnership 171 Victoria Street London SW1E 5NN www johnlewis com 822 720 352 M 04 0208 ...

Отзывы: