Joerns Chauffeur Скачать руководство пользователя страница 5

5

Joerns® Bed Frames

Chauffeur™

© 2016 Joerns Healthcare • 6110347 RevA • 16-2857

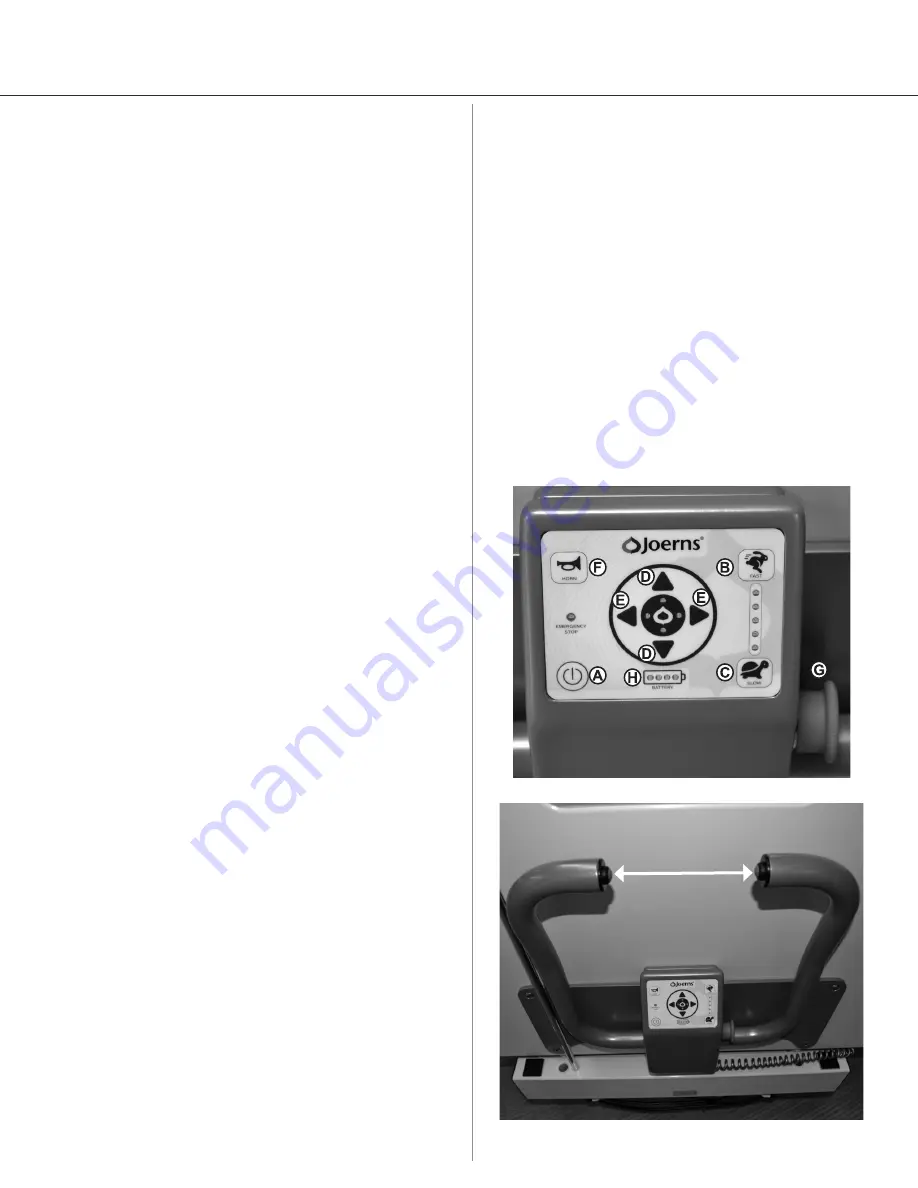
Emergency Stop (Figure 1, G)

To stop the Chauffeur in an emergency, press in on the 

Emergency Stop Button. The Emergency Stop Button 

is the large red button on the right side of the touch 

pad. The flashing LED indicates the Emergency Stop 

button has been pressed. To restart the Chauffeur 

after the Emergency Stop Button has been pressed, 

the Emergency Stop Button must be turned clockwise 

to release.

Battery Status Indicator (Figure 1, H)

The Battery Status Indicator located on bottom of the 

Chauffeur touch pad indicates when the Chauffeur’s 

batteries need to be recharged. If the battery status 

indicator shows green, the batteries are charged. If 

the battery status indicator shows yellow, the batteries 

need to be charged as soon as possible. If the 

battery status indicator shows just red (either steady 

or flashing slowly), the batteries need to be charged 

immediately. 

Control Handle

ON/OFF Power Switch (Figure 1, A)

The ON/OFF power switch is located on the bottom 

left side of the Chauffeur touch pad. To turn the power 

on, fully depress the switch until status lights turn 

on. The battery indicator will illuminate indicating the 

power switch is on.

Speed Modes

The Chauffeur control handle provides variable speed 

modes, from FAST (Rabbit: Figure 1, B) to SLOW 

(Turtle: Figure 1, C). The FAST/SLOW buttons, located 

on the right side of the Chauffeur touch pad, allows 

selection of the desired speed mode. Depressing 

SLOW enables the low speed mode, whereas FAST 

enables a comfortable walking pace. Always select the 

slow mode in close quarters. The speed mode applies 

to both forward and reverse directions as well as side 

to side.

Forward/Reverse Control (Figure 1, D)

The Forward/Reverse direction of the Chauffeur is 

controlled by the arrows on the touch pad located at 

the center of the Chauffeur control handle. Pressing 

any arrow will cause the Chauffeur to move in that 

direction. The selected direction is indicated by 

the illuminated LED next to the arrow. 

Note: 

The 

directional arrows will blink when drive is preparing to 

engage or change direction.

SideShift™ Left/Right Control (Figure 1, E)

The Left/Right direction available on the 4-way model 

is controlled by the left/right arrows on the touch pad 

located at the center of the Chauffeur control handle. 

Pressing any arrow will cause the Chauffeur to move 

in that direction. The selected direction is indicated by 

the illuminated LED next to the arrow.

Drive Buttons (Figure 2)

The Chauffeur drive movement is controlled by green 

drive buttons located on the top of the control handles.  

Pressing either of the drive buttons will cause the 

Chauffeur to move.

Horn (Figure 1, F)

The Chauffeur touchpad has a horn button located on 

the left of the control handle. Press the button to sound 

the horn. Release the button for the horn to turn off.

Figure 2

Figure 1

Содержание Chauffeur

Страница 1: ...User Service Manual Joerns Bed Systems Chauffeur Drive To avoid injury read user s manual before using...

Страница 2: ...ible Injury or Death Engage caster lock on bed when not in use Warning Possible Injury or Death The Joerns Chauffeur is designed to move select Joerns beds when the bed contains a safe working load of...

Страница 3: ...bed unplug bed from power source wrap power cord around cord storage hooks on bed frame below head panel and hang pendant from head panel Failure to do so could result in power cord pendant cord or be...

Страница 4: ...riances in battery conditions load on the bed and terrain conditions may result in actual distances that differ Electrical Specifications Batteries 2 24 VDC 35 amp hour capacity Battery Charger Input...

Страница 5: ...e Figure 1 C The FAST SLOW buttons located on the right side of the Chauffeur touch pad allows selection of the desired speed mode Depressing SLOW enables the low speed mode whereas FAST enables a com...

Страница 6: ...ectional arrows Allow a moment for the Chauffeur to adjust to the new direction The LED light will stop flashing when ready Gently press the drive button to engage Always adjust the speed appropriatel...

Страница 7: ...more upright stride by the caregiver The handle can be mounted higher to accommodate the patient helper See installation instructions Braking Systems The Chauffeur has programmed braking that will sw...

Страница 8: ...ors which can reduce battery life are Irregular or inefficient charging extreme temperatures and how much weight you are moving If the distance you travel on a charge becomes noticeably shorter and ra...

Страница 9: ...for wear fraying or cracking 2 Check the connectors for wear or cracking 3 Examine the wheel and wheel assemblies for wear or damage Lubrication All wheel bearings are sealed and permanently lubricate...

Страница 10: ...and lead may seep out from batteries that are carelessly disposed potentially contaminating bodies of water and harming wildlife and or humans Dispose of worn out batteries at your local recycling cen...

Страница 11: ...y for operation 3 Bars The display is showing a red yellow and one green LED Connect the Chauffeur to an AC outlet to recharge the batteries as soon as possible 2 Bars The display is only showing red...

Страница 12: ...speed mode and change to faster selection Check display on control Recharge unit if reading low Display shows full charge but drops shortly after powering unit Batteries are weak Remove batteries and...

Страница 13: ...cal Support at 800 826 0270 for assistance Fault Code 4 NA Solution Not used Call Technical Support at 800 826 0270 Fault Code 5 Compressor Time out Solution Check for air leaks check compressor wirin...

Страница 14: ...horized in writing by Joerns Healthcare will void this warranty Parts Joerns beds and accessories contain various parts that wear from normal use These parts such as DC batteries are not covered under...

Отзывы: