


NT-2000 REF Manual
Customizing Operation via Menu System
4-25
4 . 1 2 . P e r f or m i ng S e l f – D i ag n o s ti c Te s ts
Figure 4-37 Starting Self–Diagnostic Test
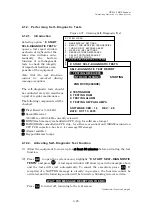
4.12.1. Introduction
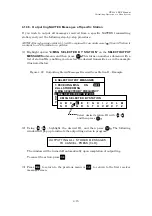
Selecting option “
8: START
SELF–DIAGNOSTIC
TESTS
”
opens a test report window
as shown at right and at the
same time initiates auto–
matically the built–in
function of self–diagnostic
tests to check the integrity
of important hardware com
–
ponents of the equipment.
Note that the test functions
cannot be executed during
message reception.
The self–diagnostic tests should
be conducted every six months as
a part of regular maintenance.
The following components will be
checked:
・
First Receiver (518 kHz)
・
Second
Receiver
(490 kHz or 4209.5 kHz, currently selected)
・
ROM (flash memory embedded in CPU chip, for software storage)
・
RAM
(DRAM embedded in CPU chip, for software execution) and (SRAM mounted on
CPU PCB
, capacitor–backed, for message/ID storage)
・
Alarm
(audible )
・
Keypad dimmer lamps
4.12.2. Activating Self–Diagnostic Test Function
(1) Allow the equipment to warm up for at least 30 minutes before activating the test
function.
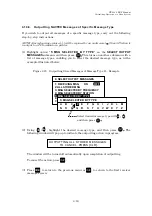
(2) Press
to open the system menu, highlight “
8: START SELF–DIAGNOSTIC
TESTS
” and press
. A test report window will show up as in the example above,
and the tests will start automatically. To cancel the execution, press
. If
reception of a NAVTEX message is already in progress, the function cannot be
activated, and the following caution will be turned on, blinking in reverse video.
i
WA I T FOR MESSAGE RECEPTION TO END!
i
Press
to turn it off, returning to the text screen.
(
continued on next page
)
S Y S T E M M E N U
1:
MAKE DISPLAY SETTINGS
2: SELECT 2ND RECEIVER FREQUENCIES
3: TURN ON / OFF KEYPRESS BEEP
4: MAKE SEL / REJ SETTINGS
5: SEARCH STORED MESSAGES
6. SELECT OUTPUT MESSAGES
7. SET OUTPUT PORTS
8. START SELF–DIAGNOSTIC TESTS
9: TURN ON / OFF MESSAGE ALARM
0. RESET TO FACTORY DEFAULTS
8: START SELF–DIAGNOSTIC TESTS
SELF–DIAGNOSTIC TEST REPORT
1: TESTING RECEIVERS
1ST RCVR
I
(518KHZ)
I STARTING
2ND RCVR (490KHZ)
2: TESTING ROM
3: TESTING RAM
4: TESTING ALARM
5: TESTING KEYPAD LAMPS
SOFTWARE VER.: 1.2 REV. : 2.9
DATE: OCT 13, 2005


