


Text Messages
82
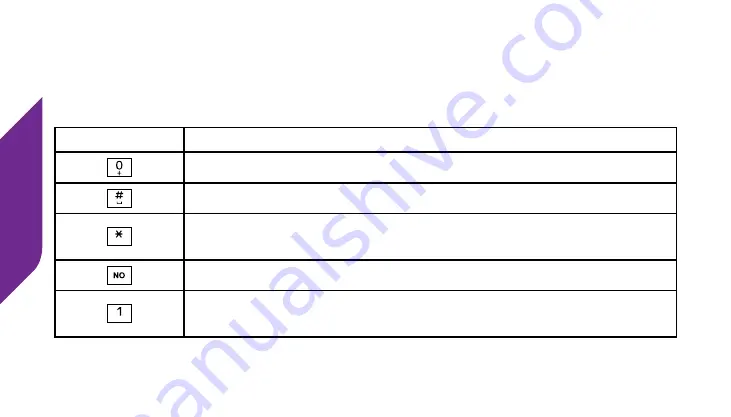
Entering Text with the Keypad
The table below explains how to create a custom
Text Message
using the
numeric keys on the
Keypad
to enter letters and special characters.
Keyboard
Function
Enters the number “0” in any Text Message entry mode
Add a space
Press repeatedly to cycle through the 123, ABC, Abc-S,
Abc-W and abc Modes
Move back a space and delete a character
Press repeatedly to enter special characters:
. , - ‘ @ : ! ? / 1
Содержание Flip
Страница 1: ...UserGuide Everything you need to know about your Jitterbug Flip jitterbug jitterbug ...
Страница 2: ......
Страница 4: ......
Страница 8: ...Table of Contents IV Legal 111 Safety and Use 111 Customer Agreement 123 Index 137 ...
Страница 9: ...Table of Contents V ...
Страница 10: ...Getting Started VI ...
Страница 12: ...Getting Started 2 Jitterbug Flip USB Cable Wall Charger Charging Dock ...
Страница 18: ...Getting Started 8 Volume Button External Speaker Flashlight Button Battery Cover Battery Cover Release ...
Страница 39: ...Getting Started 29 ...
Страница 40: ...Phone Calls 30 ...
Страница 44: ...Phone Calls 34 ...
Страница 61: ...Phone Calls 51 ...
Страница 69: ...Phone Calls 59 ...
Страница 70: ...Camera 60 ...
Страница 73: ...Camera 63 ...
Страница 82: ...Text Messages 72 ...
Страница 98: ...Additional Information 88 ...
Страница 119: ...Additional Information 109 ...
Страница 120: ...Legal 110 ...
Страница 145: ...Legal 135 ...
Страница 146: ...Index 136 ...
Страница 157: ...Index 147 Voicemail Messages 50 52 Volume 38 Volume Button 9 36 W Wall Charger 14 Y YES Button 7 ...
Страница 159: ...www greatcall com JB6 USERGUIDE V2 ...


