JIMTEN Ciclon CC T-604 CC Скачать руководство пользователя страница 25

5.3. STARTING OF APPLIANCE.

To start the unit:
- Check that the lavatory has no foreign objects.
- Open the cistern filling stopcock. The grinding process needs at least 6 litres to be completed
properly.
- Check the connection to the electrical current.
- Operate the cistern several times by putting some pieces of toilet paper between each discharge to
check the adequate operating of the evacuation process. After the discharge, there must be no pieces
of toilet paper left within the lavatory bowl

6. INSTRUCTIONS FOR FINAL USERS.

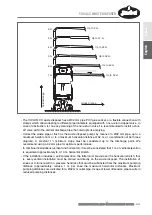
Once installed and connected to the electrical power supply, the CICLON FIT does not require special
maintenance. The waster disposer automatically goes into action every time it receives a water supply
from the lavatory or from the sanitary appliance connected to it, the waste disposer stops when the
pump has finished the evacuation. For a good waste disposer operating, it is recommended to
discharge only sewage, defecations and toilet paper.

Warning notices:

- Do not throw foreign objects such as: sanitary towels, tampons, condoms, cotton, cotton buds, scou-

ring pads, sponges, hairs, sink drains, food waste, plastic bags, nappies, paper towels, etc, since
they may damage and block the waste disposer. 

- Do not throw corrosive liquids such as: acids, solvents, oil, painting, stripping, as they can deform

and affect the correct working of the unit.

- In this case, the warranty does not cover those damages.

- Please, do not place inside the lavatory cistern dosage systems for disinfecting or cleaning the lava-

tory, since they could damage the discharge and filling mechanism materials with a result of esca-
pes, by starting continuously the system.

- Along with these documents, it is provided an adhesive label to be placed on a perceptible place (we

recommend to place it inside the lavatory lid) as a warning sign to avoid foreign wastes.

- Please, do not use the lavatory nor any of the sanitary appliances connected to the waste disposer

when, under any circumstances, there is a power cut.

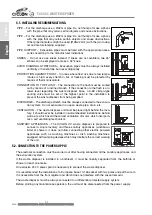
- Regarding installations of isolated use or during long non-use periods, it is

recommended to close the stopcock feeding the cistern and, then, discharge
it by emptying it. Thus, any escape risk can be avoided.

- In areas with a frost risk due to low temperatures, it is recommended to

protect pipes with thermal insulators, as well as to prepare the whole system
(cistern, waste disposer and evacuation pipes).

- You may prevent freezing by following these steps:

- Close the stopcock feeding the cistern and discharge it.

- Fill in the cistern with antifreeze solution suitable for plumbing.

- Discharge the cistern again. The antifreeze solution will go through the installation and will fill the

evacuation pipe.

- This warranty does not cover the damages caused in the waste disposer due to freezing.

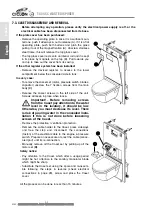
7. MAINTENANCE OPERATIONS.

Jimten waste disposer has been designed to fulfil high reliability and years of working, hereby please
find detailed the most common maintenance operations, as well as a quick troubleshooting guide for
problems you may easily solve.

INSTRUCTIONS AND MAINTENANCE GUIDE - 25

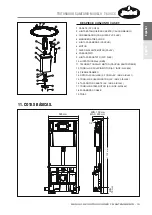
T-604 CC WASTE DISPOSER

English

Español

Содержание Ciclon CC T-604 CC

Страница 1: ...RIDAD Para reducir el riesgo de elec trocuci n no abrir las tapas superiores No manipular el interior del triturador sanitario recurrir siempre a personal cualificado Para evitar posibles incendios o...

Страница 2: ...ventes o cidos Cuando se prevean periodos largos de tiempo sin utilizaci n deber desconectarse la toma de corriente o el circuito el ctrico al que est conectado y poner especial atenci n en cerrar la...

Страница 3: ...inistrado y al bastidor cisterna mediante los tornillos de anclaje facilitados El producto se compone de 2 m dulos independientes El cuerpo triturador formado por un dep sito que recibe las conexiones...

Страница 4: ...a la toma roscada de 1 2 suministrada y verifique que no fuga Instale las tapas de protecci n de obra tanto en la descarga del como en la alimentaci n a la cisterna de forma provisional hasta que fina...

Страница 5: ...a trav s del tubo de evacuaci n 32 mediante los adaptadores suministrados hasta una altura m xima de 6 m o hasta una distancia horizontal m xima de 52 m o una combinaci n de las dos ver diagrama se d...

Страница 6: ...punto m s alto de la instalaci n para evitar el vaciado del triturador DESCARGA El tramo de descarga siempre debe conectarse a la red de evacuaci n no debe evacuar nunca en desag es abiertos sumideros...

Страница 7: ...casos los da os no est n cubiertos por la garant a No introducir en el interior de la cisterna del inodoro sistemas de dosificaci n de desinfectante o limpiador de inodoro ya que pueden deteriorar los...

Страница 8: ...e agua al triturador a trav s de la v lvula antiretorno del tubo de evacua ci n comprobar que sta cierre correctamente verificar que la clapeta asienta correctamente y susti t yala o l mpiela en caso...

Страница 9: ...motor 7 3 Aparici n de olores procedentes del triturador Desgaste del filtro de carb n activo Sustituci n del filtro Contacte con el S A T No desagua bien el plato de ducha Posible obstrucci ndel desa...

Страница 10: ...En todos los casos Para retirar el conjunto caset motor presostato cuchi llas bomba condensador retire los 7 tornillos de anclaje al cuerpo principal Retire los tornillos del caset a la izquierda de...

Страница 11: ...za reali zar varios ciclos de descarga de la cisterna y si ha sido instalada cerrar la v lvula de paso del tubo de evacuaci n vertical y desconectar la unidad de la corriente el ctrica el ctrica o des...

Страница 12: ...ste entresuelo terminado y estructura 200 mm Regulable entre profundidad 155 205 mm Tornillos de fijaci n del WC de M12 Adaptable inodoros de anclajes a 180 mm de separaci n Tanque Para pulsador de hu...

Страница 13: ...I N EXISTENTE C TUBER A ENTRADA DESAG E 1 PENDIENTE B TUBER A DE IMPULSI N 32 CON 1 DE PENDIENTE DN 50 1 3 4 2 x 6 x 6 4 5 7 5 6 3 4 2 5 7 8 2 9 English Espa ol 1 GRIFO FLOTADOR 2 V LVULA DE CORTE 3 B...

Страница 14: ...TE PP COPO 14B JUNTA CASETE CAUCHO 15 TUERCA 1 1 4 PP 16 TUBO PVCb 17 JUNTA TRICA CODO IMPULSIN NBR 19 TORNILLO SUJECIN AC INOX AISI 304 20A TUERCA CLIP VLV ANTIRETORNO PP 20B PARTE SUPERIOR VLV ANTIR...

Страница 15: ...R PA FV 8 PRESOSTATO 9 JUNTA PRESOSTATO PVC FLEX 10 JUNTA TRICA 22x3 NBR 11 TAPONES TORNILLO MOTOR CAUCHO SANTOPRENE 12 TORNILLOS SUJECIN MOTOR AC INOX AISI 304 13 CIERRE CERMICO 14 ROTOR CUCHILLAS PP...

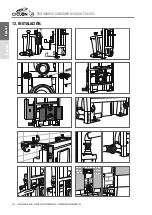
Страница 16: ...16 MANUAL DE INSTRUCCIONES Y MANTENIMIENTO TRITURADOR SANITARIO MODELO T 604 CC 12 INSTALACI N English Espa ol...

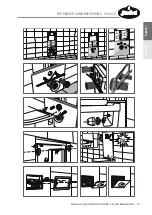
Страница 17: ...MANUAL DE INSTRUCCIONES Y MANTENIMIENTO 17 TRITURADOR SANITARIO MODELO T 604 CC English Espa ol...

Страница 18: ...18 MANUAL DE INSTRUCCIONES Y MANTENIMIENTO TRITURADOR SANITARIO MODELO T 604 CC 12 MANTENIMIENTO English Espa ol...

Страница 19: ...electrocution do not open top covers Do not manipulate the internal compo nents of the sanitary macerator Always have a qualified technician to serv ice your unit To prevent risk of fire or elec trocu...

Страница 20: ...ents or acids When long non use periods are expected disconnect the plug from the socket Take special care of turning off the stopcock allowing the water supply to the lavatory cistern and also in eve...

Страница 21: ...waste disposer by means of a coupling provided and a frame tank with the fixing screws supplied The waste disposer consists of two independent modules The sanitary macerator body formed by a tank and...

Страница 22: ...ks are finished and the lavatory installed Thread wall hung fixing bolts and protect them covers supplied Install the selected frontal finishing onto the concealed cistern light wall tiling Keep regis...

Страница 23: ...performance In combined installations vertical and horizontal it must be considered that 1 m of vertical elevation is equivalent approximately to a 10 m horizontal stretch If the installation includes...

Страница 24: ...connected to the evacua tion system Do not evacuate in an open waste pipe drain etc VENTILATION The waste disposer unit must be placed right behind the lava tory it should never be installed in wall e...

Страница 25: ...stern dosage systems for disinfecting or cleaning the lava tory since they could damage the discharge and filling mechanism materials with a result of esca pes by starting continuously the system Alon...

Страница 26: ...ces You must also check that there is no return to the waste disposer through the non return valve of the evacuation pipe due to an inappropriate closing thereof verify that the clappet fits properly...

Страница 27: ...mantling and remo val Nasty smells coming from the waste disposer Corrosion of the active carbon filter Replace the filter contact the T A S The shower base does not evacuate correctly Obstruction on...

Страница 28: ...rew the 7 fixation screws from the main body C Release the casset screws in the left side of the unit Screws will keep in place when loose Important Before removing screws from the Caset pay attention...

Страница 29: ...EMENT CLEANING NON RETURN VALVE Before starting the replacement clearing discharge several times and if it was previously installed to close the stopcock of the vertical waste pipe and disconnect the...

Страница 30: ...4 fixing points Pre assembled Includes fixing points 200mm adjustment range for floor height finishing and building structure distance Depth adjustment from 155 205 mm M12 Fixing screws for wall hung...

Страница 31: ...ILATION PIPE C WASTE INLET 1 SLOPE B 32 MM OUTLET PIPE WITH 1 SLOPE 180 mm min DN 50 1 3 4 2 x 6 x 6 4 5 7 5 6 3 4 2 5 7 8 2 9 1 UNIVERSAL FLOAT VALVE 2 CONNECTION SET INEO 3 STIFFENING BRIDGE 4 PROTE...

Страница 32: ...B CASET WATERTIGHTNESS JOINT 15 1 NUT PP 16 PVCb PIPE 17 O RING OUTLET ELBOW NBR 19 FIXING SCREW AC INOX AISI 304 20A NUT CLIP FOR NON RETURN VALVE PP 20B NON RETURN VALVE LOWER PART 20C 31X2 O RING N...

Страница 33: ...H 9 PRESSURE SWITCH JOINT PVC FLEX 10 22X3 O RING NBR 11 SCREW MOTOR PLUGS 12 MOTOR FIXING SCREW AC INOX AISI 304 13 CERAMIC LOCK 14 ROTOR PP COPO AC INOX AISI 301 15 ROTOR CLAMPING SCREW AC INOX AISI...

Страница 34: ...34 INSTRUCTIONS AND MAINTENANCE GUIDE T 604 CC WASTE DISPOSER 12 INSTALLATION English Espa ol...

Страница 35: ...MANUAL DE INSTRUCCIONES Y MANTENIMIENTO 35 T 604 CC WASTE DISPOSER English Espa ol...

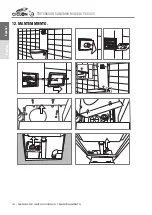
Страница 36: ...36 INSTRUCTIONS AND MAINTENANCE GUIDE T 604 CC WASTE DISPOSER 12 MAINTENANCE English Espa ol...

Страница 37: ...nde Richtlinien erfillt Niederspannungsrichtlinie 73 23 EWG AB NDERUNGEN Elektromagnetische vertr glichkeit 89 336 EWG AB NDERUNGEN Est conforme aux directives Directive Basse Tension 73 23 CEE amende...

Страница 38: ...particulares en su pais o su distribuidor local PARA LA UTILIZACI N DE ESTA GARANT A P NGASE EN CONTACTO CON SU DISTRIBUIDOR USER S COPY GUARANTEE CERTIFICATE GENERAL GUARANTEE CONDITIONS With the aim...

Страница 39: ...ir de la fecha de compra a la sustitu ci n o reparaci n de componentes defectuosos gratuitamente JIMTEN S A no responde de los da os que directa o indirectamente pudieran ocasionar a personas u objeto...

Страница 40: ...Tel fono de contacto Servicio de Asistencia T cnica 965 109 066 Horario de 08 h a 14 h y de 15 h a 17 h Apartado de Correos 5285 03080 ALICANTE Espa a 8596 11 14 JIMTEN...

Отзывы: