background image

小牛电动

Niu Electric

- 93 -

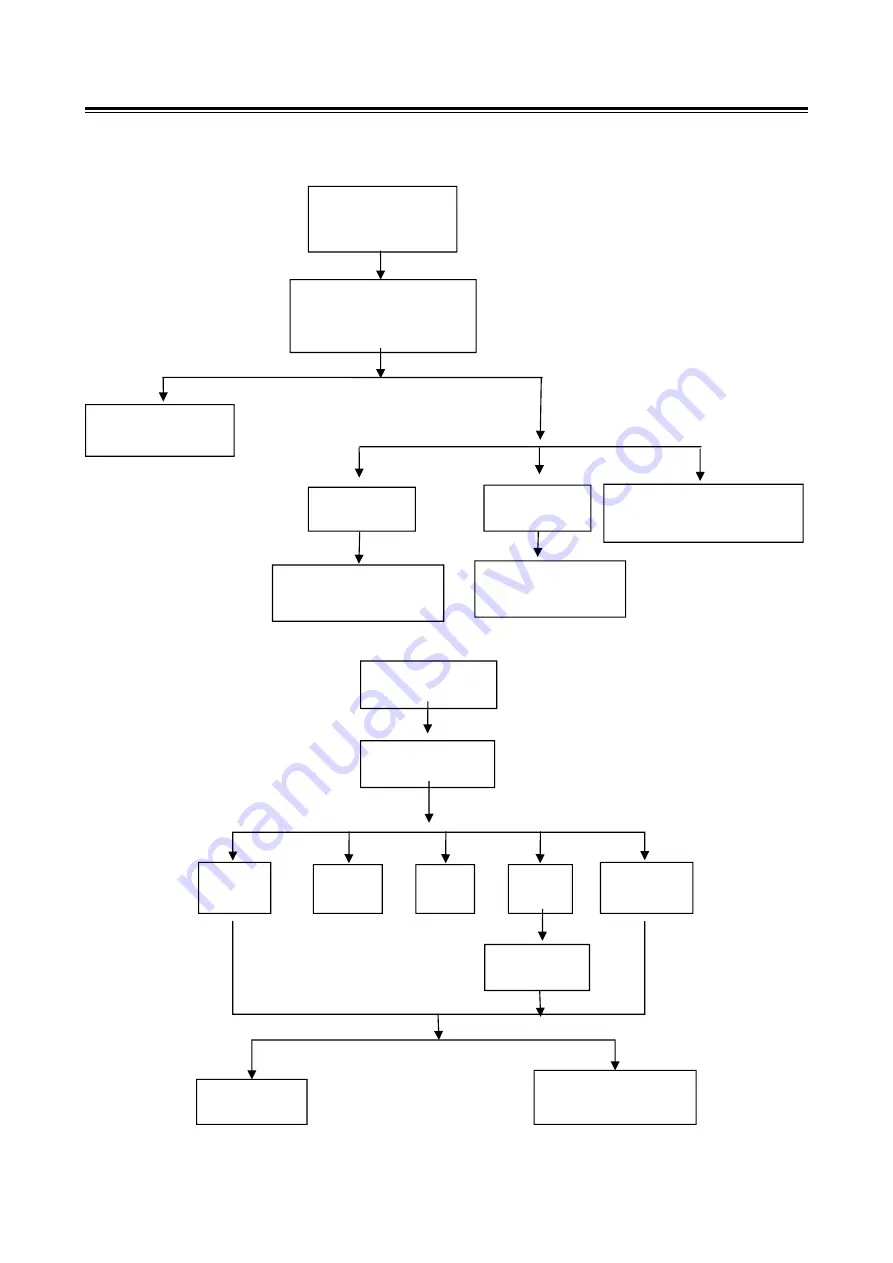
Failure code diagnosis

Failure code diagnosis procedures

Disconnect the battery

before replacement.

Disconnect the battery

before replacement.

The instrument

displays the failure

code 00

The

central

controller failed.

The instrument

failed.

Check the main harness instrument and

the central controller communication

circuit RS485.

Check the central

controller connection circuit

for looseness,

Cable falling off or in a

bad contact.

Controller or communication failure codes

The instrument displays

the failure code 10

Rotation

failure

Under-vo

ltage

Over-curr

ent

Over-vo

ltage

The controller suspends

The controller

is overheated

Check the battery

voltage

Check the controller

Stop and restart the

vehicle

Содержание N1S

Страница 1: ...Niu Electric N1S Operation Maintenance Manual for Electric Scooter N1S Jiangsu Niu Electric Technology Co Ltd...

Страница 2: ...res gloves when working on hot components is not set forth herein We recommend you not to carry out procedures specified in this manual without readiness if you have not received the workshop safety t...

Страница 3: ...r is lifted Make sure that the scooter is always supported stably when being lifted with a crane or jacks Please use jack mounts The hot motor after driving for a long time may cause burns Wait for th...

Страница 4: ...ody scooter body panel 9 Maintenance 17 Front wheel front suspension 23 Rear wheel rear suspension 31 Braking system 36 Lithium battery charger 47 Motor controller accelerator handle Hall cable sensor...

Страница 5: ...tment including maintenance methods for scooter safety and component performance that are applied from regular examinations are described Chapters are edited with disassembly diagrams system figures a...

Страница 6: ...nance Rules 4 Scooter Identification 6 Overall specifications 7 Specifications of the motor controller system 7 Specifications of the battery charger 7 Specifications of the braking system 8 Specifica...

Страница 7: ...tored in a proper installation sequence for further assembling 7 Extra attention should be paid to important fitting positions before disassembling Parts that are no longer to be used should be replac...

Страница 8: ...ons where cables may be stuck in moving The cable placement along stem handles should not be made too tight or loose and should not interfere with adjacent parts at any steering positions Cables shoul...

Страница 9: ...ged with British fasteners 3 The replacement with new washers O rings split pins and lock shims should be made for reassembly 4 Bolts or nuts should be tightened by beginning with large diameter bolts...

Страница 10: ...t shock absorber Telescopic type with 31mm dual hydraulics Rear shock absorber Telescopic type with dual hydraulic springs Brake Type of the front brake Hydraulic brake with dual pistons at one side T...

Страница 11: ...iquid DOT3 or DOT4 Diameter of the rear brake disc 180mm Thickness of the rear brake disc 3 5 2 5 Thickness of the rear hydraulic brake pad 4 5 3 0 Dedicated brake liquid DOT3 or DOT4 Specifications o...

Страница 12: ...Niu Electric 9 Scooter body scooter body panel...

Страница 13: ...indshield 2 Front journal lid 3 Front panel 4 Front fender bushing 5 Side panel 6 Side strip 7 Rear bottom fork 8 Rear fender 9 scooter body cover 10 Rear Handrail 11 Saddle 12 Front glove compartment...

Страница 14: ...t 14 Panel 15 Right front panel 16 Right side strip Note Do not damage scooter body coverages in disassembling assembling Do not damage hooks and claws on scooter body coverages in disassembling assem...

Страница 15: ...al guard Seat cushion assembly Left foot guard right foot guard Left scooter body right scooter body Note Do not damage scooter body coverages in disassembling assembling Do not damage hooks and claws...

Страница 16: ...and then remove the windshield Perform the installing contrary to the removal sequence Front journal lid Removal installation Remove 2 screws and then remove the front journal lid Perform the install...

Страница 17: ...central guard scooter body cover tail lamp assembly Removal installation Remove the following components Storage box Rear handrail Central guard Disconnect the saddle lock cable from the saddle switch...

Страница 18: ...e front panel Remove the battery compartment cover Remove the central guard Remove the foot pedal Remove the left and right side strips Remove connection screws Lift up the right side panel slightly a...

Страница 19: ...Support at one side Remove 2 connection bolts at one side Remove the rear fender Front fender bushing Removal installation Remove 4 left and right connection bolts Remove the front fender bushing The...

Страница 20: ...he accelerator handle Wearing of the brake plate with the disc brake type Inspection of the brake handle Brake liquid Brake lamp switch Inspection of the scooter lamp system and switches Side support...

Страница 21: ...ance of plastic scooter parts Screws and fasteners Front and rear shock absorbers Gap and deformation Fixed assembling Lock and hook assembling Steering inspection Front and rear tires Front wheel and...

Страница 22: ...if necessary Brake liquid Note The leaking brake liquid can damage coatings plastics or rubber parts They should be well covered with cloths or paper sheets during the system maintenance Do not use d...

Страница 23: ...brake switch is not synchronous with brake application synchronous with brake application Inspection of the scooter lamp system and switches Turn on the ignition switch to check left and right combin...

Страница 24: ...torque values Make sure that all the split pins safety clips hose clamps and wire cables have been placed properly and secured tightly Inspection and maintenance of fasteners Schedule of fastener torq...

Страница 25: ...uld be inspected as long as there are suspicious abnormal conditions Check the tire pressure with the tire pressure gauge when the tire has been cooled down Recommended tire pressure 20 25psi Front ti...

Страница 26: ...Niu Electric 23 Front wheel front suspension Preparation Failure diagnosis Front wheel Steering handle Front fork...

Страница 27: ...N m C Rim run out limits 2 0mm Vertical limit 2 0mm 2 0mm Lateral limit 2 0mm D Deflection limit of the front axle 0 2mm 0 2mm 1 Vacuum tire 90 90 12 2 Front axle 3 Front rim 12 1 25 4 Inflating valv...

Страница 28: ...right shock absorber assembly 4 Bolt M10 1 25 5 Lower conical bearing 6 Outer race of the upper conical bearing 7 Upper conical bearing 8 Bearing cover 9 Lock nut 10 Gland nut A 18 28 N m Installatio...

Страница 29: ...1 Right rear view mirror 12 Accelerator control handle 13 Right combination switch 14 Accelerator cable 15 Grip end collar 16 Hex flange bolt M10 17 T shape board 18 Fixed block 19 Nut M10 A Installat...

Страница 30: ...rd value mm Usability limit mm Front wheel axle Deflection 0 2 Front wheel Rim oscillation Vertical 2 0 Lateral Within 1 0 2 0 Torque value Tool Tightening bolts on the steering handle assembly 40 60...

Страница 31: ...firmly Loosen the installation bolt on the brake cylinder assembly Remove the brake cylinder assembly Place an appropriate support under the lower water baffle in order to lift up the front wheel Loo...

Страница 32: ...g installation tool Note The bearing must be inserted in parallel Installation The installing is made contrary to removal steps Pay attention to the following items Lubricate the front axle oil seal l...

Страница 33: ...ation Apply the lubrication grease to the lower conical bearing and make sure that the bearing rotates freely Then install the steering column Support the steering handle Apply the lubrication grease...

Страница 34: ...Niu Electric 31 Rear wheel rear suspension Preparation Failure diagnosis Motor Rear shock absorber...

Страница 35: ...ear brake 4 Kickstand 5 Motor 6 Vacuum tire 7 Rear brake disc 8 Rear bottom fork 9 Right rear shock absorber Motor A Torque value for self locking nuts on the motor as shown in the figure 60 80 N m B...

Страница 36: ...r 5 Vacuum tire 120 90 12 6 Motor 7 Rear brake disc 8 Rear disc brake pump Rear wheel rear suspension Preparation Failure diagnosis Rear wheel Rear shock absorber A Tire size 120 90 12 B Motor run out...

Страница 37: ...on the rear shock absorber 37 44 N m Bottom bolts on the rear shock absorber 22 29 N m Failure diagnosis Oscillation of the rear wheel Deformation of the motor rim Motor failure Motor un tightned Bea...

Страница 38: ...Self locking nuts on the motor Torque value 60 80 N m Rear shock absorber Disassembling Remove the seat cushion assembly and the scooter body assembly Loosen tightening bolts on top of the rear shock...

Страница 39: ...Niu Electric 36 Braking system Maintenance instruction Failure diagnosis Front hydraulic brake Rear hydraulic brake Adjustment of the rear brake pad Brake liquid change air discharging...

Страница 40: ...mit 3 0 C Installation torque value for bolt 5 in the figure 5 9 N m D Free travel of the brake handle 7 15mm 7 15mm 1 Lower pump assembly on the front hydraulic brake 2 Brake pad 3 Upper pump assembl...

Страница 41: ...5mm Operating limit 2 5 C Free travel of the brake handle 7 15mm 7 15mm 1 Self locking nut 2 Spring washer 3 Lock washer 4 Locating washer 5 Vacuum tire 120 90 12 6 Motor 7 Bracke disc 8 Rear disc br...

Страница 42: ...m Tightening bolts on the fixed handle seat cover 5 9 N m Self locking nuts on the motor 60 80 N m Failure diagnosis Brake The brake performance is not good 1 The brake is not adjusted properly 2 The...

Страница 43: ...e brake pad assembly will be used again than it should be marked at side before removal so that it can be installed at its original position Remove the following assemblies from the right handle and f...

Страница 44: ...be replaced in pairs The brake disc can be measured when it stays on the scooter without removal Installation Install the front brake disc and front wheel assembly Install the front hydraulic brake pa...

Страница 45: ...cylinder assembly from the motor Inspection Check the rear hydraulic brake pad assembly for wearing Replace brake shoes where necessary Measure thickness of the rear hydraulic brake pad assembly Meas...

Страница 46: ...htening bolts on the front shock absorber assembly Self locking nuts on the motor 60 80 N m There should be no oil stains on the brake pad Oil stains on the brake pad should be cleaned off with the br...

Страница 47: ...e and hose joint for air leakage Is there a sponge like feeling when operating the brake handle There is air left in the brake system oil circuit Check the brake pad for wearing to the limit mark Chec...

Страница 48: ...whether there is a friction Repeat the above steps if so If the brake caliper rubs with the brake disc no matter how the adjustment is made after the third step then the bolts 3 and 4 will be loosened...

Страница 49: ...nt brake handle tightly and pressurize the system until there are no air bubbles from the liquid reservoir hole and the resistance to the front brake handle is felt Connect the oil drainage hose to th...

Страница 50: ...Niu Electric 47 Lithium battery charger Maintenance Information Parameter specification Battery pack Battery test Charger Inspection...

Страница 51: ...connection may lead to damages of some units when the power supply lock is opened and there is a current The battery used for this model is a lithium battery Remove the battery from the scooter for s...

Страница 52: ...Niu Electric 49 Battery pack Battery model Charger interface Serial number of the battery pack Operation maintenance instruction...

Страница 53: ...makes acquisition processing and control of the hardware which is a core component of BMS Auxiliary controller the chip that makes acquisition and transmission of the battery pack data to the main con...

Страница 54: ...ic 51 Software operation method System log in Run the program The system log in window appears Input the user name and password Click on OK The system interface appears after log in verification Syste...

Страница 55: ...cally with the battery pack being connected The voltage information from up to 39 monomers can be displayed Firmware upgrading Click on the menu of Firmware Upgrading in the menu bar to display the co...

Страница 56: ...ge about these parameters is very professional The complicated parameter configuration has been significantly simplified in the system for easy operation by common users There is only one button displ...

Страница 57: ...Niu Electric 54 The prompt window will appear when the writing is completed as shown in the figure...

Страница 58: ...the battery has not been fully charged for more than 24 hours and the red lamp does not turn to green and then contact the after sale service for inspection of the charger and battery 1 Connect the c...

Страница 59: ...r Maintenance Information Technical parameters Failure elimination Inspection of the motor winding resistance Inspection of the motor insulation Inspection of the maximum motor no load current Inspect...

Страница 60: ...to proper maintenance of the motor system and appropriate protection measures for avoidance of the electric shock since the high current and voltage are involved The Hall cable sensor and Hall motor...

Страница 61: ...ation but the motor does not rotate 1 Inspection of the startup switch at shift P Is the startup switch shorted the shift P can not be released Yes the startup switch failed No go to step 2 2 Inspecti...

Страница 62: ...step 4 4 Inspection of the power supply lock Is the power supply lock in a bad contact Yes the power supply lock failed or the wire is in a bad contact No go to step 5 5 Controller inspection Check th...

Страница 63: ...re phase wire Standard 1 2 0 2 Replace the motor assembly if the reading is far more than the standard value Inspection of the motor insulation creepage Set up the kickstand stably on a flat ground Ch...

Страница 64: ...operated stably for 5 minutes Calculate the maximum motor no load current A Calculation A A2 A1 Standard 3 5A The measurement value that is more than the standard one indicates that the motor assembl...

Страница 65: ...ontroller judges the motor status automatically in a certain period of time after the motor rotation failure over current occurs It controls automatically the output current to protect safety of the m...

Страница 66: ...he removal Controller cable connector Compone nt name Motor controller Interface number J26 A J26 A Connector type Connector 30P J2X Interface definition PIN Color Definition 1 White and yellow Three...

Страница 67: ...gnition switch and air switch to ON It indicates that the circuit is normal Voltage of the 12V power cord Disconnect the controller connector Check the voltage between the red black wire and the negat...

Страница 68: ...PIN Color Definition 1 Dark red Power cord 2 White and green Signal wire 3 Black Ground wire Legend Component interface Component name Handle Interface number J25 A Interface definition PIN Color Defi...

Страница 69: ...Standard Start angle 0 83 0 9V End angle 3 75 3 85V The voltage should change smoothly between standard values with turning of the accelerator handle Inspection of the input circuit to power supply Tu...

Страница 70: ...Turn signal lamp Rear tail lamp assembly The turn signal lamp The braking signal lamp Liquid crystal instrument display Power lock Left and right combination switches Right combination switch Turn sig...

Страница 71: ...ns on and keep hot for a while after the light turns off Be sure that the bulb has been cooled down before performing maintenance Make sure that the power switch is OFF in light replacement Do not use...

Страница 72: ...ther the connection circuit is loose Light switch Dimmer switch Check the following items if all the above items are normal Check the vehicle light circuit Remove the front panel Disconnect the white...

Страница 73: ...Front turn signal lamp The turn signal lamp does not illuminate or the lighting is weak Check the following components Whether the light bulb is burnt or there is weld missing on the bulb Whether the...

Страница 74: ...lectric 71 Component interface Component name Left turn signal lamp Interface number J7 A Interface definition PIN Color Definition Wire length 1 Yellow Left turn signal lamp 60cm 2 Black Ground wire...

Страница 75: ...terface number J8 B Interface definition PIN Color Definition 1 Light blue Right turn signal lamp 2 Black Ground wire Legend Component interface Component name Right turn signal lamp Interface number...

Страница 76: ...lamp is burnt or there is a missing weld Whether the connection circuit is loose Light switch The flashing unit failed The alarm failed Harness interface Compone nt name Tail lamp Interface number J9...

Страница 77: ...20cm 2 Black Ground wire 3 Violet High brake lamp 4 Yellow Left lamp signal wire 5 Light blue Right lamp signal wire 6 Legend The braking signal lamp does not illuminate Standard inspection Check the...

Страница 78: ...brake lamp switch connector or the wire connector and check the connectivity between terminals at switch side The connectivity should be available when the front brake handle is pressed There should...

Страница 79: ...r Parking indicator Low electricity indicator Ambient temperature Best energy consumption status Electric energy recovery status Ride mode Real time speed Charged electricity percentage Electricity di...

Страница 80: ...e number J6 B Interface definition PIN Color Definition 1 Red and white Power cord 12V 2 Black Ground wire 3 Yellow Left turn lamp 4 Light blue Right turn lamp 5 Blue High beam 7 White Communication A...

Страница 81: ...ray Communication B 9 Black and white Earth 485 Legend Inspection The instrument display is incomplete with disordered codes The instrument indicator is flashing abnormally The screen becomes black Ch...

Страница 82: ...e Compone nt name Ignition switch Interface number J11 B Interface definition PIN Color Definition 1 Red Power cord 60V 2 Pink Ignition switch KEY Legend Component interface Component name Ignition sw...

Страница 83: ...tch Horn switch Rear brake Left handle Harness interface Compone nt name Left combination switch Interface number J1 B Interface definition PIN Color Definition 1 Blue High beam 2 White Low beam 3 Blu...

Страница 84: ...rn signal lamp 5 Light blue Right turn signal lamp 6 Gray Flasher 7 Dark green Horn 8 Red and white Power cord 12V Legend Inspection of the left handle switch Check connectivity of each switch positio...

Страница 85: ...mber J2 B Interface definition PIN Definition 1 White and yellow Low speed operation 2 White and black Intermediate speed operation 3 White and blue High speed operation 5 Blue and white Headlight on...

Страница 86: ...ight handle switch Check connectivity of each switch position at connectors of the lighting switch and the startup switch The connectivity between color wires should be available Turn signal flashing...

Страница 87: ...l lamp that illuminates indicates that the turn signal relay failed The lamp that does not illuminate indicates that the harness is broken Harness interface Compone nt name Flasher Interface number J1...

Страница 88: ...s and tightening adhesive at left of the front panel Loosen the circuit connector Remove the alarm Harness interface Compone nt name Remote controller receiver Interface number J3 B Interface definiti...

Страница 89: ...supply 4 Pink ignition switch KEY 5 Orange Controller ACC 6 Red and white Power cord 12V 7 Yellow Left turn signal lamp wire 8 Light blue Right turn signal lamp wire Legend Central control panel asse...

Страница 90: ...ch KEY 4 White Communication A 5 Violet and gray Communication B 6 Black and white Earth 485 Legend Component interface Component name Central control system Interface number J4 A Interface definition...

Страница 91: ...rter at the lower right side Remove 3 screws on the three assembly supports and then remove three assemblies separately Hall cable sensor See the motor controller accelerator handle inspection of the...

Страница 92: ...Wire length 1 Red Power cord 60V 15cm 2 Black Ground wire Legend DC DC 60V 12V converter Harness interface Compone nt name DC DC Interface number J12 B Interface definition PIN Color Definition 1 Red...

Страница 93: ...Black Ground wire 3 Black Ground wire 4 Red and white Power cord 12V Legend Charger interface Harness interface Compone nt name Charger interface Interface number J10 B Interface definition PIN Color...

Страница 94: ...a fixed speed Harness interface Compone nt name Cruise signal Interface number Interface definition PIN Color Definition 1 Gray Cruise signal Harness interface Compone nt name Cruise signal GND Inter...

Страница 95: ...Niu Electric 92 Failure code diagnosis Failure code diagnosis procedures Controller or communication failure codes Battery failure codes Warning codes by the central control system...

Страница 96: ...the main harness instrument and the central controller communication circuit RS485 Check the central controller connection circuit for looseness Cable falling off or in a bad contact Controller or co...

Страница 97: ...eness or fall off Check the circuit for tightness The controller failed The instrument displays the failure code 110 The controller failed Power tube failure Disconnect the battery before replacement...

Страница 98: ...charging Start discharging if it is normal Low temperature battery protection 20 Restore the temperature The BMS temperature detection circuit is loose Replace the battery The instrument displays the...

Страница 99: ...e central controller assembly 60 SIM808 SIM card identification failed Check the central controller assembly 61 The SIM card is overdue The flow volume in the first year is free of charge with timely...

Страница 100: ...r supply Motor controller Motor Handle Three shifts Instrument Startup switch Central controller Earth Brake lamp Brake lamp Left brake handle Right brake handle Horn Left horn Front aperture Clearanc...

Страница 101: ...Niu Electric 98...

Отзывы: