background image

21

2. GETTING STARTED

2-2-2 BOOT SEQUENCE

The procedure for starting-up your notebook is termed the Bootup sequence and
involves your notebook’s BIOS. When your notebook is turned on for the first time,
the main system memory is empty, and it needs to find instructions to start up your
notebook. This information is stored in the BIOS program. Each time you power on or
restart your notebook, it goes through a boot sequence which displays a flash screen
until your operating system is loaded. During booting, your notebook is performing a
standard boot sequence including a Power On Self Test (POST). When the boot
sequence is completed without a failure and without a request for the BIOS Setup
Utility, the system displays the operating system’s opening screen.

The boot sequence is executed when:

You turn on the power to your notebook.

You restart your notebook from the Windows Shut Down dialog box.

The software initiates a system restart. Example: When you install a new application.

2-2-3 BIOS SETUP UTILITY

The BIOS Setup Utility is a program that sets up the operating environment for your
notebook. Your BIOS is set at the factory for normal operating conditions, therefore
there is no need to set or change the BIOS environment to operate your notebook.

The BIOS Setup Utility configures:

Device control feature parameters, such as changing I/O addresses and boot de-
vices.

System Data Security feature parameters, such as passwords.

Entering the BIOS Setup Utility

To enter the BIOS Setup Utility, do the following:

1. Turn on or restart your notebook.

2. Press the [F2] key once the flash screen appears on the screen. This will open the

main menu of the BIOS Setup Utility with the current settings displayed.

3. Press the [RIGHT ARROW] or [LEFT ARROW] key to scroll through the other

setup menus to review or alter the current settings.

Содержание Z500 series

Страница 1: ...Z500 SERIES NOTEBOOK PC QUICK START GUIDE April 2003...

Страница 2: ...2 Thispageisintentionallyleftblank...

Страница 3: ...3 FRONT PANELCOMPONENTS 11 1 2 4 LEFT SIDE PANELCOMPONENTS 12 1 2 5 RIGHT SIDE PANELCOMPONENTS 13 1 2 6 BACK PANEL COMPONENTS 14 1 2 7 BOTTOM COMPONENTS 15 2 GETTING STARTED 17 2 1 Power Sources 17 2...

Страница 4: ...makesureyoudon t blocktheopeningspro videdforventilation DONOTplaceordropobjectsonthecomputerand DONOTapplyheavypressureonit DONOTsubjectthecomputertomagneticfields DONOTplaceonunevenorunstableworksur...

Страница 5: ...t DONOTtamperwiththebatteries Keepthemaway fromchildren DONOTexposetodirectsunlight DONOTuseorstoreinextremetemperatures Avoidsuddenchangesintemperatureorhumidityby keepingitawayfromA Candheatingvents...

Страница 6: ...echemicals DONOTslamyournotebookshutandneverpickup orholdyournotebookbythedisplay DONOTspraywateroranyothercleaningfluids directlyonthedisplay Ifyouaretravelingwithyourcomputer rememberto carryitashan...

Страница 7: ...ebook Computer Lithiumionbattery AC adapter withAC power cord DriverandApplicationsCD Quick StartGuide or UserGuide Dependingupontheconfigurationofyournotebook youmayhavealsoreceivedthe followingitems...

Страница 8: ...E DISPLAY PANEL 1 Slide the latch located at the top of the display panel to the right This releases the lockingmechanismandraisesthedisplayslightly 2 Lift the display backwards being careful not to t...

Страница 9: ...lor LCDpanel with back lighting for the display of text and graphics Keyboard Afull sizekeyboardwithdedicatedWindowskeys Stereo Speakers The built in dual speakers allow for stereo sound Suspend Resum...

Страница 10: ...See Suspend Resume Power On Button in 2 3 1 Power On for more information Touchpad Pointing Device TheTouchpadpointingdeviceisamouse likecursorcontrolwithfourbuttons left right and two scroll buttons...

Страница 11: ...ost convenient method to transfer pictures music and data between your notebook pc and flash compatible devices such as digital cameras MP3 players mobile phones and PDAs Infrared Port ThefastIrDA com...

Страница 12: ...t is used to connect between your and a peripheral such as a digital video camera PC Card Slot The PC Card Slot allows you to install one Type II PC Card Audio In Jack The audio in jack allows audio s...

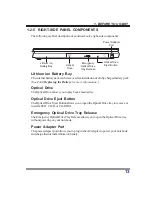
Страница 13: ...media disc Optical Drive Eject Button The OpticalDrive Eject Button allows you to open the OpticalDrive tray to remove or install aDVD CD R or CD ROM Emergency Optical Drive Tray Release The Emergenc...

Страница 14: ...ing ports to connect PS 2 devices an external monitor a serial device a parallel device USB devices a LAN RJ 45 cable an external audio source and anAC adapter Parallel Port Theparallelportallowsyouto...

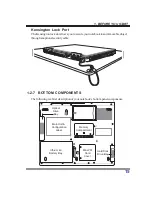
Страница 15: ...book s bottom panelcomponents Lithium ion Battery Bay Memory Compartment Optical Drive Bay Main Unit Configuration Label Hard Disk Drive Bay Mini PCI Card Cover Kensington Lock Port The Kensington loc...

Страница 16: ...formationthatyouwillneedtogiveyoursupportrepresentative It identifiestheexactversionofvariouscomponentsofyournotebook Memory Compartment ThememorycompartmentcontainsthesystemRAM Lithium ion Battery Ba...

Страница 17: ...ecting the AC Adapter 1 Plug theDC output cable into theDC power jack of your notebook PC 2 Plug theAC adapter into anAC electrical outlet Switching from AC Adapter Power to Battery Power 1 Be sure th...

Страница 18: ...be saved once the notebook reachesthispoint To protect your notebook PC from damage use only the power adapter that came with the notebook PC because each power adapter has its own power output rating...

Страница 19: ...dge battery maintains memory in suspend mode for up to 5 minutes morethanenoughtimeforyoutoswapbatteries Charge your notebook PC for at least 24 hours before using it for thefirsttime Doingsoinsuresth...

Страница 20: ...ou may either place it in Suspend mode orturnitoffdirectly Do not carry your notebook around with the power on or subject it to shocks or vibration as you risk damaging your notebook When you power on...

Страница 21: ...on the power to your notebook You restart your notebook from the Windows ShutDown dialog box Thesoftwareinitiatesasystemrestart Example Whenyouinstallanewapplication 2 2 3 BIOS SETUP UTILITY The BIOS...

Страница 22: ...epursuingcom plextroubleshooting 1 Turn off your notebook PC 2 Make sure theAC adapter is plugged into your notebook PC and to an activeAC power source 3 Make sure that any card installed in the PC Ca...

Страница 23: ...rovideyouwiththefastestpossiblesolution Productname Productconfigurationnumber Productserialnumber Purchase date Conditionsunderwhichtheproblemoccurred Any error messages that have occurred Hardwareco...

Страница 24: ...24...

Отзывы: