background image


10

2.  Re-tighten the set screw with your fingers 

until it only lightly touches the column tube.  

3.  Hold the set screw in position with the hex 

wrench, and re-tighten the hex nut. 

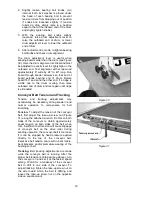
Install Handwheel 

Mount the handwheel to the top of the height 
adjustment screw (Figure 6). Align one of the set 
screws with the flat on the height adjustment 
screw, and tighten both set screws. 

Install the knob to the threaded hole in the 
handwheel, and tighten the hex nut against the 
handwheel. 

Install Conveyor Table 

1. Lower the table mounting brackets by 

rotating the handwheel. 

2.  Remove conveyor table from packaging, 

and place it on the mounting brackets of the 
stand. The gear motor should be on the 
right, or inboard side of the sander as 
shown in Figure 7. 

3.  Secure the conveyor bed with four 3/8”x1” 

hex head bolts, 3/8” flat washers and 3/8” 
flanged lock nuts. 

4.  Plug the motor cord into the control box 

receptacle (Figure 8). 

IMPORTANT: The conveyor belt has been 
overtightened for shipping purposes. It must be 
tensioned properly before operating the sander! 
See page 19. 

Infeed and Outfeed Tables 

(Optional 

Accessory)


See Figure 9. 

1.  Remove the lower hex cap screw (A) and 

square nut (B) from the rail on the infeed 
side of the sander. 

2.  Slide a left hand mounting bracket (C) into 

the end of the rail.  

3.  Align holes and re-install the hex cap screw 

(A) and square nut (B). Install a 3/8”x1” hex 
head bolt (D), 5/16” flat washer (E) and 
flanged lock nut (F). 

4.  Tighten the hex cap screw (A) first to align 

the bracket, then tighten the flanged hex nut 
(F) on the 3/8” screw. 

5.  Install a right hand mounting bracket (G) in 

the same manner. NOTE: You will have to 
open the control box to remove the screw  
from the rail – remove the front lower screw 
and base panel (# 16 on page 38) of the 
control box. 


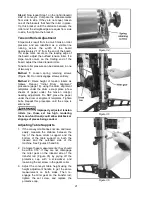
Figure 6 


Figure 7 


Figure 8 


Figure 9 

Содержание SandSmart 22-44 Pro

Страница 1: ...l Drum Sander Model 22 44 Pro Deluxe model shown with casters and infeed outfeed tables WMH TOOL GROUP 2420 Vantage Drive Elgin Illinois 60123 Part No M 638003 Ph 800 274 6848 Revision A 4 06 www wmht...

Страница 2: ...ostage prepaid to a location designated by us For the name of the location nearest you please call 1 800 274 6848 You must provide proof of initial purchase date and an explanation of the complaint mu...

Страница 3: ...ment 17 Conveyor Belt Tension and Tracking 19 Trackers 20 Conveyor Belt Replacement 20 Tension Roller Adjustment 21 Adjusting Table Supports 21 Replacing V Belt 22 Rotating Drum Bearings 22 Replacing...

Страница 4: ...nd chromium from chemically treated lumber Your risk of exposure varies depending on how often you do this type of work To reduce your exposure to these chemicals work in a well ventilated area and wo...

Страница 5: ...best and safest performance Follow instructions for lubricating the machine and changing accessories 28 Always feed stock against the rotation of the drum 29 Keep your hands clear when feeding parts o...

Страница 6: ...wmhtoolgroup com Specifications Model Number 22 44 Pro Stock Number 638003 Maximum Sanding Width in 44 2 passes Minimum Sanding Length in 2 1 4 Maximum Sanding Thickness in 4 Minimum Sanding Thickness...

Страница 7: ...ogy The illustration below shows the major components and features of the 22 44 Pro Sander These are referenced throughout the manual and will help to familiarize you with the operation and functions...

Страница 8: ...assembly maintenance and safety instructions Contents of the Shipping Container 1 Drum Sander with stand A 1 Conveyor Bed Assembly B 2 Assembly Fixtures C 1 Handwheel D 1 Handwheel Knob E 4 Legs F 4...

Страница 9: ...en the flanged lock nuts securely making sure the legs remain in contact with the plywood 4 Lift the sander and remove the assembly fixtures 5 With the sander raised install the four leg glides or opt...

Страница 10: ...d bolts 3 8 flat washers and 3 8 flanged lock nuts 4 Plug the motor cord into the control box receptacle Figure 8 IMPORTANT The conveyor belt has been overtightened for shipping purposes It must be te...

Страница 11: ...just the four leg glides see Figure 4 using a carpenter s level placed on the conveyor bed in both X and Y axis positions Make sure the hex nuts on the leg glides are tightened securely against the sa...

Страница 12: ...utboard slot width its end must be trimmed back three inches as shown 2 Squeeze the fastener lever Figure 12 on the outboard end of drum and insert the tapered end of the abrasive so that it uses most...

Страница 13: ...does not bottom out against the inside of the drum IMPORTANT Leave a gap at least 1 8 between the tapered strip and the closed end of the slot Figure 16 to allow strip to be pulled into the fastener...

Страница 14: ...essary do not connect the equipment grounding conductor to a live terminal Check with a qualified electrician or service personnel if the grounding instructions are not completely understood or if in...

Страница 15: ...r initial drum alignment or other reasons lift the front cover half way and pull the dust cover out from the outfeed side of sander The edges will pop out when the dust cover is pulled from the carria...

Страница 16: ...osition 4 Check the miter gear alignment The miter gears can be adjusted on their shafts by prying off their protective caps with a flat blade screwdriver and loosening the set screws on the gears Che...

Страница 17: ...gauge support in position Once calibrated the locking knob B Figure 15 of the lower depth gauge support can be loosened allowing the lower depth gauge support to ride on top of the table support The...

Страница 18: ...note that the drum will adjust about 1 2 on each end Position drum alignment templates Figure 28 on the conveyor and below the drum with one template at each end of the drum 5 Raise the conveyor bed s...

Страница 19: ...of drum and test again until ridge is eliminated Conveyor Belt Tension and Tracking Tension and tracking adjustments may occasionally be necessary during break in and normal operation to compensate f...

Страница 20: ...ke up screw nuts see Figure 31 to relieve belt tension and slide the driven roller fully inward 3 Remove the four bolts that attach the conveyor table to the table mounting brackets Lift up the convey...

Страница 21: ...the drum alignment templates under the drum except place a few sheets of paper under the tension roller s needing adjustment Do NOT place the paper under the drum or alignment templates Tighten bolts...

Страница 22: ...otor support Figure 38 and raise motor Remove v belt from pulleys 5 Install new v belt and tension the belt by using the weight of the motor only Make sure the pulleys are aligned Replace transfer rod...

Страница 23: ...elt guard away from the v belt 6 Release v belt tension by loosening pinch bolt in motor support and raising motor 7 Loosen the set screw in the driven pulley and remove the pulley from the shaft 8 Re...

Страница 24: ...raise the conveyor table slightly Always maintain control of stock Through practice you will learn the proper depth of cut considering the variables above Selecting Feed Rates Selecting proper feed ra...

Страница 25: ...conveyor belt Sanding Imperfect Stock When sanding stock with a cup or crown place the crown up This will stabilize the stock to help prevent tipping or rocking during sanding After the crown has been...

Страница 26: ...hen cleaning dust from the drums Also brush the conveyor belt after cleaning operations If not cleaned the conveyor belt could allow stock to slip during sanding operations For best results perform th...

Страница 27: ...m slot of the Tracker Note When installed properly only the bottom lip of the Tracker will be visible The top slot is to be used if the bottom slot wears out 8 Install second Tracker opposite the firs...

Страница 28: ...he most material in one pass whether you are doing abrasive planing cleaning up glued panels or flattening stock Grits from 100 through 220 are primarily finishing grits designed to remove the scratch...

Страница 29: ...ive load on sanding drum and motor Allow motor to cool and re set overload button Too many tools on circuit Connect sander to a dedicated circuit Have a certified electrician correct any shop wiring p...

Страница 30: ...uce depth of cut Excessive feed rate Reduce feed rate Inadequate dust collection Increase airflow at dust port Inadequate abrasive Use an open coat abrasive Abrasive loads up prematurely Stock fed at...

Страница 31: ...tighten Dirty drum clean inside Excessive v belt tension reduce tension Worn v belt replace Warped drive pulley replace Drum out of balance contact your dealer or WMH authorized service center Tension...

Страница 32: ...due to lack of contact Use alternate feeding procedure Gouging of wood Abrasive is too fine Replace with coarser grit Line or groove in stock Inconsistent feed rate Do not stop or change the feed rate...

Страница 33: ...rasive Strip 50 Grit 60 8060 Klingspore Blue Ready To Cut TM Abrasive Strip 60 Grit 60 8080 Klingspore Blue Ready To Cut TM Abrasive Strip 80 Grit 60 8120 Klingspore Blue Ready To Cut TM Abrasive Stri...

Страница 34: ...34 Stand Assembly...

Страница 35: ...ar Table Mount Bracket 1 20 72 6208 Frame Clip 1 21 30 5105 Outboard Table Support 1 22 12 0209 Flanged Lock Nut 3 8 16 28 23 20 0755 Retaining Ring 10mm ID 20mm OD 1mm H 2 23A 20 0757 Retaining Ring...

Страница 36: ...36 Drum Head Assembly...

Страница 37: ...ller Spring 4 21 40 0303 Left Tension Roller Support Bracket 2 22 40 0302 Right Tension Roller Support Bracket 2 23 50 3105 Oilite Bushing I D 5 16 4 24 40 0304 Tension Roller Bracket 2 25 80 1060 Ten...

Страница 38: ...38 Conveyor and Motor Assembly...

Страница 39: ...4 2 26 11 0504 Lock Washer Internal Tooth 1 4 2 27 41 0003 Take Up Slide Bracket includes 17 2 28 30 3010 02 Driven Roller 1 29 20 1161 Wave Washer 1 4 2 30 4000380 Nylon Lock Nut 1 4 20 4 31 40 0002...

Страница 40: ...unting Bracket LH 2 2R 40 0328 Mounting Bracket RH 2 3 10 9103 Hex Head Bolt 5 16 18x3 4 2 4 12 0152 Square Nut 5 16 18 2 7 10 9205 Hex Head Bolt 3 8 16x1 4 8 11 9103 Hardened Flat Washer 3 8 4 9 12 0...

Страница 41: ...41 Electrical Connections...

Страница 42: ...42 NOTES...

Страница 43: ...43...

Страница 44: ...44 WMH Tool Group 2420 Vantage Drive Elgin Illinois 60123 Phone 800 274 6848 www wmhtoolgroup com...

Отзывы: