background image


Figure 4 

6.  Plug the planishing hammer into the power 

supply. 

7.  With the workpiece between the 

hammer


and 

anvil

 (Figure 5), press the foot switch to 

begin planishing. 

Note:

 Planishing blows-per-minute can be adjusted 

by turning 

adjustment knob

 (see Figure 2). 


Figure 5 

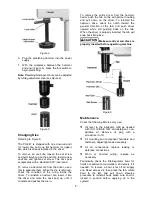
Changing Dies 

Referring to Figure 6: 

The PH-24T is shipped with one crowned anvil 
(or lower) die, and one flat hammer (or upper) 
die, which is already installed in the driver.  

To remove an 

anvil die

, loosen the set screw 

and pull straight up on the anvil die. Install a new 
anvil die and tighten set screw. The anvil post 
accepts dies with a standard 0.79” insert end. 

To remove a 

hammer die

 from the driver, use a 

tool to separate them. When the die is removed, 
check the condition of the o-ring inside the 
driver. To reinstall a hammer die, insert it into 
the driver and raise the anvil post up until it 
contacts and pushes the die in. 


To remove the entire driver from the hammer 
barrel, push the tab on the air hammer housing 
and pull down on the driver. To reinstall the 
hammer drive, orient the notch toward the 
general direction of the tab, and push driver 
upward while still pushing back on the tab. 
When the driver is properly inserted, the tab will 
snap back into place.  


Make sure driver and dies are 

properly inserted before operating machine. 


Figure 6 

Maintenance 

Check the following before every use: 

ˆ

  Oil level in the lubricator; refill as needed 

with ISO 32/SAE 10W non-detergent, non-
additive oil. Remove oil plug with a 
screwdriver to fill. 

ˆ

  All mounting and component hardware and 

fasteners; adjust/tighten as necessary. 

ˆ

 All air connections; replace leaking or 

defective connections. 

ˆ

 Worn or shorted wiring; replace as 

necessary. 

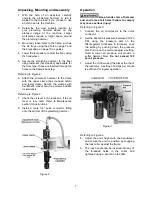
Periodically check the filter/regulator bowl for 
fluids or sediment accumulation, and empty it if 
needed. To remove a bowl, shut off air supply 
and bleed excess air; then press the tab, rotate 
bowl to the left, and pull down. Reverse 
procedure to reinstall bowl. 

Make sure bowl is 

locked in position before applying air to the 
system! 

Содержание PH-24T

Страница 1: ...ructions and Parts Manual 24 inch Pneumatic Planishing Hammer Model PH 24T JET 427 New Sanford Road LaVergne Tennessee 37086 Part No M 756121 Ph 800 274 6848 Revision B1 08 2018 www jettools com Copyr...

Страница 2: ...from the machine before turning it on 13 Check damaged parts Before further use of the machine a guard or other part that is damaged should be carefully checked to determine that it will operate prop...

Страница 3: ...er construction activities contain chemicals known to the State of California to cause cancer and birth defects or other reproductive harm Some examples of these chemicals are lead from lead based pai...

Страница 4: ...This manual is provided by JET covering the safe operation and maintenance procedures for the JET PH 24T Planishing Hammer This manual contains instructions on installation safety precautions general...

Страница 5: ...M Noise Level 92 26 to 104 3 dB Lubrication required Lubricator cup ISO32 SAE10W Construction Frame welded and gusseted 0 137 steel tubing Frame Tube size 4 x 4 Support Tube size 3 x 2 Handwheels poli...

Страница 6: ...6 Features and Terminology Figure 1 Features...

Страница 7: ...to Figure 3 7 Check the oil level in the lubricator If the oil level is low refill Refer to Maintenance section for instructions 8 Install a male 1 4 quick connector fitting onto the air inlet of the...

Страница 8: ...ire driver from the hammer barrel push the tab on the air hammer housing and pull down on the driver To reinstall the hammer drive orient the notch toward the general direction of the tab and push dri...

Страница 9: ...9 Assembly Drawing for PH 24T Planishing Hammer...

Страница 10: ...O Ring 7 8x2 4 mm 1 13 06 PH24 13 06 Valve Cap 1 13 07 PH24 13 07 Lever 1 13 08 PH24 13 08 Spring Pin 5x22 5 mm 1 13 09 PH24 13 09 Hose Adapter 1 13 10 PH24 13 10 Lock Ring 1 13 11 PH24 13 11 Alignme...

Страница 11: ...4010 Hex Nut M16 4 50 PH24 50 Washer 2 51 TS 1550031 Flat Washer 5 mm 2 53 PH24 53 Pressure Gauge 0 140 psi 1 54 PH24 54 Lower Anvil 1 55 TS 1524041 Socket Set Screw M8x15 4 56 PH24T 56G Hinge Lever 2...

Страница 12: ...additional action needed JET has Authorized Service Centers located throughout the United States For the name of an Authorized Service Center in your area call 1 800 274 6846 or use the Service Cente...

Отзывы: