12
8.0
Lubrication
Do not operate the mill before
lubricating the machine fully. Failure to
comply may cause damage to the machine.
Refer to
section 11.0
and make sure the machine
has been fully lubricated before operating.
9.0
Operating instructions
9.1
Operating controls
The milling machine is equipped with an automatic
lubrication system. Ensure that reservoir has the
proper amount of lubricant. The system reservoir is
located at rear of machine.
The position of the mill head can be set up to
accommodate the workpiece being machined. The
mill head can be set up for angles to left or right and
for fore and aft angles. The mill head can also be
rotated on its turret. The ram can be moved back
and forth to reach workpiece locations at fore and
aft extremes of worktable travel. Refer to
section
10.0.
9.2
Control panel
The control panel is located on the arm at right side
of machine. See Figure 4 for functions.
Figure 4
A
–
RPM digital readout.
B –
Motor direction switch:
Has two positions:
FWD (forward) and REV (reverse). Setting the
switch to FWD will provide clockwise spindle
rotation. Use FWD for normal, right-hand tooling.
FWD (clockwise) operation occurs only when
gearbox is in low speed position. When gearbox is
in high-speed position, the motor switch must be in
the REV position to provide right-hand or clockwise
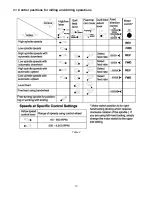
rotation. Refer to Table 2 for required switch
positions.
The motor switch controls a three-phase motor. The
motor can be switched from FWD to REV and back
with the motor running, and will reverse direction
when the switch setting is changed. At higher
speeds, this may put strain on the timing belt but
there will be no damage to the motor or gear
mechanism.
C –
Coolant switch
: installed for optional coolant
pump. The wiring must be connected to U2, V2 and
W2 in the terminal strip.
D –
Power lamp
: indicates electrical power is
flowing to machine.
E –
Speed dial
: Sets spindle speed.
F –
Spindle switch
: Engages spindle rotation.
G –
Emergency stop switch
: Shuts down all
controls on machine. Rotate switch clockwise to
disengage and restart machine.
Содержание JTM-1050EVS2
Страница 9: ...9 5 2 Overview and terminology JTM 949EVS 230 JTM 1050EVS2 Figure 2 Overview JTM 949EVS 230 shown ...
Страница 13: ...13 9 3 Control positions for milling and drilling operations Table 2 ...
Страница 23: ...23 13 1 1 JTM 949EVS JTM 1050EVS2 Upper Head Assembly Exploded View ...
Страница 26: ...26 13 2 1 JTM 949EVS JTM 1050EVS2 Lower Head Assembly Exploded View ...
Страница 30: ...30 13 3 1 JTM 949EVS Base Machine Exploded View ...
Страница 33: ...33 13 4 1 JTM 1050EVS2 Base Machine Exploded View ...
Страница 36: ...36 13 5 1 JTM 949EVS Table Assembly Exploded View ...
Страница 38: ...38 13 6 1 JTM 1050EVS2 Table Assembly Exploded View ...
Страница 46: ...46 14 0 Electrical Connections JTM 949EVS JTM 1050EVS2 ...
Страница 47: ...47 This page intentionally left blank ...
Страница 48: ...48 427 New Sanford Road LaVergne Tennessee 37086 Phone 800 274 6848 www jettools com ...


