12
Change speed range only
when motor is NOT running.
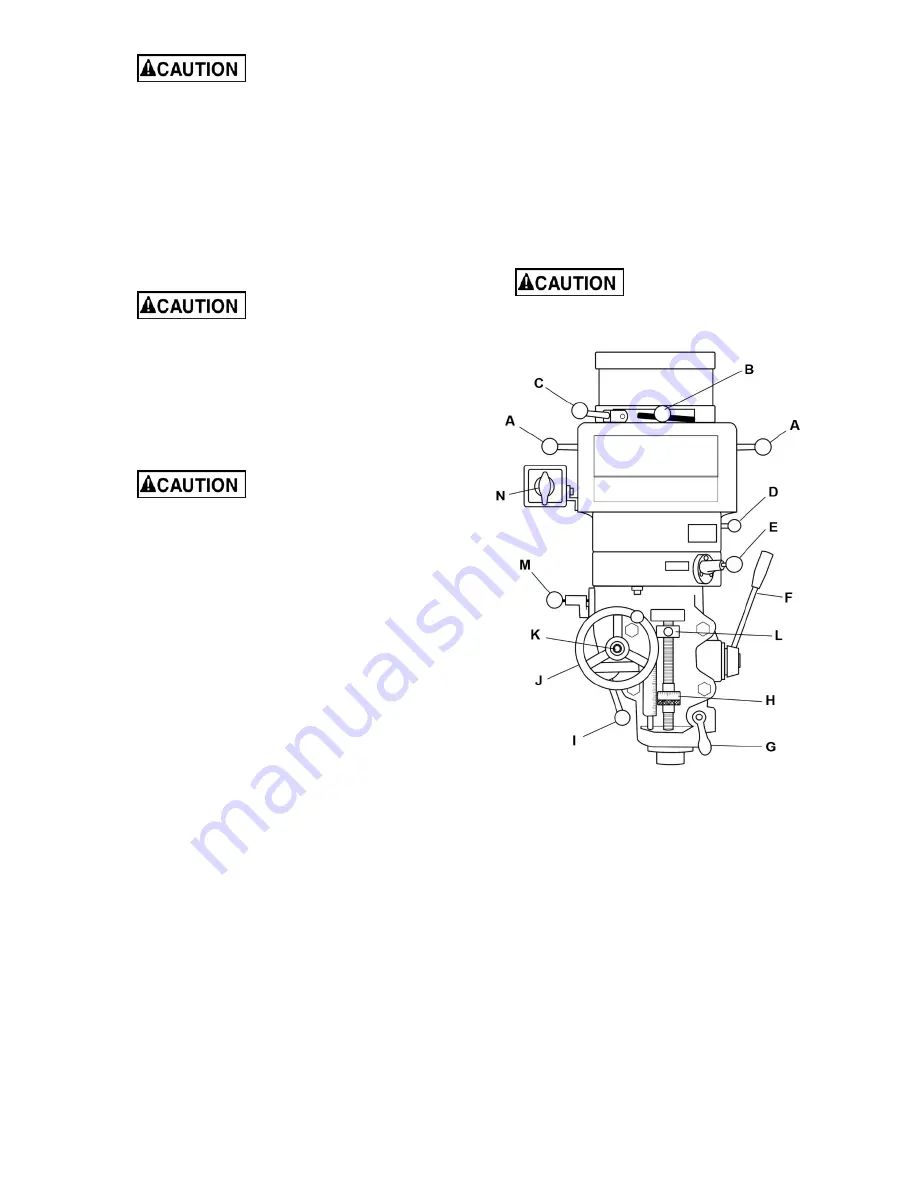
C.
Spindle Brake
(C, Figure 5) – Move in either
direction to prevent spindle from turning.
D.
Back Gear Control Lever
(D, Figure 5) – Pull
out knob and rotate lever in to position. “IN”
position engages back gear for low speed.
“OUT” position disengages back gear for high
speed. (Used in conjunction with Speed Range
Selector B.) Middle position is neutral and
allows free spindle rotation for such things as
setup work.
Shift back gear control
lever only when motor is NOT running.
Rotate spindle by hand to facilitate lever
engagement.
E.
Power Feed Transmission Engagement
Lever
(E, Figure 5) – When lever is in right
hole, power feed worm gear is disengaged. To
engage power feed, pull knob out and move
lever to left hole. Engage pin in hole.
Power feed may be
engaged when spindle is rotating; however,
it must be engaged gently to avoid damage
to worm gear. It may be disengaged any
time. Do not use power feed at speeds
above 2700 RPM. It is recommended that
power feed worm gear be disengaged
whenever power feed is not required; this
avoids unnecessary wear on the worm
gear.
F.
Coarse Feed Handle
(F, Figure 5) – Used for
manual operations. Rotate counterclockwise to
lower spindle. Return spring will automatically
retract spindle once handle is released.
Handle can be removed when not in use.
G.
Quill Lock
(G, Figure 5) – Rotate handle
clockwise to lock quill in position; counter-
clockwise to release.
H.
Micrometer Adjusting Nut
(H, Figure 5) – For
setting specific spindle depth. Each graduation
on the nut represents 0.001” of depth, and
corresponds to the adjacent scale.
I.
Feed Trip Lever
(I, Figure 5) – Engages
overload clutch on pinion shaft when
positioned to the left. Stays engaged until quill
stop comes into contact with micrometer
adjusting nut (forcing feed trip lever to drop out
automatically), or until lever is released
manually by pushing it to the right.
IMPORTANT
: Overload clutch is factory-set to
hold up to 200 lb. downfeed pressure on the
quill (accommodates drills up to 3/8”). Do
not
attempt to adjust clutch pressure.
J.
Manual Fine Feed Handwheel
(J, Figure 5) –
Feed reversing knob (K, Figure 5) must be in
neutral position. The feed trip lever (I, Figure
5) must be engaged. Note: Manual feed
handwheel may be removed when not in use.
K.
Feed Reversing Knob
(K, Figure 5) – located
in center of manual feed handwheel. Position
of knob depends upon direction of spindle
rotation. If boring with right hand cutting tools,
pull knob towards operator until clutch
engages. Neutral position is between forward
and reverse positions (see Figure 7).
It is recommended that
feed reversing knob be left in neutral
position when not in use.
Figure 5 (repeated)
L.
Quill Stop
(L, Figure 5) – Disengages
automatic feed in either direction, as well as
the setting point for working to a given depth
during manual feeds.
M.
Quill Feed Rate Selector
(M, Figure 5) – Pull
knob out and locate handle over choice of
three feed rates: 0.0015”, 0.003”, 0.006”
downfeeds per revolution of spindle. Feed is
more readily engaged when spindle is turning.
N.
Reversing Switch
(N, Figure 5) – Turns
spindle on and off, and changes rotation
direction.
Содержание JTM-1
Страница 6: ...6 5 0 JTM 1 JTM 2 installation layout Figure 1 ...
Страница 21: ...21 15 1 1 Upper Head Assembly Exploded View ...
Страница 24: ...24 15 2 1 Head Assembly Exploded View ...
Страница 28: ...28 15 3 1 Base Assembly Exploded View ...
Страница 33: ...33 16 0 Electrical Connections ...
Страница 34: ...34 This page intentionally left blank ...
Страница 35: ...35 This page intentionally left blank ...
Страница 36: ...36 427 New Sanford Road LaVergne Tennessee 37086 Phone 800 274 6848 www jettools com ...


