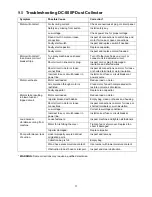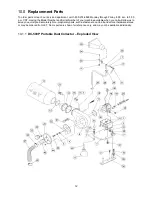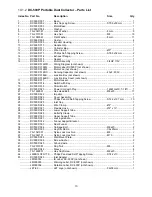
7
5.4
Assembly
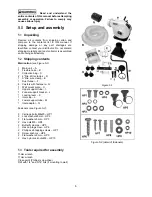
1. Install casters (G, Figure 5-3), to base, using
the fasteners supplied with each caster, in the
order as shown. Tighten the hex nut and cap
nut to secure.
A caster can be locked in position by pushing
down on the adjoining lever. Push up lever to
unlock caster.
NOTE:
If Dust Collector will be wall-mounted,
proceed to
sect. 5.5
, then return to this section
for further assembly.
2. Remove protective cap from tube holder, and
install butterfly clamp (HP5) and lower support
tube (M). Tighten butterfly clamp to secure.
Figure 5-3
3. Install upper support tube (I) and secure with
butterfly clamp (HP5). See Figure 5-4.
4. If funnel will be used, mount funnel bracket (J)
to upper support tube (I) with locking lever (K)
and washer (HP3). Install funnel (F) with
carriage bolts, washers and nuts (HP1/2/3/4).
Figure 5-4
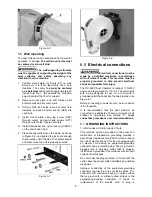
5. Push inlet adaptor (N, Figure 5-5) onto inlet port
until the holes align, and secure with the
provided self-tapping screws.
6. Press ring of inlet cap (L) onto adaptor. Press
cap over inlet when inlet is not being used.
Figure 5-5
7. Place a 4-inch wire clamp (D, Figure 5-5) onto
end of hose, and install hose to adaptor.
Tighten wire clamp with screwdriver.
8. If using the dust funnel, connect opposite end of
hose to funnel port and secure with 4-inch wire
clamp. Or, connect hose to dust port of
woodworking machine, and secure with wire
clamp.
9. Place 5-inch diameter wire clamp (E, Figure 5-
6) onto end of collection bag, and slide bag onto
exhaust port. Tighten cloth strap and wire
clamp.


