


7
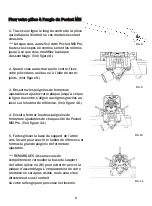
SETTING THE STOP COLLAR
Always be sure to set your stop collar to the
top line of the drill extension and secure the
set screw with the 1/8" Hex Key provided.
Setting the stop collar to this line, ensures
maximum depth of your cut.
**
127(
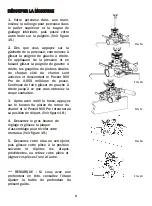
Make sure you return it back to the starting position after your project and
before you begin your next project to avoid a depth issue
Original Position
Depth Stop Lowered
),*
**
127(
Be sure to check your endmill and set
WLQJV
before beginning another project to
make sure you do not cut t
R
o deep or not enough
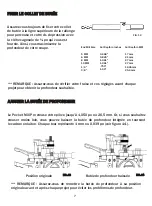
ADJUSTING THE DEPTH STOP
The
Mill
Pro
plunges
into
your
material
up
to
0.8267
or
2
1
mm
however
if
you
do
not
want
to
go
that
deep,
you
can
lower
the
built
in
depth
stop
by
turning the brass dial
3DUW
. Each revolution is 1mm or 0.039 inches.
6HH)LJXUH
),*
),*
End Mill Size
Cut Depth in MM
5 MM
1
7
mm
6 MM
2
1
mm
8 MM
2
7
mm
10 MM
Cut Depth in Inches
0.668"
0.825"
1.061"
1.061"
2
7
mm
1/4"
.75
0
"
19.
05
mm
3/8"
1.00"
25.
4
mm


