


31
VM9512
iPod OPERATION
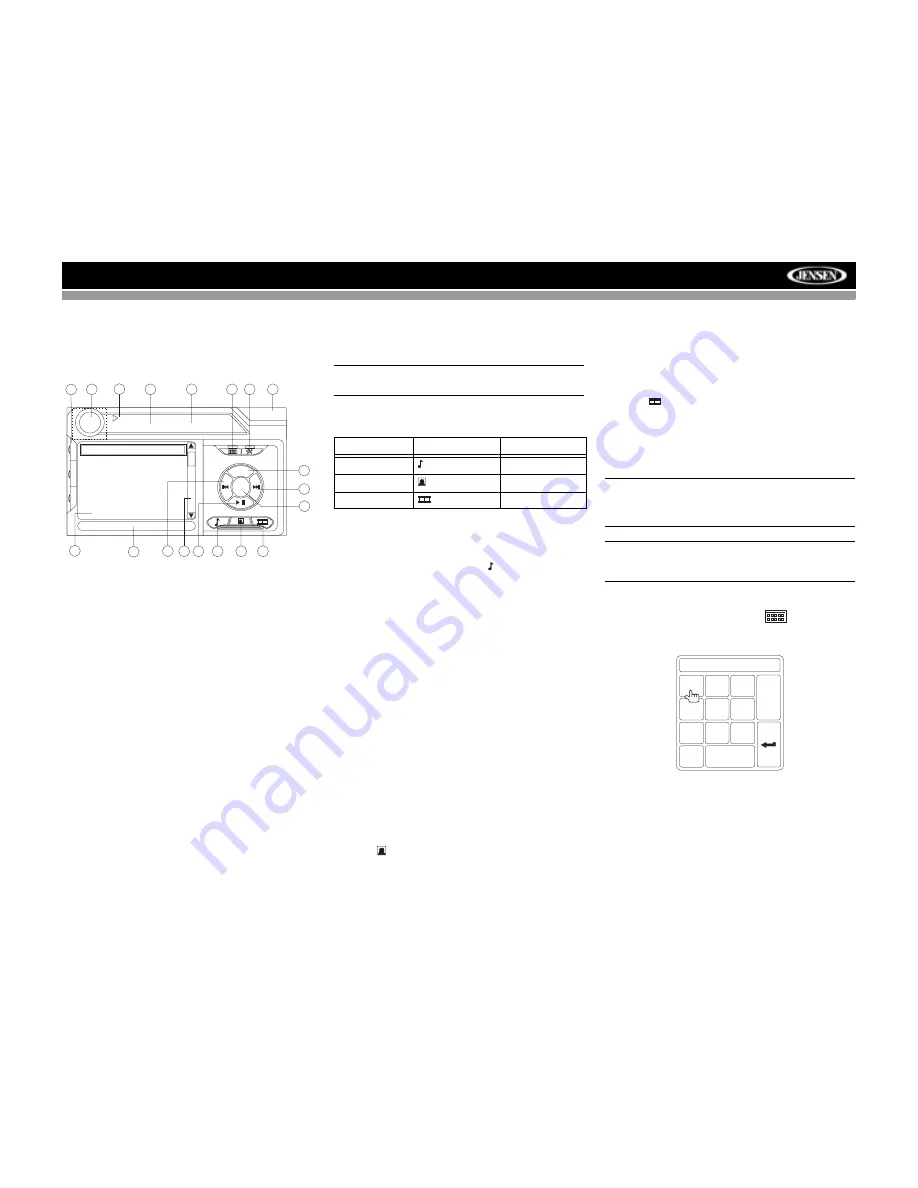
iPod User Interface
The on-screen indicators and touch key areas for iPod
playback are outlined below.
1.
Elapsed playing time
2.
Current track and total number of files
3.
Current time
4.
Media titles/menu information
5.
ID3 information
6.
Enter
7.
Touch to access photos
8.
>>|
: Touch to move to next track
9.
|<<
: Touch to move to previous track
10. Touch to access the iPod menu
11.
>||
: Touch to play/pause disc playback
12. Touch to access music files
13. Touch to access video files
14. Touch to access the SETUP screen
15. Touch to view Spectrum Analyzer > Equalizer
16. Touch to view the SOURCE MENU and select a new
playback source
17. Song title
18. Touch to view the direct entry menu
19. Touch the scroll bar and arrows to view the previous/
next page of songs
Controlling Your iPod
The unit will automatically switch to iPod mode when an iPod
is plugged into the MediaLink
4
. To return to the iPod menu
from any other source menu, press the
SRC
button (6) on the
front panel or remote control (8) until the iPod menu appears
on the screen.
NOTE: Be sure your iPod has the latest Apple firmware
installed to avoid connectivity issues.
The following touch screen icons and remote control buttons
are used to access the iPod menus:
Use the touchscreen, the joystick, or the directional keys on
the remote control to navigate the iPod menus.
iPod Music Playback
To access iPod music files, touch the button on screen or
press the
AUDIO
button (5) on the remote control.
•
Touch the
> ||
button on screen to play/pause.
•
Touch
>>|
on screen, press the
>>|
button (19) on the
remote control, or press the
>
button on the joystick (17)
to move to the next item on the menu.
•
Touch
|<<
on screen, press the
|<<
button (17) on the
remote control, or press the
<
button on the joystick (16)
to move to the previous item on the menu.
•
Use the touch screen or press the
>/||
button (18) on the
remote control or the joystick
ENTER
button (20) on the
control panel to select the highlighted menu option.
•
Press the
>>
button (14) on the remote control or the
/\
button (18) on the joystick, or touch the
MENU
button on
screen to return to the previous menu.
Fast Forward/Fast Reverse
Press and hold
the
|<<
or
>>|
buttons on screen or on the
remote control (17, 19) for 1 second and continue to hold for
fast forward or fast reverse. Release to resume normal
playback.
Photo Playback
While iPod photos can be viewed on the VM9512 screen, you
must use the iPod to control photo playback options.
Touch the
icon on screen or press the
SUB-TITLE
button
(9) on the remote control to access the iPod PHOTO mode.
The VM9512 will release control back to the iPod so you can
select video media to be displayed on the TFT monitor. To
exit PHOTO mode, touch the screen.
Video Playback
While iPod video can be viewed on the VM9512 screen, you
must use the iPod to control video playback options.
Touch the
button on screen or press the
ANGLE
button
(13) on the remote control to access iPod VIDEO mode. The
VM9512 will release control back to the iPod so you can
select video media to be displayed on the TFT monitor. To
exit VIDEO mode, touch the screen, press the
>>
button (14)
on the remote control, or press the
MENU
button on the iPod.
NOTE: To transmit the video from your iPod to the
VM9512 screen, you must set the following options
through the iPod video settings menu: TV Out = On, TV
Signal = NTSC, and Widescreen = On.
NOTE: After disconnecting your iPod, the VM9512 will
always return to the last mode accessed when the iPod
is plugged back into the unit.
Direct Track/File Entry
To select a track/file directly, touch the
button on
screen control to display the direct entry menu.
Enter the desired track/file using the on-screen number pad.
Press the
Enter
button to tune to the selected station. To exit
the screen without changing the station, touch
Exit
. To clear
your entry and start over, touch
Clear
.
You can also use the numeric keypad (29) on the remote
control to access files directly.
14
1
7
2
13
5
15
12
3
16
iPod
1:08
2/124
01:02 AM
0001 A Rush Of Blood to
0002 40
0003 4th of July
0004 A Little Less Conver
0005 A Message
0006 A Sort of Homecomi
4
9
11
10
8
6
17
A Rush of Blood to the Head
MENU
Artist: Coldplay
Enter
18
E
Q
R
E
A
R
P
I
P
19
Menu
Touch Screen
Remote Control
Music
AUDIO
Photos
SUB-TITLE
Videos
ANGLE
TRACK: _ _ / ##
1
2
3
4
5
6
7
8
9
0
Clear
Exit


