Jensen VM9512 - Motorized Touch-Screen Multimedia... Скачать руководство пользователя страница 26

22

VM9512

SATELLITE RADIO OPERATION

Listeners can subscribe to XM® Radio on the Web by 
visiting www.xmradio.com, or by calling (800) 967-2346. 
Customers should have their Radio ID ready (see 
“Displaying the Identification (ID) Code”). Customers can 
receive a limited number of free-to-air channels without 
activation. 

Listeners can subscribe to Sirius® Radio on the Web by 
visiting www.sirius.com, or by calling (888) 539-SIRIUS. 
Customers should have their Sirius ID ready (Sirius ID is 
located on the Satellite Radio Tuner, sold separately). 
Customers can listen to music samples by tuning to 
channel 184.

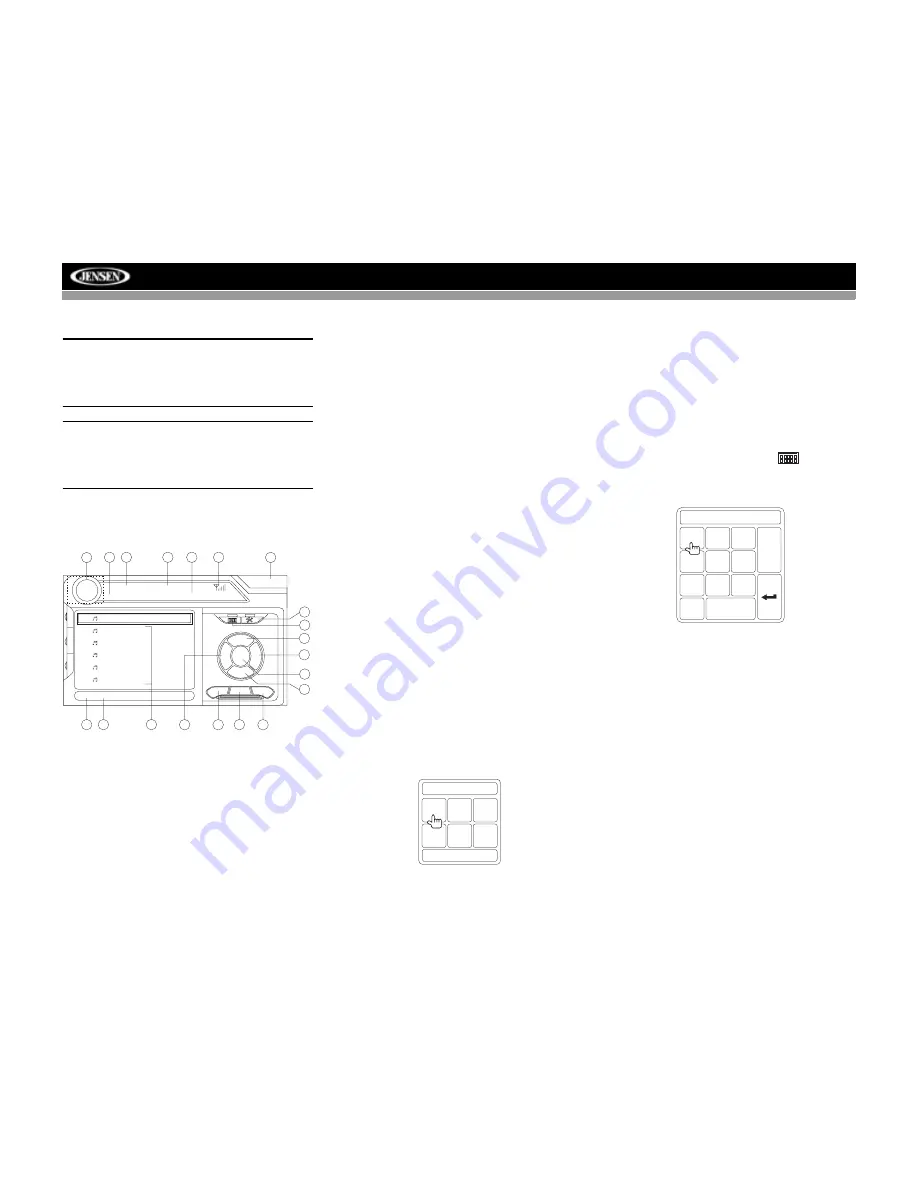
Accessing Satellite Radio Mode

Press the 

SRC

 button (8) on the front panel or remote control 

(8) to switch to the SAT source. 

1.

SAT channel name

2.

SAT channel number

3.

SAT band

4.

Time

5.

Song title

6.

Artist name

7.

Song category

8.

Signal strength indicator

9.

Current preset channels/on-screen preset buttons

10.

CH -

: Select the previous channel

11.

CH +

: Select the next channel

12.

CAT +

: Select next channel in current category only

13.

CAT -

: Select previous channel in current category only

14. Touch to enter channel directly using keypad on screen
15.

CG

: Access Channel/Category Guide mode

16.

BAND

: Change between SAT1, SAT2 and SAT3 bands

17. Touch to view the SETUP menu
18. Touch this area to view the SOURCE MENU and select 

a new playback source

19.

MEM

: View screen used to enter current channel into 

preset memory

20.

DIAG

: This feature is reserved for use by service 

professionals for troubleshooting.

Displaying the Identification (ID) 

Code

Before you listen to satellite radio, you must subscribe to the 
service using your radio’s identification number. To display 
the radio ID, press


the left/right buttons (16, 17) on the 

joystick or the 

CH -

 or 

CH +

 buttons on the touch screen 

repeatedly to tune to channel “000”. The screen displays the 
radio ID where the channel name is usually displayed.

Selecting a Station

Use the left/right joystick buttons or the 

CH -

 or 

CH +

 buttons 

on the touch screen to change to another station.

Preset Mode

To enter preset mode, touch the 

BAND

 button on the screen, 

or press the 

BAND

 button on the unit (14) or remote control 

(20) to change between the following bands: SAT1, SAT2, or 
SAT3 (indicated in the top left corner of the TFT screen).

Six numbered preset buttons store and recall stations for 
each band. All six stored stations (P1-P6) for the current 
band appear on the TFT screen.

Storing a Station

1.

Select a band (if needed), then select a station.

2.

Touch the on-screen 

MEM

 button (18) to open the 

preset screen.

3.

Touch the preset number in which you would like to 
store the current station (or press 

EXIT

 to cancel and 

close the menu). The preset number and station 
appears highlighted.

Recalling a Station

1.

Select a band (if needed).

2.

Touch an on-screen preset button to select the 
corresponding stored station.

Direct Tuning

To enter a radio station directly, touch the 

 button or 

press the 

GOTO

 button (21) on the remote control to display 

the direct entry menu.

Enter the desired radio station using the on-screen number 
pad. Touch the 

Enter

 button to tune to the selected station. 

To exit the screen without changing the station, touch 

Exit

. To 

clear your entry and start over, touch 

Clear

.

Channel/Category Guide Mode

There are two search modes to help navigate through 
channels and or categories. To access the Channel/Category 
Guide mode, press the 

ENTER

 button (18) on the remote 

control or the 

CG 

button on the touch screen.

Channel Guide is the default search mode. To access 
Category Guide, press the 

TITLE

 button (2) on the remote 

control or touch 

CAT

 on the touch screen. To return to 

Channel Guide, touch 

CH

 on the screen or press the 

SUBTITLE

 button (9) on the remote control.

Channel Guide Mode

When Channel Guide mode is selected, the first six satellite 
channels are displayed in the boxes in the bottom left of the 
TFT screen and the on-screen menu changes to facilitate 
search mode.

SAT

SAT1

CH001

01:02

CG

BAND

MEM

DIAG

P1

XM Preview

P2

XM Preview

P3

XM Preview

P4

XM Preview

P5

XM Preview

P6

XM Preview

Title: Fridays XM144!

XM Preview

Preview

CAT

+

CAT

-

CH

CH

+

-

10

11

12

13

14

15

18

4

3

2

1

5

16

17

6

7

8

9

19

20

E

Q

R

E

A

R

P

I

P

Mem:

E x i t

P1 P2

P3

P4 P5 P6

CH NO: _ _ _ /255

1

2

3

4

5

6

7

8

9

0

Clear

Exit

Содержание VM9512 - Motorized Touch-Screen Multimedia...

Страница 1: ...240 DIV Watts Peak Watts en Cr te Vatios el M ximo 60W x 4 VM9512 Installation and Operation Manual video Enter VM9512 Press Audio ANGLE TILT PICTURE Multimedia Receiver AS DISP BAND CLOSE...

Страница 2: ......

Страница 3: ...s of your new Jensen VM9512 Mobile Multimedia Receiver for maximum enjoyment Preparation 1 Installation 5 Anti Theft Feature 6 Controls and Indicators 7 Remote Control 9 Using the TFT Monitor 12 Opera...

Страница 4: ...ii...

Страница 5: ...s Photos and Video Requires Photo or Video iPod Power Management Charges iPod while Connected Requires jLinkCable iPod Interface Cable included MediaLink4 Under Dash Interface Allows Portable Media De...

Страница 6: ...or power connections 16 18 gauge speaker wire Disconnecting the Battery To prevent a short circuit be sure to turn off the ignition and remove the negative battery cable prior to installation NOTE If...

Страница 7: ...Mute leave open if not connected MUTE BROWN Car Phone SUB W REAR L REAR R BLUE RED WHITE FRONT L FRONT R RED WHITE WHITE RED Rear Video 1 YELLOW WHITE YELLOW RED Rear View Video Camera External AV Sys...

Страница 8: ...od Nano iPod Mini iPod iPod Video SAT Radio SAT L SAT R To Head Unit VIDEO LEFT RIGHT 3 5mm Audio MediaLink MEDIALINK AND SATELLITE CONNECTIONS SAT Cable Kit JXMC or XMDJEN100 sold separately XM or Si...

Страница 9: ...t be on If unit does not operate recheck all wiring until problem is corrected Once proper operation is achieved turn off the ignition switch and proceed with final mounting of the chassis 1 Connect w...

Страница 10: ...ss the SETUP button 31 on the remote control or touch the button on the screen to enter the SETUP menu 2 Touch RATING to view the RATING sub menu The small lock icon will be unlocked 3 Enter a new 6 d...

Страница 11: ...s to select playing mode 7 LCD Display 8 MUTE Press to silence the receiver Press again to resume previous volume level BT Mode Answer Bluetooth call NOTE The VM9512 features Softmute which will allow...

Страница 12: ...disc insertion ejection Press and hold to reset core mechanism position 17 TFT Display 18 REAR Select rear zone source Allows front passengers to listen to the radio while rear passengers listen to a...

Страница 13: ...to rear zone move the F R switch 32 located on the right side of the controller 29 3 4 5 9 6 7 26 27 15 16 34 33 19 32 23 24 31 30 8 35 1 2 10 13 28 25 11 12 14 20 18 17 22 21 NOTE Your remote contro...

Страница 14: ...playing DVD DivX or Photo Zooms in Navigates the preset station list Navigates list window Navigates the preset station list Navigates list window PRESET 12 Zooms out when playing DVD DivX or Photo Z...

Страница 15: ...N EMA or Standby Selects display mode CIN EMA or Standby 1 2 3 4 5 6 7 8 9 0 Numeric Keypad 29 Directly accesses chapter 1 6 selects preset for current band Directly accesses track 1 6 selects preset...

Страница 16: ...e TFT screen in Out Press the OPEN button 1 if necessary 2 Locate the extender mechanism behind the screen 3 Firmly grasp both sides of the screen near the bottom 4 Gently pull on either the left or r...

Страница 17: ...ould be displayed on the TFT monitor within 1 2 seconds Parking break is disengaged off when the vehicle is started or the accessory ignition is turned on To activate video the following sequence of e...

Страница 18: ...A output or MediaLink4 Select AUX1 or AUX2 mode to access and control connected auxiliary devices Source Menu To access the SOURCE MENU touch the TFT screen in the top left corner of the screen This m...

Страница 19: ...ress the reset button 12 located on the front bottom right corner of the unit After a system reset the unit restores all factory default settings NOTE If the unit is reset while a DVD is playing the D...

Страница 20: ...led you can touch the screen to control most rear zone functions You can also use the remote control The VM9512 remote controls both the front and rear zones To switch from front to rear zone move the...

Страница 21: ...PM 24 Hour Clock displays 24 hour time up to 23 59 RADIO RADIO SETUP RDS Rating Hardware P VOL TS Cal General Language Audio Back Clock Mode 12 Hour Clock Adjust 04 31 AM Video Input AUTO Beep On Spea...

Страница 22: ...connected Auto Automatically connect when your paired phone is in range Pairing Code The default code is 1234 Touch the keypad icon to open the keypad and enter the pairing code or pass key required f...

Страница 23: ...ess the SETUP button 31 on the remote control or touch the BACK button on the screen Setting Options Function Camera In Normal Mirror Reverse the camera image as if looking through a rear view mirror...

Страница 24: ...CE MENU Touch RADIO Press the SRC button 6 on the front panel or remote control 8 to switch to the AM FM or RADIO source Select FM AM Band Touch the BAND button 15 on the screen or press the BAND butt...

Страница 25: ...tored in that band Preview Scan PS To scan the AM or FM band for a preview of available stations in your particular area touch the PS button 21 Touch again to stop preview scan Local Radio Station See...

Страница 26: ...Mode To enter preset mode touch the BAND button on the screen or press the BAND button on the unit 14 or remote control 20 to change between the following bands SAT1 SAT2 or SAT3 indicated in the top...

Страница 27: ...While in Search Mode to switch between Channel and Category search modes press the CH or CAT buttons on the touch screen Use the scroll bar and arrows on the touch screen to view the next previous pa...

Страница 28: ...forward Keep pressing and releasing the button to increase the rate from 2X to 4X 6X and 8X Press the joystick enter button 18 on the remote control or touch the play button to resume normal playback...

Страница 29: ...choose a language Changing Subtitle Language If you are watching a disc recorded in multiple languages with subtitles press the SUBTITLE button 9 on the remote control to choose the language in which...

Страница 30: ...umber of subtitle languages available on the disc maximum of 32 Number of angles provided maximum of 9 Aspect ratios available LB stands for Letter Box and PS stands for Pan Scan In the example on the...

Страница 31: ...sc playback To resume playback touch the button on screen or press the joystick button Pausing Playback Touch the button on screen or press the joystick button to suspend or resume disc playback Movin...

Страница 32: ...creen to display the direct entry menu Enter the desired track number using the on screen number pad and then press the Enter button To exit the screen without making a selection touch Exit To clear y...

Страница 33: ...Folder Select are accessed in the order they were written by the CD writer As a result the order in which they are expected to be played may not match the order in which they are actually played You...

Страница 34: ...ncrease disc reading reliability Also use folders when burning large numbers of songs files to a disc for easy music navigation Select the Disc at Once option and close your disc Stopping Playback Tou...

Страница 35: ...ENU button on screen to return to the previous menu Fast Forward Fast Reverse Press and hold the or buttons on screen or on the remote control 17 19 for 1 second and continue to hold for fast forward...

Страница 36: ...the head unit turn the Bluetooth connectivity off on the mobile phone Phone Book direct searching through the head unit is only available if the mobile phone supports Phone Book Download If the featu...

Страница 37: ...be answered directly or left for voice mail Volume Control To increase or decrease the volume level turn the rotary encoder 5 on the front panel or press the VOL VOL buttons 15 16 on the remote contr...

Страница 38: ...The VM9512 allows you to play back audio files from your phone PDA or personal music player using a Bluetooth connection Before using an audio player it may be necessary to enter a PIN code into the u...

Страница 39: ...malfunction MUTE wire is grounded Check that the MUTE connection is not grounded and that it s properly insulated Unit resets itself when engine is off Incorrect connection between ACC and positive b...

Страница 40: ...d files Incorrect playback message displayed Message is longer than LCD can display SAT RADIO No Sound Incorrect cable connections Check RCA cables Satellite source not available Incorrect cable conne...

Страница 41: ...aged by foreign objects 5 Do not attempt to use a 3 8 cm CD Single disc in this unit either with or without an adaptor as damage to the player and or disc may occur Such damage is not covered by the W...

Страница 42: ...ge Rejection 60dB Frequency Response 50Hz 2 kHz 3dB Monitor Screen Size 7 0 Measured diagonally 16 9 Widescreen 6 06 154 1mm W X 3 42 87mm H Screen Type TFT Liquid Crystal Display LCD active matrix Re...

Страница 43: ...tenance section of your Installation and Operation Manual for additional information regarding the proper use of your product Limitations THE EXTENT OF THE COMPANY S LIABILITY UNDER THIS WARRANTY IS L...

Страница 44: ...Audiovox Electronics Corporation Hauppauge NY 11788 Technical Assistance 1 800 323 4815 www jensen com 2007 Audiovox Ver 070607 Printed in China...

Отзывы: