background image


JWM6A 


14 

MP3/USB OPERATION 


If the user connects a USB mass storage device, the radio automatically powers on, if necessary, 

and switches to digital file playback mode and selects that physical media. Changing modes or 

turning off the radio pauses playback. Playback will resume exactly where paused when 

returning to digital file playback mode. 

Inserting a USB Device 

The 

USB connector

 (28) is at the bottom right corner of the 

panel. Insert a USB device to automatically access USB 

mode and begin playback. The LCD will 

display “LOADING” 

and "USB" while files are initially loaded. 

When USB is removed, it will automatically back to the 

previous mode before the USB is connected. During other 

playback mode, when USB is connected, press 

MODE 

DISPLAY 

button to enter USB playback mode directly. 

NOTE: MP4 video format is not supported. 

MP3 Specifications 

Notes on MP3 Playback 


Any directory that does not include an MP3 file is 

skipped 


Maximum number of folders: 512 (including skipped directories) 


Maximum number of folder levels: 12 


Maximum number of MP3 files: 999 


Maximum number of characters for MP3 file name and folder name: 32 


Maximum number of Characters of ID3 Tag: 


ID3 Tag version 1.0: 32 


ID3 Tag version 2.x: 32 
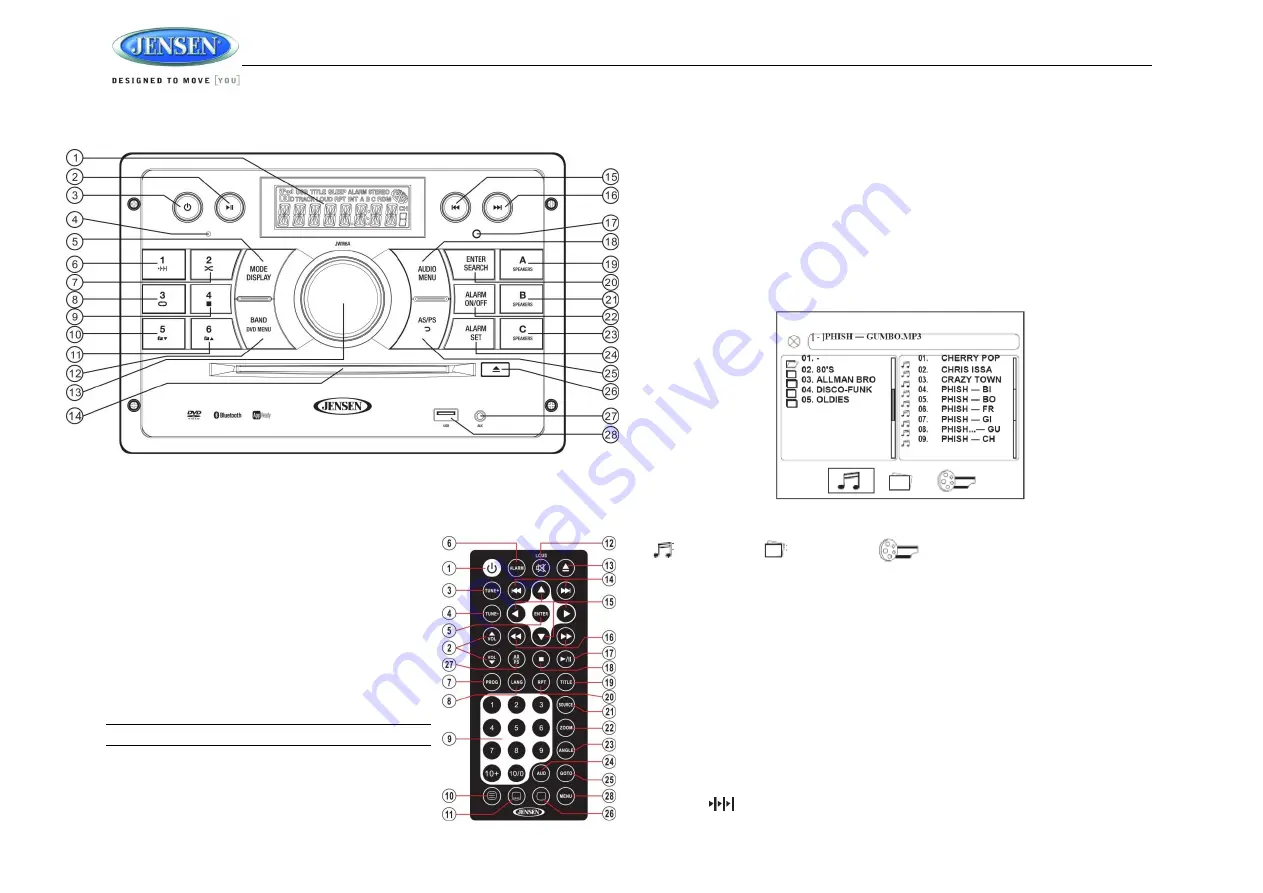
MP3 Monitor Display 

After loading an MP3 disc or USB device, the following screen will appear on your output 

monitor. 

Select one of these icons to access the corresponding media on your disc or USB device.   

If the media type is not present, the icon will not be selectable. 

          : Audio                        : Photos                              : Video 

Play/Pause 

Press the 

|| 

button (2) to suspend or resume disc play 

Track Select 

Press the 

>>| 

or 

|<< 

button (16, 15) or 

|<< 

or 

>>| 

button (14) on the remote control to advance to 

the next or previous track in the current folder. The selected track number will appear on the 

display. 

Folder Up/Down 

Press and hold

 the 

(11) to access a higher folder level (FOLDER UP). 

Press and hold

 the 

5

 (10) to access a lower folder level (FOLDER DN). 

Intro Scan (INT) 

Press the 

1       

  button (21) during disc play to play the first 10 seconds of each track on the 

Содержание JWM6ABK

Страница 1: ...JWM6A MOBILE AUDIO SYSTEM Installation and Operation Manual...

Страница 2: ...ion 5 Wiring 6 Basic Operation 7 Tuner Operation 10 Disc Operation 11 CD Operation 11 MP3 USB Operation 14 Bluetooth Operation 16 App Operation 17 Remote Control Operation 18 DVD Setup Menu 20 Care an...

Страница 3: ...n a North American vehicle Protect the Disc Mechanism Avoid inserting any foreign objects into the slot of this player Failure to observe this may cause malfunction due to the precise mechanism of thi...

Страница 4: ...alized Disc Maintenance A dirty or defective disc may cause sound dropouts while playing Before playing wipe the disc using a clean cloth working from the center hole towards the outside edge Never us...

Страница 5: ...led in a vehicle equipped with an on board drive or navigation computer do not disconnect the battery cable If the cable is disconnected the computer memory may be lost Under these conditions use extr...

Страница 6: ...ITE FRONT LEFT A SPEAKER 11 ORANGE RIGHT B SPEAKER 12 ORANGE BLACK RIGHT B SPEAKER 13 BROWN LEFT B SPEAKER 14 BLUE AMP REMOTE 12VDC 100mA 15 RED 12VDC SWITCHED 16 BLACK GROUND 17 VIOLET RIGHT REAR A S...

Страница 7: ...ft and right speakers from LEFT 7 full left to RIGHT 7 full right 0 indicated an equal balance between the left and right speakers FADE Adjust the speaker fade between the rear and front speakers from...

Страница 8: ...d functions and time are shown on the LCD panel 1 NOTE LCD panels may take longer to respond when subjected to cold temperatures for an extended period of time In addition the visibility of the number...

Страница 9: ...A SPEAKER 19 also controls the output of the rear line level audio out Press any of the three buttons to turn the corresponding speaker sets on or off SPK A SPK B or SPK C will appear on the display...

Страница 10: ...d a 1 6 preset button for two seconds The present number will appear on the display Recall a Station Select a band if needed Press a 1 6 preset button to select the corresponding stored station Automa...

Страница 11: ...forward or reverse and resume normal playback Intro Scan INT Press the 1 button 6 during disc play to play the first 10 seconds of each track on the current disc Press 1 again to end the scan and play...

Страница 12: ...button 16 15 to advance to the next or previous track on the disc The selected track number will appear on the display MENU Select While in menu mode press the BAND DVD MENU button 12 to select a men...

Страница 13: ...ining playing time 00 02 18 total elapsed playing time of the current track C 00 34 37 remaining playing time of the current track T 00 02 18 total elapsed playing time for disc T 00 34 37 remaining p...

Страница 14: ...n MP3 file is skipped Maximum number of folders 512 including skipped directories Maximum number of folder levels 12 Maximum number of MP3 files 999 Maximum number of characters for MP3 file name and...

Страница 15: ...uttons 15 on the remote control to access the fields on the PROG screen 3 Use the number buttons on the remote control to enter a track number in each field 4 Press the button 17 on the remote control...

Страница 16: ...nge Lock or Unlocked DISCONNECT To disconnect a paired device press the ENTER SEARCH button to temporarily remove the Bluetooth link The link can be re established through your phone menu by selecting...

Страница 17: ...o features including Power on off Volume and mute CD DVD player AM FM radio tuner access station recall store presets switch songs Bluetooth streaming audio File structure visibility track selection t...

Страница 18: ...Use 1 6 to access preset stations Enter track number to access track directly For track Number 10 use 10 followed by second digit Enter track number to access track directly For track Number 10 use 1...

Страница 19: ...e viewing angle if available 24 AUD Access Audio Menu options Access Audio Menu options Access Audio Menu options Access Audio Menu options Access Audio Menu options 25 GOTO Select exact time track or...

Страница 20: ...allows the selection of a new four digit code to use for security purposes Rating Select the parental control level for all DVD play The security password is required to make changes to this feature...

Страница 21: ...0 2 4 or 6 Saturation Adjust the saturation of the screen from the following levels 12 10 8 6 4 2 or 0 Sharpness Adjust the sharpness of the screen from the following levels 8 6 4 2 or 0 Speaker Setup...

Страница 22: ...er a bridge or when passing under high voltage lines Although AM is subject to environmental noise it has the ability to receive at great distance This is because broadcasting signals follow the curva...

Страница 23: ...to operate the equipment NOTE This equipment has been tested and found to comply with the limits for a Class B digital device pursuant to Part 15 of the FCC Rules These limits are designed to provide...

Страница 24: ...ASA Electronics Corporation www asaelectronics com www jensenrvdirect com 2016 ASA Electronics Corporation...

Отзывы: