Jensen JTA-410 Скачать руководство пользователя страница 7


E-6 

4. Do not dispose of batteries in fire, batteries may explode or leak. 

5. Do not try to recharge batteries not intended to be recharged; they can overheat 

and rupture.( Follow battery manufacturer’s directions ). 


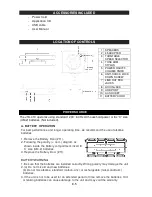
B. AC POWER CONNECTION


1. Insert one end of power cord to the AC Socket (#10)  at the back of the JTA-410.


2. Connect the power cord to AC power source. 
3. When the unit is operated from AC power source,  the internal battery source will 

automatically  be disconnected.


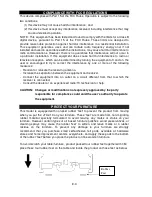
ANTI-SHOCK LOCK DOWN SCREW   

 
The  turntable  on  this  unit  features  a  built  in  Anti-Shock  system,  and  the  turntable  is 
locked down when shipped from the factory. Turn the anti-shock lock down screw (#6), in 
a clockwise direction to release the turntable and activate the anti-shock feature before 
using the turntable. 
 

STEREO PHONOGRAPH OPERATION 

  Please Note - Before Use 

-

  Remove the stylus protector. 

-

  Make sure that the tone arm is unlocked and free 

to move from the tone arm rest prior to operating. 
Lock the tone arm in place again when not in use. 

 
1.   Raise the JTA-410 top cover. 
2.  Turn on the system by rotating the Power on/off/volume knob (#5) clockwise until the 

“ Power LED” turns on. 

3.   Place a record on the turntable platter [ use the 45 RPM SPINDLE ADAPTOR (#2) if 

you are playing 45 RPM records ]. 

4.   Set the TURNTABLE SPEED SELECTOR (#3) to the proper position for the record 

you are playing. 

5.   Lift the tone arm from the rest and slowly move it over the 

record. The turntable platter will begin spinning. 

6.  Place the tone arm down onto the record at the location that 

you want to play. 

7.   Adjust the volume to the desired level. 

8.   At the end of record, the platter will stop spinning and the 

tone arm will return to the rest automatically. 

9.   To stop playing, manually lift the tone arm from the record and return it to the rest. 
 

NOTES:


1.  Make sure the cover latch is in lock position when the cover is open. 
2.  Don’t close the cover while playing a record. 
3.  Do not leave a record on the turntable when closing the cover. 
4.  The turntable will automatically disconnect and stop playing when a 3.5mm stereo 

aux-in cord (not included) is plugged into the AUX IN JACK (#8) on the back.   
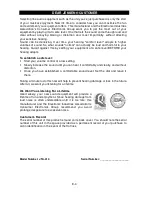


Cartridge 

Stylus assembly 

Содержание JTA-410

Страница 1: ...PORTABLE 3 SPEED TURNTABLE WITH BUILT IN SPEAKERS USER MANUAL JTA 410 PLEASE READ THIS USER MANUAL COMPLETELY BEFORE OPERATING THIS UNIT AND RETAIN THIS BOOKLET FOR FUTURE REFERENCE...

Страница 2: ...the safety purpose of the polarized or grounding type plug A polarized plug has two blades with one wider than the other A grounding type plug has two blades and a third grounding prong The wide blade...

Страница 3: ...he wall outlet and refer servicing to qualified service personnel under the following conditions a When the power supply cord or plug is damaged b If liquid has been spilled or objects have fallen int...

Страница 4: ...na Increase the separation between the equipment and receiver Connect the equipment into an outlet on a circuit different from that to which the receiver is connected Consult the dealer or an experien...

Страница 5: ...a safe level Start your volume control at a low setting Slowly increase the sound until you can hear it comfortably and clearly and without distortion Once you have established a comfortable sound le...

Страница 6: ...tteries 3 Replace the Battery Door 11 BATTERY WARNING 1 Be sure that the batteries are installed correctly Wrong polarity may damage the unit 2 a Do not mix old and new batteries b Do not mix alkaline...

Страница 7: ...rm in place again when not in use 1 Raise the JTA 410 top cover 2 Turn on the system by rotating the Power on off volume knob 5 clockwise until the Power LED turns on 3 Place a record on the turntable...

Страница 8: ...be able to listen to the record from the Turntable 3 Rotate the POWER ON OFF VOLUME KNOBS to turn off the JTA 410 when you finish listening Don t forget to switch off the power on your external devic...

Страница 9: ...to install USB drivers for it automatically 3 Waiting for the installation complete until your computer shows a pop up a message that it is installed properly and ready to use SET RECORDING INPUT LEV...

Страница 10: ...y a record on the turntable and use the Sound Recorder to record a short clip of music for testing The sound wave will show on the interface screen when recording RUNNING AUDACITY SOFTWARE Note Please...

Страница 11: ...pears You will find the Record Play Pause Stop Skip to Start and Skip to End control buttons here Use the File Edit View Transport Tracks Generate Effect and Analyze menus from your computer screen to...

Страница 12: ...Input and Output Volume bars 5 Click the record button to start recording left and right tracks will show on your computer screen If you cannot see the sound waves appear on the Interface when recordi...

Страница 13: ...you want to encode your recorded music to MP3 format you need to download the LAME MP3 encoder either in the CD provided or under the page Other Audacity Downloads for Windows of the website http aud...

Страница 14: ...ower source when cleaning The finish on the unit may be cleaned with a dust cloth and cared for as other furniture Use caution when cleaning and wiping the plastic parts If the cabinet becomes dusty w...

Страница 15: ...de the POWER ON OFF switch to the ON position Unit is ON but there is low or no volume The volume Control has been turned all the way down Turn the Volume control to a higher output Sound is distorted...

Страница 16: ...ure to provide reasonable care and necessary maintenance as outlined in the user manual 3 Warranty of all SPECTRA products applies to residential use only and is void when products are used in a nonre...

Отзывы: