background image


E-7 

IMPORTANT NOTES


Avoid installing the unit in locations described below:  


Places exposed to direct sunlight or close to heat radiating appliances such as electric heaters. 


Dusty places. 


Places subject to constant vibration. 


Humid or moist places.  


POWER SOURCES  


This  Music  System  operates  on  120V~  60Hz.  Do  not  attempt  to  operate  the radio  on  any  other power 
source. You could cause damage to the unit and void your warranty.  
Please  be  sure  the  power  outlet  you  plug  this  unit  into  is  working  and  receives  constant  (unswitched) 
power.  The  system  is  also  equipped  with  a  battery  back-up  system  for  the  clock  that  is  powered  by  2 
pieces of “AA” (UM-3) size batteries (Not included).  
Note: The batteries may be installed as a backup option to maintain the clock time if electrical power fails. 
In  the  event  of  power  outage,  the  clock  time  will  not  be  displayed,  however  the  clock  will  continue  to 
operate so  current time will be maintained.  

The remote control unit it is designed to operate on 1 x CR2025 battery.  


GETTING STARTED  

 
A.  INSTALLING BACK UP BATTERIES INTO THE SYSTEM  

1.  Remove the BATTERY DOOR.  
2.  Install 2 x “AA” (UM-3) batteries (not included) according to the polarity diagram inside the battery 

compartment. 

3.  Close  the BATTERY DOOR.  
Note : The backup battery is only for the Clock Setting and cannot backup the Alarm Setting. 
 

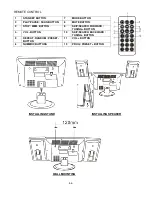
B.  INSTALLING BATTERIES INTO THE REMOTE CONTROL  

The remote control operates on one CR2025 battery (included). To 
activate the remote control, remove the insulation tab inserted in the 
battery compartment. When the operation of the remote control 
becomes intermittent or unsatisfactory, replace the original battery 
with a new CR2025 lithium battery.


1. Slide out the battery holder from the remote control case.                                                  
2. Replace the 3V CR2025 battery. Be sure the battery is installed 

correctly. 
The remote will not work if the battery is installed with the wrong 
polarity.  

3. Insert the battery holder back into the battery slot.  


WARNING

 : DO NOT INGEST BATTERY, CHEMICAL BURN HAZARD.


The remote control supplied with this product contains a coin/button cell battery.  If the coin/button 
cell battery is swallowed, it can cause severe internal burns in just 2 hours and can lead to death. 
Keep new and used batteries away from children.  If the battery compartment does not 
close securely, stop using the product and keep it away from children. 
If you think batteries might have been swallowed or placed inside any part of the body, 
seek immediate medical attention. 


Содержание jmc-180b

Страница 1: ...0 MODEL JMC 180B WALL MOUNTABLE CD SYSTEM WITH DIGITAL AM FM STEREO RECEIVER PLEASE READ THIS USER MANUAL COMPLETELY BEFORE OPERATING THIS UNIT AND RETAIN THIS BOOKLET FOR FUTURE REFERENCE...

Страница 2: ...tripod bracket or table recommended by the manufacturer or sold with the product Any mounting of the product should follow the manufacturer s instructions and should use a mounting accessory recommen...

Страница 3: ...rous voltage points or short out parts that could result in a fire or electric shock Never spill liquid of any kind on the product 22 Damage Requiring Service Unplug this product from the wall outlet...

Страница 4: ...e and 2 This device must accept any interference received including interference that may cause undesired operation This equipment has been tested and found to comply with the limits for a Class B Dig...

Страница 5: ...ime We Want You Listening For a Lifetime Used wisely your new sound equipment will provide a lifetime of fun and enjoyment Since hearing damage from loud noise is often undetectable until it is too la...

Страница 6: ...SE SCAN BUTTON 24 FOLD OUT SPEAKER STANDS 5 STANDBY BUTTON 15 SKIP SEARCH FORWARD BUTTON 25 FM ANTENNA 6 TIME ADJ BUTTON 16 STOP MEM BUTTON 26 REMOVABLE STAND 7 AL ON OFF SLEEP BUTTON 17 MODE BUTTON 2...

Страница 7: ...CAN BUTTON 8 MUTE BUTTON 3 STOP MEM BUTTON 9 SKIP SEARCH FORWARD TUNING BUTTON 4 VOL BUTTON 10 SKIP SEARCH BACKWARD TUNING BUTTON 5 REPEAT RANDOM PRESET BUTTON 11 VOL BUTTON 6 NUMERIC BUTTONS 12 PROG...

Страница 8: ...uded according to the polarity diagram inside the battery compartment 3 Close the BATTERY DOOR Note The backup battery is only for the Clock Setting and cannot backup the Alarm Setting B INSTALLING BA...

Страница 9: ...Remote Control at the remote SENSOR IR 20 located on the front of the System The functions of the remote buttons are the same as the corresponding controls on the main unit The performance of the Infr...

Страница 10: ...until the internal antenna picks up the strongest signal FM During FM reception always keep the FM Wire Antenna fully extended If FM reception is weak try repositioning the FM Wire Antenna until you f...

Страница 11: ...SE button 14 to pause the PLAY PAUSE INDICATOR will flash Press the PLAY PAUSE button 14 again to resume playing 6 Adjust the VOLUME buttons 8 or 9 to the desired volume level REPEAT MODE REPEAT 1 Whe...

Страница 12: ...to your external player s line out or headphone jack 1 The AUX IN and PHONES JACKS are covered by the DOOR 13 2 Slide the DOOR downwards plug one end of an audio cable not included into the AUX IN Ja...

Страница 13: ...ight up 7 At the selected wake up time the Radio will turn on and will play about 60 minutes and then shut off automatically 8 To stop the radio before it shuts off press STANDBY button 5 once The rad...

Страница 14: ...ALARM INDICATOR will appear in the DISPLAY 2 Press the AL ON OFF Button 7 again to turn the alarm function off The ALARM INDICATOR will disappear in the DISPLAY CHECKING THE WAKE UP TIME Whenever you...

Страница 15: ...quality blank media and Retest CD skips while playing Disc is dirty or scratched Wipe CD with clean cloth or use another disc Intermittent sound from CD player Dirty or defective disc Dirty pick up le...

Страница 16: ...lure to provide reasonable care and necessary maintenance as outlined in the user manual 3 Warranty of all SPECTRA products applies to residential use only and is void when products are used in nonres...

Отзывы: