background image


8

INSTALLATION 

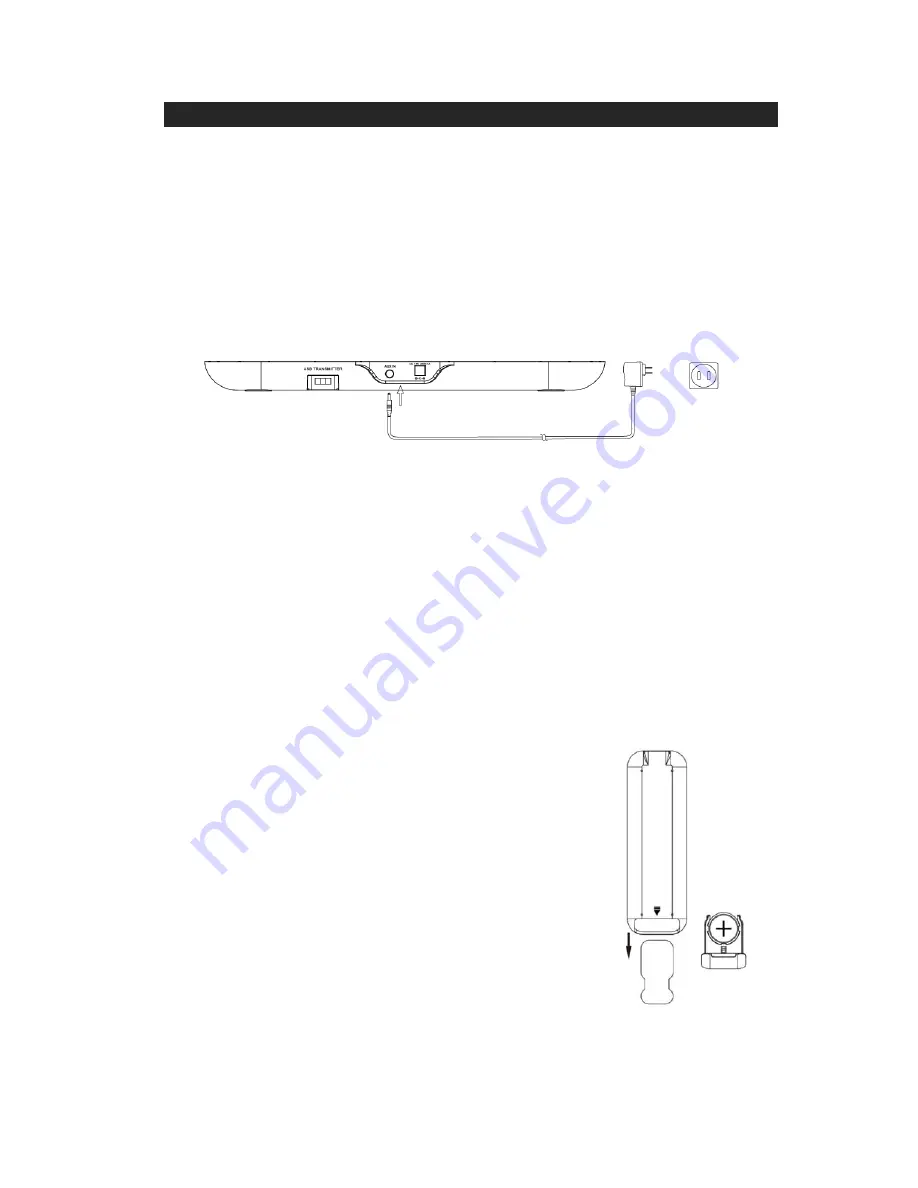
CONNECTING THE AC POWER   

An AC-DC Adaptor with 7.5V DC 2400mA output (included) is required for 

operating the main unit. Plug the AC-DC Adaptor into the unit and into an AC 

outlet: 

1.) Firmly and securely insert the DC plug of the adaptor into the DC Jack on the back of 

the unit 

2.) Plug the Adaptor plug into an outlet rated at 120V ~ 60Hz.   


NOTE: 

This speakers are not magnetically shielded and may cause color 

distortion on the screen of some TVs or video monitors. To avoid this, you may 

need to move the speakers further away from the TV or monitor if unnatural color 

shifts or image distortion occurs. 


POWER OF INDIVIDUAL SPEAKER 

Each speaker has a built-in rechargeable lithium battery for independent playback. 

Before the first use, we recommend to charge each speaker battery for 12 hours. 

Switch off the speaker power and place it on the recessed charging area of the 

powered Docking Base, charging will start automatically. The charging LED 

indicator will be flashing green while the speaker is 

charging and will switch to solid green when charged.


REMOTE CONTROL 

The remote control operates on one CR2025 battery 

(included). To activate the remote control, remove the 

insulation tab inserted in the battery compartment. 

When the operation of the remote control becomes 

intermittent or unsatisfactory, replace the original 

battery with a new 3-volt lithium CR2025 battery. 

1.) Slide out the battery holder from the remote control 

   case. 

2.) Replace the 3V CR2025 battery. Be sure the battery is installed correctly. The 

Содержание JiSS-600i

Страница 1: ...MUSIC SYSTEM WITH WIRELESS SPEAKERS FOR iPod AND iPhone USER S MANUAL JiSS 600i iPod iPhone Not Included PLEASE READ THIS USER MANUAL COMPLETELY BEFORE OPERATING THIS UNIT AND RETAIN THIS BOOKLET FOR...

Страница 2: ...tablish a safe level Start your volume control at a low setting Slowly increase the sound until you can hear it comfortably and clearly and without distortion Once you have established a comfortable s...

Страница 3: ...ch as radiators heat registers stoves or other apparatus including amplifiers that produce heat 9 Protect the power cord from being walked on or pinched particularly at plugs convenience receptacles a...

Страница 4: ...ss B digital device pursuant to Part 15 of the FCC Rules These limits are designed to provide reasonable protection against harmful interference in a residential installation This equipment generates...

Страница 5: ...amage to your furniture we strongly recommend that you purchase small self adhesive felt pads available at hardware stores and home improvement centers everywhere and apply these pads to the bottom of...

Страница 6: ...tus Indicator 4 Docking Base 5 Remote Infrared Sensor 6 Volume Down Button 7 iPod iPhone Docking Connector 8 Volume Up Button 9 Speaker Volume Up Button 10 Speaker Volume Down Button 11 Battery Chargi...

Страница 7: ...ck 20 DC IN Jack REMOTE CONTROL 1 Infrared Transmitter 2 Power ON Standby Button iPod iPhone Menu Enter Button 3 iPod iPhone Menu Scroll Up Button 4 iPod iPhone Skip Backward button 5 iPod iPhone Menu...

Страница 8: ...ed No charging LED Off Charging Flashing Green Speaker Battery Charging Indicator Docking Base Charging Finished Solid Green Speaker Power Off LED Off Linking Rapid Flashing Green Not linked Slow Flas...

Страница 9: ...built in rechargeable lithium battery for independent playback Before the first use we recommend to charge each speaker battery for 12 hours Switch off the speaker power and place it on the recessed c...

Страница 10: ...Press and hold the Link button located on the back of the speaker box for about 3 seconds and then release it The speaker status LED will rapidly flash green 5 Now press the link button on the USB tr...

Страница 11: ...laying automatically and start charging immediately You can also start playing the iPod iPhone by tapping the iPod iPhone PLAY PAUSE button when the unit is in a different mode 4 Tap the iPod iPhone P...

Страница 12: ...your computer the volume control on Docking Base and remote control will not work Please use the volume control on your computer or the volume buttons on the wireless speakers to control the sound le...

Страница 13: ...your wireless speaker system 5 Open the music player program on your computer and adjust the volume of the player program to a low level 6 Click the play button and slowly increase the volume level of...

Страница 14: ...ing external audio devices like MP3 players CD players and older non dockable iPods except iPod shuffle 3rd gen and listen to your external source through the speakers of this system 1 Plug the USB tr...

Страница 15: ...rical noise such as fluorescent lamps or motors 3 For better Clock Display clarity avoid operating the unit under direct sunlight or in strong room illumination 4 Unplug the unit from the electrical p...

Страница 16: ...obstruction on the connectors in the dock and on your iPod iPhone Then reseat it on the dock iPod iPhone does not respond to the speaker system Your iPod iPhone is locked up Please make sure that your...

Страница 17: ...for the operation of this device or its compliance with safety and regulatory standards Please note that the use of this accessory with iPod or iPhone may affect wireless performance iPhone iPod iPod...

Страница 18: ...ilure to provide reasonable care and necessary maintenance as outlined in the user manual 3 Warranty of all SPECTRA products applies to residential use only and is void when products are used in a non...

Отзывы: