


Language Video Audio More Aud Rating
English
A. Press
ENTER
to confirm
B. Press
SETUP
to exit the Setup Menu
A. Press
ENTER
to confirm
B. Press
SETUP
to exit the Setup Menu
A. Press
ENTER
to confirm
B. Press
SETUP
to exit the Setup Menu
Language Setup
OSD Menu
Subtitle
Audio
DVD Menu
English
English
English
English
Press to change your selection
Press to change your selection
Press to change your selection
Note:
Subtitle languages vary by disc.
Note:
Audio languages vary by disc.
Note:
Menu languages vary by disc.
Select [Audio],
and press ENTER
or to display the [Audio] submenu:
Select [DVD Menu], and press ENTER or to display the [DVD Menu] submenu:
Select [Subtitle], and press ENTER or to display the [Subtitle] submenu:
German
French
Spanish
Auto
Off
Language Video Audio More Aud Rating
English
OSD Menu
Subtitle
Audio
DVD Menu
English
English
English
English
German
French
Spanish
Language Video Audio More Aud Rating
English
Subtitle
Audio
DVD Menu
English
English
English
German
French
Spanish
9
20
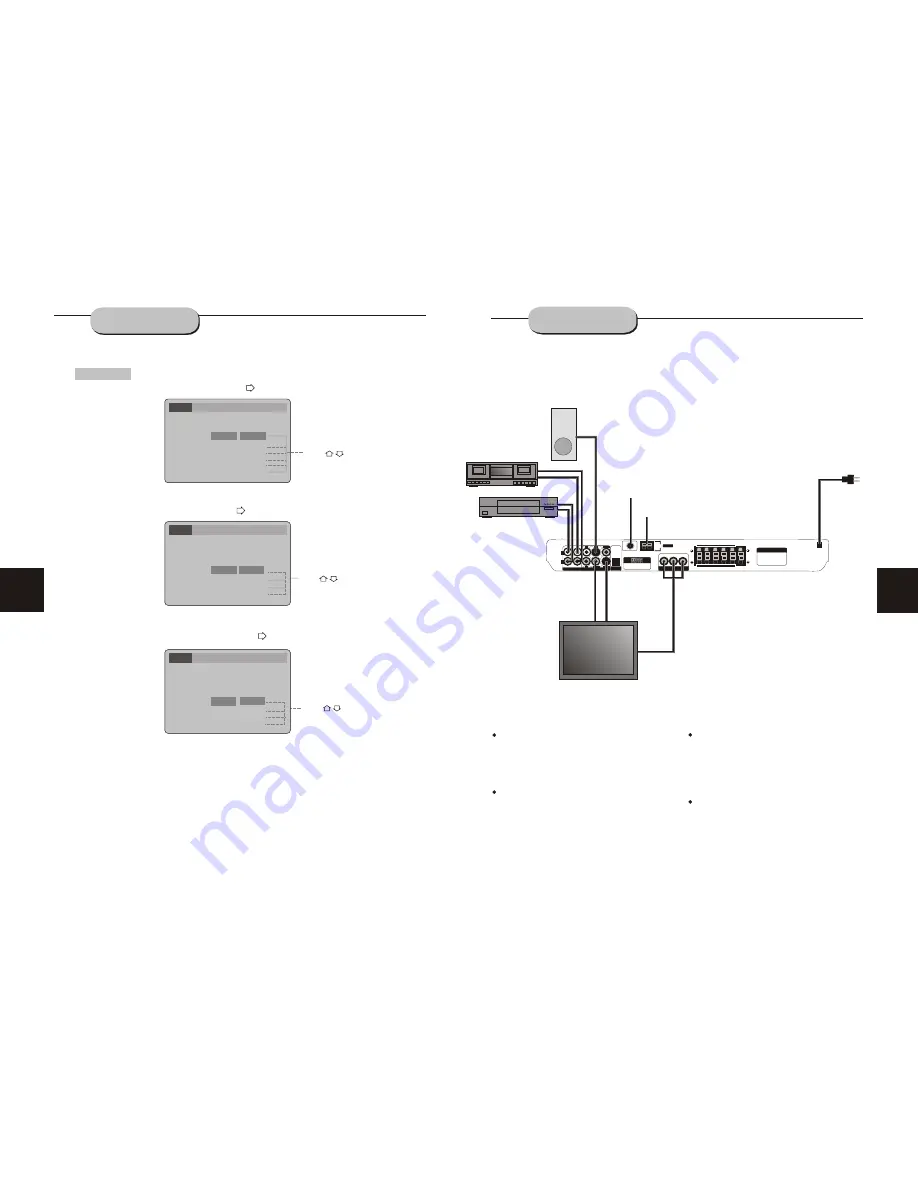
Connection terminals for this DVD receiver
are found on the rear panel.
C
arefully
read
and follow the manufacturers' instructions
for
any video
or
audio device being
connected to this unit.
Do not connect the power until all
other
connections
have been properly completed.
The r
ed terminal (
"
R
"
) is for connecting the
right channel. The white terminal (
"
L
"
)
is
ior connecting the left channel. The yellow
terminal is for video connection. Make sure
all connections are securely made. Improper
connections may cause noise, poor perfor-
mance or damage to the equipment.
Do not tie the AV cord with any other cords,
such as the power cord or speaker wires, as
doing so
may result in poor picture and/or
sound
quality.
CONNECTING
DEVICES
SYSTEM SETUP
Component
Video Output
VCR
Active
Subwoofer
(optional)
COMPONENT VIDEO OUT
Cr
Cb
Y
OPTICAL
R
L
AUX IN
OUTPUT
AUX 1
AUX 2
AM
ANTENNA
SR
SL
FR
FL
CEN
SW
SPEAKERS IMPEDANCE 6
W
L
SW
COAXIAL
R
VIDEO
S-VIDEO
FM
(75
W
)
8
W
DVD & AMPLIFIER SYSTEM
AM
Antenna
FM
Antenna
V
i
eo
d
S-
i
o
V
de
Power
Television
Cassette Deck


