E-6
POWER SOURCE
AC POWER CONNECTION
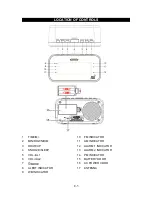
This product operates on 120V ~60Hz AC power supply. Plug the AC power cord (#16)
into a household outlet AC source.
INSTALLING THE BACK-UP BATTERY
This unit is equipped with a battery back-up system, it requires 3V
2 x AA (UM-3)
batteries (not included) to maintain the time settings and radio presets during an AC
power outage.
1. Remove the battery door (#15).
2. Install two pieces AA size batteries into the battery compartment following the
polarity diagram inside. Use only the specified size and type of batteries.
3. Replace the battery door (#15).
Note:
The unit will operate without a battery installed but your time & alarm setting will
be lost and will have to be reset in the event of power interruption or failure.
IMPORTANT:
Be sure that the batteries are installed correctly. Wrong polarity may damage the unit
and void the warranty. For best performance and longer operating time, we recommend
the use of good quality alkaline battery.
BATTERY WARNING
1.
Be sure that the batteries are installed correctly. Wrong polarity may damage the unit
2. Use only the size and type of batteries specified.
3.
If the unit is not to be used for an extended period of time, remove the batteries.
Old or leaking batteries can cause damage to the unit and may void the warranty.
4.
Do not try to recharge batteries not intended to be recharged; they can overheat
and rupture. (Follow battery manufacturer’s directions)
5.
Do not dispose of batteries in fire, batteries may leak or explode
POWER ON/STANDBY
1. In standby mode, press and hold the /MODE BUTTON (#7) to turn on the unit.
2. Press and hold the /MODE BUTTON (#7) again to return the unit to standby mode.
CLOCK OPERATION
TIME SETTING
1. At Standby mode, press Time/M+ button (#1), 12 or 24 Hr will flash on the display.
2. Press MIN/DOWN/DIM (#2) or HOUR/UP BUTTON (#3) repeatedly to select 12 or
24-hour display mode.
3. Press TIME/M+ button (#1) to confirm, the time will flash on the display.
4. Press the HOUR/UP BUTTON (#3) repeatedly to set the hour, press the
MIN/DOWN/DIMBUTTON (#2) repeatedly to set the minute.
Notes:
•
If the PM Indicator (#14) is not showing in 12-hour mode, the time displayed
is AM.
•
It will auto confirm after it flashes 4 times. Once the time stop flashing, you can
repeat step 1 to step 4 to reset the time.


