background image

7

Clock and Control Pad Area

• To activate “Control Lock” for cleaning, see page 13.
• Wash, rinse and dry. 

Do not

 use abrasive cleaning agents

as they may scratch the finish.

• Glass cleaners may be used if sprayed on a cloth first. 

DO

NOT spray directly on control pad and display area.

Control Knobs

• Remove knobs in the OFF position by pulling up.
• Wash, rinse and dry. 

Do not 

use abrasive cleaning agents as

they may scratch the finish. Turn on each burner to be sure the
knobs have been correctly replaced.

Backguard, Cooktop and Control Panel - Porcelain Enamel

Porcelain enamel is glass fused on metal and may crack or chip

with misuse. It is acid-resistant, not acid- proof. All spillovers,
especially acidic or sugary spillovers, should be wiped up
immediately with a dry cloth.

• When cool, wash with soapy water, rinse and dry.

Never

 wipe off a warm or hot surface with a damp cloth. This

may cause cracking or chipping.

Never

 use oven cleaners, abrasive or caustic cleaning agents

on exterior finish of range.

Side Panels, Painted Enamel

• When cool, wash with warm soapy water, rinse and dry. 

Never

wipe a warm or hot surface with a damp cloth as this may
damage the surface and may cause a steam burn.

• For stubborn soil, use mildly abrasive cleaning agents such

as baking soda paste or Bon Ami*. 

Do not

 use abrasive

cleaners such as steel wool pads or oven cleaners. These
products will scratch or permanently damage the surface.

Important: Use a dry towel or cloth to wipe up spills,
especially acidic or sugary spills. Surface may discolor
or dull if soil is not immediately removed. This is
especially important for white surfaces.

Oven Windows and Doors - Glass

• Avoid using excessive amounts of water which may seep

under or behind glass, causing staining.

• Wash with soap and water. Rinse with clear water and dry.

Glass cleaner can be used if sprayed on a cloth first.

Do not

 use abrasive materials such as scouring pads, steel

wool or powdered cleaners as they will scratch glass.

Oven Interior

• Follow instructions on page 5-6 to set a self-clean cycle.

Oven Racks

Clean with soapy water.

Remove stubborn soil with cleansing powder or soap-filled
scouring pad. Rinse and dry.

Racks will permanently discolor and may not slide out
smoothly if left in the oven during a self-clean operation. If
this occurs, wipe the rack and embossed rack supports with
a small amount of vegetable oil to restore ease of move-
ment, then wipe off excess oil.

Stainless Steel

DO NOT USE ANY CLEANING PRODUCT CONTAINING
CHLORINE BLEACH.

• DO NOT USE ABRASIVE OR ORANGE CLEANERS.

ALWAYS WIPE WITH THE GRAIN WHEN CLEANING.

• Daily Cleaning/Light Soil ––

 Wipe with one of the

following - soapy water, white vinegar/water solution,
Formula 409 Glass and Surface Cleaner* or a similar glass
cleaner - using a sponge or soft cloth. Rinse and dry. To
polish and help prevent fingerprints, follow with Stainless
Steel Magic Spray* (Part No. 20000008)**.

• Moderate/Heavy Soil ––

 Wipe with one of the following -

Bon Ami*, Smart Cleanser*, or Soft Scrub* - using a damp
sponge or soft cloth. Rinse and dry. Stubborn soils may be
removed with a damp Scotch-Brite* pad; rub evenly with the
grain. Rinse and dry. To restore luster and remove streaks,
follow with Stainless Steel Magic Spray*.

• Discoloration ––

 Using a damp sponge or soft cloth, wipe

with Cameo Stainless Steel Cleaner*. Rinse immediately and
dry. To remove streaks and restore luster, follow with
Stainless Steel Magic Spray*.

M

AINTENANCE

Oven Doors

Do not

 place excessive weight on or stand on an open

oven door. This could cause the range to tip over, break
the door, or injure the user.

Do not

 attempt to open or close door or operate oven

until door is properly replaced.

Never

 place fingers between hinge and front oven frame.

Hinge arms are spring mounted. If accidentally hit, the
hinge will slam shut against oven frame and could injure
your fingers.

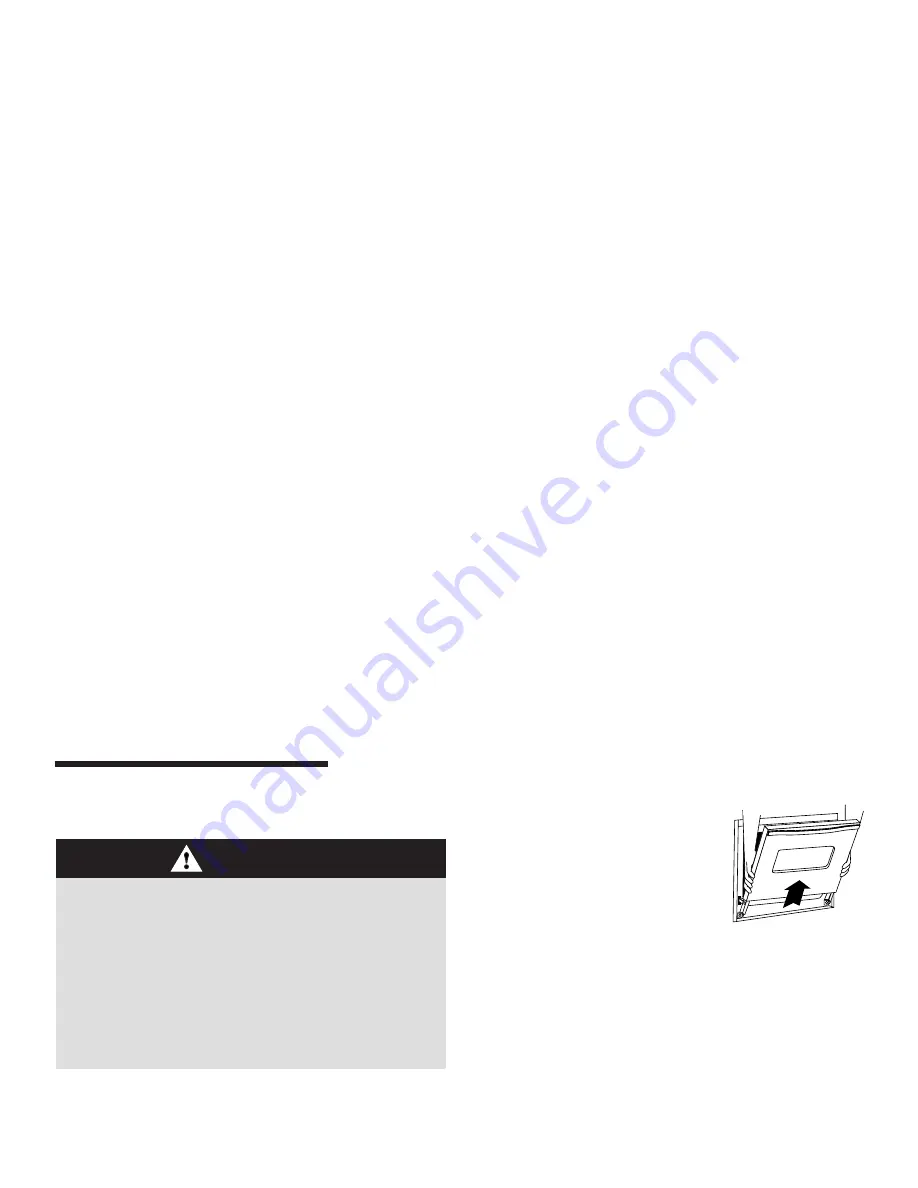
Both the upper and lower oven doors are removable.

CAUTION

To remove:

1. When cool, open the oven door to

the broil stop position (opened
about four inches).

2. Grasp door at each side.  

Do not

use the door handle to lift door.

3. Lift up evenly until door clears hinge arms.

To replace:

1. Grasp door at each side.

2. Align slots in the door with the hinge arms on the range.

3. Slide the door down onto the hinge arms until the door is

completely seated on the hinges. Push down on the top
corners of the door to completely seat door on hinges.
Door should not appear crooked.

Important: 

The oven door on a new range may feel “spongy”

when it is closed. This is normal and will decrease with use.

8113P620-60

3/22/06, 4:34 PM

8

Reviewed by Stewart, Steven | Released

Содержание Pro-Style JGR8890ADP

Страница 1: ... Important Safety Instructions 1 4 Care Cleaning 5 7 Maintenance 7 8 Troubleshooting 9 Surface Cooking 10 11 Oven Cooking 12 21 Warranty Service 23 Guide de l utilisation et d entretien 24 Guía de uso y cuidado 48 USE CARE GUIDE TABLE OF CONTENTS Form No A 01 08 Part No 8113P716 60 ...

Страница 2: ...g or operating the appliance Always contact your dealer distributor service agent or manufacturer about problems or conditions you do not understand Recognize Safety Symbols Words Labels WARNING Hazards or unsafe practices which COULD result in severe personal injury or death CAUTION Hazards or unsafe practices which COULD result in minor personal injury WARNING CAUTION Read and follow all instruc...

Страница 3: ...be secured by a properly installed anti tip device WARNING ALL RANGES CAN TIP AND CAUSE INJURIES TO PERSONS INSTALL ANTI TIP DEVICE PACKED WITH RANGE FOLLOW ALL INSTALLATION INSTRUCTIONS WARNING NEVER use appliance doors as a step stool or seat as this mayresultinpossibletippingoftheapplianceandserious injuries NEVER use this appliance as a space heater to heat or warm a room Doing so may result i...

Страница 4: ...ms and reduce the life of the components of the appliance Always place a pan on a surface burner before turning it on Be sure you know which knob controls which surface burner Make sure the correct burner is turned on and that the burner has ignited When cooking is completed turn burner off before removing pan to prevent exposure to burner flame Always adjust surface burner flame so that it does n...

Страница 5: ...nforcement Act of 1986 Proposition 65 requires the Governor of California to publish a list of substances known to the State of California to cause cancer or reproductive harm and requires businesses to warn customers of potential exposures to such substances Users of this appliance are hereby warned that the burning of gas can result in low level exposure to some of the listed substances includin...

Страница 6: ...tempt to open the door when LOCK is displayed Avoid touching door window or oven vent area during a clean cycle Do not use commercial oven cleaners on the oven finish or around any part of the oven They will damage the finish or parts The self clean cycle uses above normal cooking temperatures to automatically clean the oven interior The oven should be cleaned regularly by wiping up spillovers to ...

Страница 7: ...ake them easier to move Fine lines may appear in the porcelain because it went through heating and cooling This is normal and will not affect performance A white discoloration may appear after cleaning if acidic or sugary foods were not wiped up before the self clean cycle This discoloration is normal and will not affect performance CAUTION Cleaning Procedures Be sure appliance is off and all part...

Страница 8: ...dry Racks will permanently discolor and may not slide out smoothly if left in the oven during a self clean operation If this occurs wipe the rack and embossed rack supports with a small amount of vegetable oil to restore ease of move ment then wipe off excess oil Stainless Steel DO NOT USE ANY CLEANING PRODUCT CONTAINING CHLORINE BLEACH DO NOT USE ABRASIVE OR ORANGE CLEANERS ALWAYS WIPE WITH THE G...

Страница 9: ...nect this appliance to the gas supply are not designed for continuous movement Once installed DO NOT repeatedly move this gas appliance for cleaning or to relocate If this appliance has to be moved and or removed for servicing follow the procedure described in the installation instructions For information contact Jenn Air Customer Service at 1 800 JENNAIR 1 800 536 6247 To prevent range from accid...

Страница 10: ...roiler insert with foil Trim excess fat from meat before broiling A soiled broiler pan was used Preheat oven for 3 4 minutes before placing food in the oven TROUBLESHOOTING Oven will not self clean Check to make sure the cycle is not set for a delayed start See pages 5 6 Check if door is closed Check if control is in Sabbath Mode See page 19 Oven may be over 400 F Oven temperature must be below 40...

Страница 11: ...ace burners be sure all of the controls are in the OFF position Strike the match first and hold it in position before turning the knob to LITE 1 Hold a lighted match to the desired surface burner head 2 Push in and turn the control knob slowly to LITE 3 When the burner lights adjust the flame to the desired level Suggested Heat Settings OFF LOW LITE HIGH The size and type of cookware type and amou...

Страница 12: ...lation or removal of the grates may result in chipping or scratching of the cooktop It may also cause pans to be unsteady on the grates Sealed Burners The sealed burner bases of your range are secured to the cooktop and are not designed to be removed Since the burners are sealed into the cooktop boilovers or spills will not seep underneath the cooktop However the burner base should be cleaned afte...

Страница 13: ...a preset time then keeps food warm for 1 hour M Delay Programs the oven to start baking or cleaning at a later time N Favorite Use to set and save a specific Cook Hold procedure O Autoset Use to quickly set temperatures A B C D E F G H I J K L M N O Clock The clock can be set to display time in a 12 hour or 24 hour format The clock is set at the factory for the 12 hour format To change the clock t...

Страница 14: ...ors cannot be locked if the oven temperature is 400 F or above Fault Codes BAKE or LOCK may flash rapidly in the display to alert you if there is an error or a problem If BAKE or LOCK flash in the display press the CANCEL pad If BAKE or LOCK continue to flash disconnect power to the appliance Wait a few minutes and then reconnect power If the flashing still continues disconnect power to the applia...

Страница 15: ... will increase the temperature by 25 The oven temperature can be set from 170 to 550 3 Press Bake pad again or wait four seconds BAKE will stop flashing and light in the display PREHEAT will light in the display and the oven turns on 100 or the actual oven temperature if over 100 F will display It will rise in 5 increments until the preset temperature is reached Setting Oven Functions Autoset Pad ...

Страница 16: ... the preset temperature is reached The FAN icon will start to rotate 4 Allow the oven to preheat for 7 12 minutes When the set oven temperature is reached one long beep will sound and PREHEAT will turn off The set temperature will display To recall the set temperature during preheat press the Convect Bake pad To set Convect Roast 1 Press the Convect Roast pad LOWER ROAST the FAN icon and 00 00 wil...

Страница 17: ... hot After one hour in WARM HOLD The oven turns off automatically Press CANCEL pad and remove food from the oven To cancel Cook Hold at any time Press the appropriate CANCEL pad Remove food from oven Delay Cook Hold CAUTION 6 When 75 of the set cooking time has elapsed the oven will signal you to check the cooking progress Check the cooking progress at this time Cook longer if needed The oven ligh...

Страница 18: ...g to be slightly lighter if appliance is installed on a 208 volt circuit If more than 30 seconds elapse between pressing the Broil pad and the Autoset pad the oven will not be set and the display will return to the previous display Most foods should be turned halfway through broiling time 4 Place food in the oven 5 Turn meat once while cooking UPPER OVEN FOODS RACK SETTING COOK TIME MINUTES POSITI...

Страница 19: ...ancel Keep Warm 1 Press the appropriate CANCEL pad 2 Remove food from the oven Favorite The Favorite pad allows you to save the time and temperature from a Cook Hold Bake Cook Hold Convect Bake or Cook Hold Convect Roast lower oven only cycle To set a Favorite cycle a Cook Hold function must be either active or just programmed To set a new Favorite cycle or to save a currently running Cook Hold as...

Страница 20: ...r than the actual oven cavity temperature No preheat beep will sound The self clean cycle and automatic door lock do not operate during the Sabbath Mode Pressing a CANCEL pad will cancel a Bake cycle however the control will stay in the Sabbath Mode If power fails the ovens will power up in Sabbath Mode with 72 hours remaining and no cycle active Adjusting the Oven Temperature Oven temperatures ar...

Страница 21: ... oven Is equipped with one RollerGlideTM rack one half rack and one regular flat rack Do not place plastics near the vent opening as heat from the vent could distort or melt the plastic OVEN VENT LOCATION CAUTION Oven Fan A convection fan is used to circulate hot air in the oven when the convection feature is selected It automatically turns on after the Convect Bake or Convect Roast pads are press...

Страница 22: ...cuts of meat casseroles baking loaves of bread bundt cakes or custard pies and two rack baking RACK 1 Use for roasting large cuts of meat and poultry frozen pies dessert souffles or angel food cake and two rack baking MULTIPLE RACK COOKING Two rack Use rack positions 2 and 4 1 and 4 or 2 and 5 Three rack Use rack positions 1 3 and 5 Baking Layer Cakes on Two Racks For best results when baking cake...

Страница 23: ...NOTES 22 ...

Страница 24: ...o Jenn Air within 30 days from the date of purchase 6 Any food loss due to refrigerator or freezer product failures 7 Costs associated with the removal from your home of your major appliance for repairs This major appliance is designed to be repaired in the home and only in home service is covered by this warranty 8 Repairs to parts or systems resulting from unauthorized modifications made to the ...

Страница 25: ...age 29 31 Entretien 32 33 Recherche des pannes 33 34 Cuisson sur la surface 35 36 Cuisson au four 37 46 Garantie et service 47 Guía de uso y cuidado 48 CUISINIÈRE À DEUX FOURS JENN AIR PRO STYLE MC GUIDE D UTILISATION ET D ENTRETIEN TABLE DES MATIÈRES ...

Страница 26: ...e détaillant le distributeur l agent de service après vente ou le fabricant dans le cas de problèmes ou de conditions qui ne seraient pas comprises Reconnaissez les étiquettes paragraphes et symboles sur la sécurité AVERTISSEMENT Dangers ou pratiques dangereuses qui POURRAIENT résulter en de graves blessures ou même la mort ATTENTION Dangers ou pratiques dangereuses qui POURRAIENT résulter en des ...

Страница 27: ...ue la bride antibasculement soit convenablement installée AVERTISSEMENT TOUTE CUISINIÈRE PEUT BASCULER ET PROVOQUER DES BLESSURES INSTALLEZ LA BRIDE ANTIBASCULEMENT FOURNIE AVEC CETTE CUISINIÈRE RESPECTEZ TOUTES LES INSTRUCTIONS D INSTALLATION par l appareil La température pourrait être excessive pour certains articles comme liquides volatils produits de nettoyage ou flacons d aérosol Familiarisat...

Страница 28: ...placer ou retirer un plat S il est nécessaire de déplacer une grille lorsqu elle est chaude utilisez une manique sèche Veillez à toujours arrêter les fours à la fin d une période de cuisson Ouvrez toujours les portes des fours très prudemment Laissez l air chaud ou la vapeur s échapper avant de retirer introduire un plat AVERTISSEMENT METS PRÉPARÉS Respectez les instructions du fabricant Si le con...

Страница 29: ... guide Ne nettoyez pas les joints de porte Les joints jouent un rôle essentiel quant à l étanchéité Veillez à ne pas frotter endommager ou déplacer les joints N utilisez pas de produits de nettoyage pour four ou enduits de four dans les fours autonettoyants ou sur les zones voisines Avant d exécuter une opération d autonettoyage retirez la lèchefrite les grilles du four et les autres ustensiles et...

Страница 30: ...ge est affiché Évitez de toucher la porte le hublot et la zone de l évent du four lors d un cycle d autonettoyage N utilisez pas de nettoyant commercial pour four sur le fini ou tout autre composant du four pour ne pas les endommager Le cycle d autonettoyage utilise des températures de cuisson supérieures à la normale afin de nettoyer automatiquement l intérieur du four Le four doit être nettoyé r...

Страница 31: ...levez le avec un linge humide S il reste de la saleté cela indique que le cycle de nettoyage n a pas été assez long Cette saleté restante sera enlevée au prochain cycle d autonettoyage Si les grilles du four ont été laissées à l intérieur pendant le cycle d autonettoyage et qu elles glissent mal sur leurs supports enduisez les ainsi que les supports d une fine couche d huile végétale De fines lign...

Страница 32: ...u Bon Ami N utilisez pas de nettoyants abrasifs comme les tampons en laine d acier ou les nettoyants pour four Ces produits rayeraient ou endommageraient la surface de façon permanente Important Utilisez un linge ou un torchon sec pour essuyer les produits renversés surtout s ils sont acides ou sucrés La surface pourrait se décolorer ou se ternir si la saleté n était pas immédiatement enlevée Ceci...

Страница 33: ...isinière avant de remplacer l ampoule Laissez le four refroidir avant de remplacer l ampoule Assurez vous que le cabochon et l ampoule sont froids avant de les toucher Ne grimpez pas sur la porte du four ouverte ou ne lui imposez pas une charge excessive Ceci pourrait provoquer un basculement de la cuisinière le bris de la porte ou des blessures pour la personne concernée N essayez pas d ouvrir ou...

Страница 34: ... la terre Pour la plupart des problèmes observés essayez d abord ce qui suit Vérifiez que les commandes du four sont correctement réglées Vérifiez si le four est bien raccordé au circuit électrique Inspectez réarmez le disjoncteur Inspectez remplacez les fusibles Vérifiez l alimentation électrique ou de gaz Un brûleur de surface ne s allume pas Vérifiez que l appareil est correctement raccordé à l...

Страница 35: ... le cycle d autonettoyage L intérieur du four est encore chaud Allouez environ une heure pour que le four se refroidisse après un cycle d autonettoyage Il est possible d ouvrir la porte après la disparition du message LOCK Verrouillage sur l afficheur Les commandes et la porte sont peut être verrouillées Voyez page 38 De l humidité se retrouve sur le hublot ou de la vapeur s échappe de l évent Cec...

Страница 36: ...lles se forment à un rythme modéré Ce réglage peut aussi servir pour faire frire la majorité des aliments et pour maintenir l ébullition de grandes quantités de liquide Ajustez le bouton entre High et Low pour obtenir l ébullition désirée Ébullition Des bulles se forment dans le liquide à un rythme rapide Ce réglage peut aussi être utilisé pour porter un liquide à ébullition faire brunir de la via...

Страница 37: ...rs doivent être correctement placés sur le socle de brûleur pour l exécution appropriée du brûleur Brûleurs de haute performance Cette cuisinière est dotée d un brûleur de 16 000 BTU à haute vitesse placé à l avant gauche Un brûleur de 12 000 BTU est situé à l avant droit Ces brûleurs permettent une cuisson rapide qui peut servir à faire bouillir rapidement de l eau ou à cuire une grande quantité ...

Страница 38: ...issage B Broil Gril S utilise aussi pour faire dorer C Keep Warm S utilise pour maintenir au chaud dans le Maintien au chaud four les aliments cuits D Clean Nettoyage S utilise pour programmer le cycle d autonettoyage E Oven Light S utilise pour allumer ou éteindre la lampe Lampe de four de four supérieure et l inférieure F Number Pads S utilisent pour programmer la durée et la Touches température...

Страница 39: ...r débranchez l appareil et prenez contact avec un réparateur autorisé 3 Programmez l heure en suivant les instructions données dans la section Réglage de l horloge Programmation de l horloge 1 Appuyez sur la touche Clock Horloge L heure du jour clignote à l afficheur Deux points clignotent à l afficheur 2 Appuyez sur les touches numériques appropriées pour programmer l heure du jour 3 Appuyez à no...

Страница 40: ...ône PREHEAT s éteint Pour rappeler la température programmée pendant le préchauffage appuyez sur la touche Bake Réglage du niveau de bruit Le réglage par défaut de l usine pour le niveau de bruit est MEd moyen mais ce réglage peut être changé à LO faible ou à HI fort Modification du réglage 1 Appuyez sur les touches Delay Attente et CANCEL Annuler supérieur du four supérieur pendant trois secondes...

Страница 41: ... pour le maintien au chaud ni à un niveau inférieur à 93 C 200 F pour cuire car ces températures ne sont pas suffisamment brûlantes pour cuire la nourriture La partie arrière de l élément du four inférieur ne deviendra pas rouge pendant la cuisson Ceci est normal Pour la cuisson d une pizza auto levante surgelée dans le four supérieur placez la sur une plaque à biscuits pour éviter de la griller P...

Страница 42: ...pérature du four Appuyez sur la touche Autoset pour 350 F 175 C ou sur les touches numériques appropriées Rôtissage par convection four inférieur seulement Pour le rôtissage avec convection entrez la durée et la température de rôtissage normales Le régulateur indique automatiquement de vérifier la cuisson de la nourriture à 75 de la durée programmée Programmation de Convect Roast 1 Appuyez sur la ...

Страница 43: ...e four est déjà chaud N utilisez pas la cuisson différée pour des denrées très périssables comme les produits laitiers le porc la volaille ou les fruits de mer La fonction voulue 000 et soit UPPER soit LOWER clignotent La température peut être programmée de 77 à 288 C 170 F à 550 F 4 Appuyez à nouveau sur la touche de la fonction désirée OU attendez quatre secondes Le mot correspondant à la foncti...

Страница 44: ... au gril plus longues et un rissolage légèrement moins doré si l appareil fonctionne sur un circuit de 208 volts Si plus de 30 secondes s écoulent entre la pression sur la touche Broil et la touche Autoset le four ne sera pas programmé et l afficheur reviendra à l information précédente La plupart des aliments doivent être retournés lorsque la moitié de la durée prévue pour la cuisson au gril s es...

Страница 45: ...posez pas des assiettes tièdes sur une surface froide les changements rapides de température pourraient les fissurer ou les abîmer Favorite La touche Favorite permet de mémoriser la durée et la température d un cycle de cuisson courante et maintien cuisson courante et maintien avec convection ou rôtissage et maintien avec convection four inférieur seulement Pour programmer un cycle Favorite une fo...

Страница 46: ...he en mode Sabbat avec 72 heures restantes sans cycle en cours Réglage de la température des fours La précision des réglages de température a été soigneusement vérifiée à l usine Il est normal de remarquer quelques différences dans la durée de cuisson entre un four neuf et un four ancien La température des fours peut éventuellement se décaler Vous ajustez la température des fours si vous pensez qu...

Страница 47: ...ent car la chaleur qui s en dégage peut le déformer ou le faire fondre EMPLACEMENT DE L ÉVENT DE FOUR ATTENTION Pour la grille RollerGlideMC tirez ensemble sur la glissière et la base de la grille Pour remettre les grilles en place Mettez la grille sur le support de grille du four relevez légèrement le rebord avant poussez la grille jusqu à ce qu elle arrive à la butée d arrêt abaissez l avant et ...

Страница 48: ... suivant la date d achat 6 Toute perte d aliments due à une défaillance du réfrigérateur ou du congélateur 7 Les coûts associés au transport du gros appareil ménager du domicile pour réparation Ce gros appareil ménager est conçu pour être réparé à domicile et seul le service à domicile est couvert par la présente garantie 8 Les réparations aux pièces ou systèmes résultant d une modification non au...

Страница 49: ...cciones importantes sobre seguridad 49 52 Cuidado y limpieza 53 55 Mantenimiento 56 57 Localización y solución de averías 57 58 Cocción en la cubierta 59 60 Cocción en el horno 61 70 Garantía y servicio Última página GUÍA DE USO Y CUIDADO TABLA DE MATERIAS ...

Страница 50: ...nte si surgen problemas o situaciones que usted no comprenda Reconozca los símbolos de seguridad advertencias y etiquetas ADVERTENCIA Peligros o prácticas no seguras que PODRÍAN causar lesiones personales graves o mortales PRECAUCIÓN Peligros o prácticas no seguras que PODRÍAN causar lesiones personales menos graves ADVERTENCIA PRECAUCIÓN Lea y siga todas las instrucciones antes de usar este elect...

Страница 51: ...e que el electrodoméstico se vuelque debido al uso indebido o a la sobrecarga de las puertas de los hornos el mismo debe estar fijado por un dispositivo antivuelco debidamente instalado ADVERTENCIA TODAS LAS ESTUFAS SE PUEDEN VOLCAR Y CAUSAR LESIONES PERSONALES INSTALE EL DISPOSITIVO ANTIVUELCO PROVISTO CON LA ESTUFA SIGA TODAS LAS INSTRUCCIONES DE INSTALACIÓN ADVERTENCIA NUNCAuselaspuertasdeestee...

Страница 52: ...omaollas húmedos pueden causar quemaduras por vapor Nunca use paños para secar platos u otros artículos como tomaollas ya que pueden arrastrarse sobre la superficie caliente de los quemadores y se pueden encender o enredar en las piezas del electrodoméstico Siempre permita que el aceite utilizado para freír se enfríe antes de mover o manipular el utensilio PRECAUCIÓN NUNCA almacene artículos de in...

Страница 53: ...os de la cocina Los pájaros tienen un sistema respiratorio muy sensible Los vapores producidos durante el ciclo de autolimpieza del horno pueden ser perjudiciales o mortales para los pájaros Los vapores que despiden el aceite de cocina la grasa y la margarina sobrecalentados y la vajilla antiadherente sobrecalentada pueden también ser perjudiciales 52 Asegúrese de que el utensilio sea lo suficient...

Страница 54: ...lgunas piezas del horno se calienten durante un ciclo de autolimpieza Para evitar daños a la puerta del horno no intente abrirla cuando LOCK Bloqueado se muestre en la pantalla Evite tocar la puerta la ventana o el área del respiradero durante un ciclo de autolimpieza No use limpiadores de hornos comerciales sobre el acabado del horno o en ninguna pieza del horno Estos limpiadores dañan el acabado...

Страница 55: ... hasta que se cierre la puerta y se presione la tecla Clean Limpieza nuevamente Si pasan más de 30 segundos entre la activación de la tecla Clean y la activación de la tecla Autoset el programa regresará automáticamente al despliegue anterior Las puertas de los hornos se dañarán si se intenta abrirlas a la fuerza mientras LOCK esté desplegado en el indicador visual Pueden aparecer líneas delgadas ...

Страница 56: ...sodio o Bon Ami No use limpiadores abrasivos tales como esponjas de lana de acero o limpiadores para hornos Estos productos rayarán o dañarán la superficie permanentemente Importante Use una toalla o paño húmedo para limpiar derrames especialmente si los mismos son ácidos o azucarados La superficie puede descolorarse u opacarse si no se limpian inmediatamente Esto es especialmente importante para ...

Страница 57: ...uministro eléctrico a la estufa antes de reemplazar el foco Permita que el horno se enfríe antes de reemplazar el foco Asegúrese de que la cubierta y el foco estén fríos antes de tocarlos No coloque peso en exceso sobre la puerta del horno y no se pare sobre ella Esto podría causar el volcamiento de la estufa daños a la puerta o lesiones al usuario No intente abrir o cerrar la puerta o hacer funci...

Страница 58: ...a las siguientes sugerencias Verifique si los controles fueron programados correctamente Verifique que el enchufe esté bien conectado en el tomacorriente Verifique o restablezca el disyuntor Verifique o reemplace el fusible Verifique el suministro eléctrico o de gas Los quemadores superiores no se encienden Asegúrese de que el electrodoméstico esté debidamente conectado al suministro de energía Ve...

Страница 59: ...se una vez que la luz indicadora LOCK Bloqueado no esté desplegada en el indicador visual El control y las puertas pueden estar bloqueados Vea la página 62 La humedad se acumula en la ventanilla del horno o sale vapor del respiradero del horno Esto es normal cuando se cocinan alimentos con alto contenido de humedad Se usó humedad excesiva cuando se limpió la ventana Se percibe un fuerte olor o un ...

Страница 60: ...n tibias o calientes durante la cocción Use tomaollas para proteger sus manos Ajustes de calor sugeridos TAPA DEL QUEMADOR ENCENDEDOR ORIFICIOS BASE DEL QUEMADOR OFF LOW LITE HIGH El tamaño y tipo de utensilio el tipo y cantidad de alimento que esté calentando y la potencia del elemento determinarán la posición ideal de la perilla para la cocción Utilice los ajustes marcados alrededor de la perill...

Страница 61: ...uede retirar fácilmente para la limpieza Vea la página 54 para las instrucciones de limpieza Las tapas de los quemadores deben estar colocadas de manera apropiada en la base del quemador para que el mismo funcione correctamente Quemador de alto rendimiento Su estufa cuenta con un quemador de alta velocidad de 16 000 BTU y se encuentra en la posición delantera izquierda de la cubierta Hay un quemad...

Страница 62: ...Use para ajustar el tiempo y la temperatura G CANCEL Anular Anula todas las funciones excepto el temporizador y el reloj H Convect Roast Use para asar por convección Asado por convección I Convect Bake Use para hornear por convección Horneado por convección J TIMER 1 o 2 Ajusta el temporizador Temporizador 1 o 2 K Clock Reloj Ajusta el reloj L Cook Hold Hornea durante un tiempo predefinido y Cocin...

Страница 63: ...e 205 C 400 F Para ajustar el reloj 1 Oprima la tecla Clock Reloj La hora del día destellará en el indicador visual Los dos puntos destellarán en el indicador visual 2 Oprima las teclas numéricas correspondientes para programar la hora del día 3 Oprima la tecla Clock nuevamente o espere cuatro segundos Los dos puntos permanecerán encendidos Cuando se suministra corriente eléctrica o después de una...

Страница 64: ...ra de secado de 60 C 140 F Fermentado estándar Ajuste del nivel de sonido El ajuste de fábrica del sonido es el nivel intermedio MEd pero puede ser cambiado a bajo Lo o alto HI Para cambiar el ajuste 1 Oprima y mantenga oprimidas las teclas Delay Diferir y CANCEL superior durante tres segundos Escuchará una señal sonora larga bEEP y el nivel de sonido actual LO MEd o HI se desplegará en el indicad...

Страница 65: ...po mínimo de cocción Cocine durante un mayor tiempo si es necesario 7 Cuando termine la cocción oprima la tecla CANCEL Anular apropiada 8 Retire el alimento del horno Diferencias en el horneado entre su horno usado y uno nuevo Es normal observar algunas diferencias en el tiempo de horneado entre un horno nuevo y uno usado Vea la sección Ajuste de la Temperatura del Horno en la página 69 Horneado c...

Страница 66: ...tiempo de cocción entre 00 10 y 11 59 Asado con convección horno inferior únicamente Cuando ase por convección programe el tiempo y temperaturas normales de asado El control le avisará cuando un 75 del tiempo de cocción haya pasado para que revise el nivel de cocción del alimento Notas Cuando ase por convección programe el tiempo de cocción antes de programar la temperatura Si su receta requiere u...

Страница 67: ...rar alimentos fácilmente perecederos tales como los productos lácteos la carne de cerdo de ave o mariscos PRECAUCIÓN Cuando use la función Delay Diferir el horno comenzará a funcionar a otra hora del día Programe la cantidad de tiempo que desea esperar antes de encender el horno y el tiempo de cocción El horno comenzará a calentarse a la hora seleccionada y cocinará durante el período de tiempo pr...

Страница 68: ...doméstico en un circuito de 208 voltios Si pasan más de 30 segundos entre la activación de la tecla Broil y la activación de la tecla Autoset el horno no quedará programado y el indicador visual mostrará el despliegue anterior La mayoría de los alimentos deben voltearse a la mitad del tiempo de asado 4 Coloque el alimento en el horno POSICIÓN DE ALIMENTOS LA PARRILLA AJUSTE TIEMPO DE COCCIÓN SUPER...

Страница 69: ...ntes sobre una superficie fría ya que los cambios repentinos de temperatura pueden agrietar o romper los platos Favorite Favorito La tecla Favorite Favorito le permite guardar la duración y la temperatura de un ciclo de Hornear y mantener caliente de Horneado por convección y mantener caliente o de Asado por convección y mantener caliente horno inferior solamente Para guardar un ciclo favorito deb...

Страница 70: ...oras el Modo sabático habrá terminado SAb destellará durante cinco segundos La hora del día reaparecerá en el indicador visual Ajuste de la temperatura del horno Las temperaturas de los hornos se prueban cuidadosamente en la fábrica para asegurar su precisión Es normal observar algunas diferencias en el tiempo de horneado o dorado entre un horno nuevo y uno usado A medida que se usan los hornos la...

Страница 71: ...s del horno Tire de la parrilla derecho hacia afuera hasta que se detenga en el tope de bloqueo levante la parte delantera de la parrilla y tire de ella para sacarla Para retirar la parrilla RollerGlide MR tire tanto de la parrilla como de la base derecho hacia afuera Para reinstalar las parrillas del horno Coloque la parrilla en el soporte de la parrilla en el horno levante el extremo delantero l...

Страница 72: ...de comida debido a fallas del refrigerador o del congelador 7 Costos relativos a la remoción de su electrodoméstico principal desde su hogar para obtener reparaciones Este electrodoméstico principal está diseñado para ser reparado en el hogar y únicamente el servicio de reparación en el hogar está cubierto bajo esta garantía 8 Reparaciones de piezas o sistemas como resultado de modificaciones no a...

Отзывы: