Jenn-Air JGR8895BDS Скачать руководство пользователя страница 11

11

GAS CONVERSIONS

Gas conversions from Natural gas to LP gas or from LP gas to 
Natural gas must be done by a qualified installer. 

LP Gas Conversion

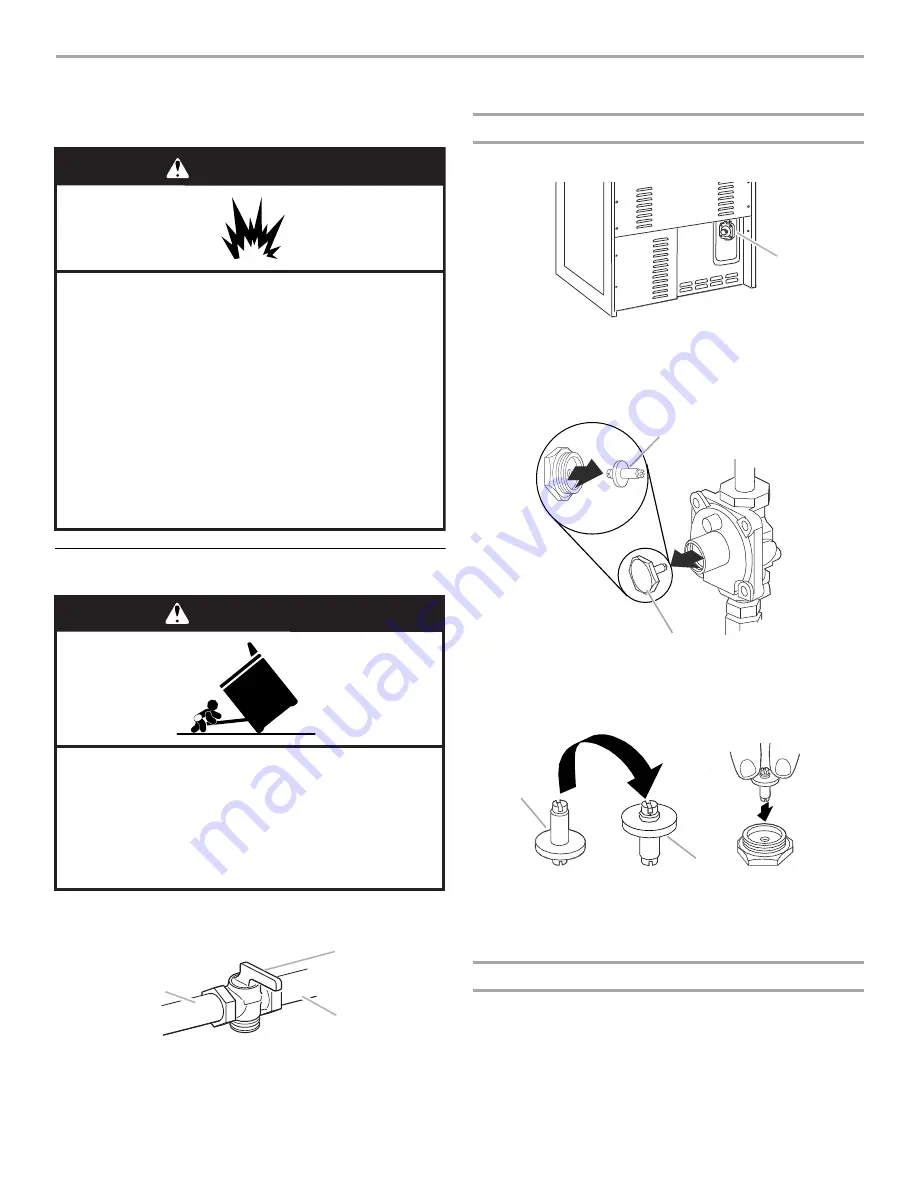
1. Turn manual shutoff valve to the closed position.

2. Unplug range or disconnect power.

To Convert Gas Pressure Regulator

1. Locate gas pressure regulator at the rear of the range.

IMPORTANT: Do not remove the gas pressure regulator.

2. Unscrew the hex-shaped regulator cap from the regulator 

and remove the regulator pin.

3. Flip the regulator pin over and snap pin firmly into place.

4. Screw the hex-shaped regulator cap securely back into 

place. Do not overtighten.

To Convert Oven Bake Burners

To Convert Lower Oven Bake Burner:

1. Remove oven racks from inside the oven cavity.

2. Remove oven door. See “Oven Door” section in the Use and 

Care Guide for oven door removal instructions.

A. To range
B. Shutoff valve (closed position)

C. Gas supply line

WARNING

Explosion Hazard

Use a new CSA International approved gas supply line.

Install a shut-off valve.

Securely tighten all gas connections.

If connected to LP, have a qualified person make sure 
gas pressure does not exceed 14" (36 cm) water 
column. 

Examples of a qualified person include: 

licensed heating personnel, 
authorized gas company personnel, and
authorized service personnel.

Failure to do so can result in death, explosion, or fire.

WARNING

Tip Over Hazard

A child or adult can tip the range and be killed.

Connect anti-tip bracket to rear range foot.

Reconnect the anti-tip bracket, if the range is moved.

Failure to follow these instructions can result in death 
or serious burns to children and adults.

A

B

C

A. Gas pressure regulator

A. Regulator pin
B. Regulator cap

A. Natural gas position
B. LP gas position

A

A

B

A

B

Содержание JGR8895BDS

Страница 1: ...ces 19 Exigences d emplacement 19 Sp cifications lectriques 21 Sp cifications de l alimentation en gaz 22 INSTRUCTIONS D INSTALLATION 23 D ballage de la cuisini re 23 R glage des pieds de nivellement...

Страница 2: ...ath Do not store or use gasoline or other flammable vapors and liquids in the vicinity of this or any other appliance WHAT TO DO IF YOU SMELL GAS Do not try to light any appliance Do not touch any ele...

Страница 3: ...dimensions that are shown must be used Given dimensions are minimum clearances The floor anti tip bracket must be installed To install the anti tip bracket shipped with the range see Install Anti Tip...

Страница 4: ...m rear wall for gas supply line Gas lines and electrical plugs must be installed within the shaded area to ensure proper alignment of this oven with cabinets NOTE 24 61 0 cm minimum when bottom of woo...

Страница 5: ...th Natural gas or after proper conversion for use with LP gas This range is factory set for use with Natural gas See Gas Conversions section The model serial rating plate located behind the control pa...

Страница 6: ...609 6 m ratings are reduced at a rate of 4 for each 1 000 ft 304 8 m above sea level not applicable for Canada Gas Supply Pressure Testing Gas supply pressure for testing regulator must be at least 1...

Страница 7: ...leg prior to anti tip bracket installation InstallAnti TipBracket 1 Remove the anti tip bracket that is taped inside the upper oven with the literature package 2 Determine which mounting method to us...

Страница 8: ...Burner caps should be level when properly positioned If burner caps are not properly positioned surface burners will not light Place burner grates over burners and caps 4 Plug into a grounded 3 prong...

Страница 9: ...op Burners Standard Surface Burners Push in and turn each control knob to the LIGHT position The flame should light within 4 seconds The first time a burner is lit it may take longer that 4 seconds to...

Страница 10: ...open position Repeat start up If burner does not light press CANCEL to turn off the oven and contact your dealer or authorized service company for assistance CompleteInstallation 1 Check that all part...

Страница 11: ...or section in the Use and Care Guide for oven door removal instructions A To range B Shutoff valve closed position C Gas supply line WARNING Explosion Hazard Use a new CSA International approved gas s...

Страница 12: ...set the bake burner to the side 8 Unscrew and remove the cover over the orifice 9 Turn the Number 0723 Natural gas orifice hood counterclockwise to remove 10 Install the Number 047 LP gas orifice hoo...

Страница 13: ...ck of the oven while changing the orifice hood 3 Turn the Number 1 42 Natural gas broil burner orifice hood counterclockwise to remove 4 Install the green Number 38 LP gas broil burner orifice hood tu...

Страница 14: ...rner grates 11 Complete installation See Make Gas Connection and Electronic Ignition System sections Checking for proper cooktop burner flame is very important The small inner cone should have a very...

Страница 15: ...or oven door removal instructions 3 Using a Phillips screwdriver remove and set aside the 2 oven bake burner cover screws located at the front of the oven 4 Lift up and remove oven bake burner cover 5...

Страница 16: ...er 1 Remove broil burner screw and set aside 2 Remove the broil burner from the broil burner orifice hood The broil burner will hang in the back of the oven while changing the orifice hood 3 Turn the...

Страница 17: ...as orifice spud See the Natural Gas Orifice Spud Chart 6 Replace burner base and hand tighten the screws 7 Replace burner cap 8 Repeat steps 1 through 7 for the remaining burners 9 Place LP gas orific...

Страница 18: ...ERTISSEMENT Si les renseignements dans ce manuel ne sont pas exactement observ s un incendie ou une explosion peut survenir causant des dommages au produit des blessures ou un d c s Ne pas entreposer...

Страница 19: ...de surface doit tre vit Si le rangement en placard est envisag le risque peut tre r duit par l installation d une hotte de cuisini re ou d un ensemble hotte micro ondes op rant horizontalement sur un...

Страница 20: ...0 ou des codes locaux en vigueur Autres crit res respecter pour une installation en r sidence mobile Dans le cas de l installation de cette cuisini re dans une r sidence mobile la cuisini re doit tre...

Страница 21: ...ast Pleasant Valley Road Cleveland OH 44131 5575 L appareil doit tre aliment uniquement par un circuit de 120 V 60 Hz CA seulement 15 A prot g par fusibles On recommande l emploi de fusibles temporis...

Страница 22: ...et la dimension appropri e Raccord m tallique flexible Si le code local le permet on peut utiliser pour raccorder la cuisini re la canalisation de gaz un raccord m tallique flexible neuf homologation...

Страница 23: ...emballage Empiler l un des coins sur un autre R p ter avec les 2 autres coins Les disposer sur le plancher dans le sens de la longueur derri re la cuisini re en guise de support lorsque la cuisini re...

Страница 24: ...cer deux trous de 3 mm qui correspondent aux trous de la bride selon la m thode de montage d termin e Voir ci dessous Montage au plancher Montage au mur 5 l aide d un tournevis Phillips monter la brid...

Страница 25: ...rancher sur une prise 3 alv oles reli e la terre V rificationdel emplacementdelabride antibasculement 1 D placer la cuisini re pr s de l ouverture d encastrement 2 Retirer le carton ou le panneau de f...

Страница 26: ...F arr t V rifier que la cuisini re est branch e et correctement aliment e fusible grill disjoncteur ouvert V rifier que chaque robinet d arr t est ouvert V rifier que les chapeaux de br leur sont corr...

Страница 27: ...oubli e 2 V rifier la pr sence de tous les outils 3 Jeter ou recycler tous les mat riaux d emballage 4 Contr ler l aplomb de la cuisini re Voir R glage de l aplomb de la cuisini re 5 Utiliser une sol...

Страница 28: ...onnexion au gaz propane demander une personne qualifi e de s assurer que la pression de gaz ne d passe pas 36 cm 14 po de la colonne d eau Par personne qualifi e on comprend le personnel autoris de ch...

Страница 29: ...etien pour conna tre les instructions de d pose de la porte 3 l aide d un tournevis Phillips ter et mettre de c t les deux vis du couvre br leur l avant du four 4 Soulever et retirer le couvre br leur...

Страница 30: ...gril 1 Retirer la vis du br leur du gril et la mettre de c t 2 Retirer le br leur du gril du gicleur Le br leur du gril pendra l arri re du four pendant le remplacement du gicleur 3 Tourner le gicleu...

Страница 31: ...ts fournis avec l appareil pour pouvoir les r utiliser ult rieurement 10 R installer les grilles des br leurs 11 Achever l installation Voir les sections Raccordement au gaz et Syst me d allumage lect...

Страница 32: ...our de la cavit du four 2 Retirer la porte du four Voir la section Porte du four dans le guide d utilisation et d entretien pour conna tre les instructions de d pose de la porte 3 l aide d un tournevi...

Страница 33: ...sion du br leur de cuisson du four sup rieur 12 R p ter les tapes 1 8 ci dessus pour la conversion du br leur de cuisson du four sup rieur 13 Retirer le gicleur de gaz propane num ro 038 et le remplac...

Страница 34: ...re de 4 5 tours Ne pas serrer excessivement 5 Placer le br leur du gril sur le gicleur Ins rer la broche de positionnement du br leur du gril dans le trou pr vu l arri re du four 6 Positionner le br l...

Страница 35: ...r gaz naturel 6 R installer la base de br leur et serrer les vis manuellement 7 R installer le chapeau de br leur 8 R p ter les tapes 1 7 pour les autres br leurs 9 Placer les gicleurs pour propane da...

Страница 36: ...W10162494A 2008 All rights reserved Tous droits r serv s 2 08 Printed in U S A Imprim aux U...

Отзывы: