background image

Содержание JDS8850BDS19

Страница 1: ...nce 8 9 Troubleshooting 10 11 Surface Cooking 12 13 Oven Cooking 14 20 Options 21 25 Favorites 26 Setup 27 29 Accessories 30 Warranty Service 31 Guide d utilisation et d entretien 32 Guia de uso y cuidado 64 JENN AIR Form No A 01 08 Part No 8113P756 60 2006 Maytag Appliances Sales Co All rights reserved Litho U S A ...

Страница 2: ...iance IF YOU SMELL GAS Do not try to light any appliance Do not touch any electrical switch Do not use any phone in your building Immediately call your gas supplier from a neighbor s phone Follow the gas supplier s instructions If you cannot reach your gas supplier call the fire department Installation and service must be performed by a qualified installer service agency or the gas supplier Gas le...

Страница 3: ...ems which are used infrequently and which are safely stored in an area subjected to heat from an appliance Temperatures may be unsafe for some items such as volatile liquids cleaners or aerosol sprays in Case of Fire Turn off appliance and ventilating hood to avoid spreading the flame Extinguish flame then turn on hood to remove smoke and odor Cooktop Smother fire or flame in a pan with a lid or c...

Страница 4: ... in or near the appliance hood or vent fan Clean hood frequently to prevent grease from accumulating on hood or filter When flaming foods under the hood turn the fan on NEVER wear garments made of flammable material or loose fitting or long sleeved apparel while cooking Clothing may ignite or catch utensil handles Always place oven racks in the desired positions while oven is cool Slide oven rack ...

Страница 5: ...can produce noxious fumes if applied to a hot surface Clean only parts listed in this guide Self Clean Oven Do not clean door gasket The door gasket is essential for a good seal Care should be taken not to rub damage or move the gasket Do not use oven cleaners or oven liners of any kind in or around any part of the self clean oven important Safety Notice and Warning The California Safe Drinking Wa...

Страница 6: ...or The gasket is designed to seal in heat during the clean cycle 5 Wipe up excess grease or spill overs from the oven bottom This prevents excessive smoking flare ups or flaming during the clean cycle OR 5 Select HEAVY for a heavily soiled oven and four hours of cleaning time CLEAN TIME LOCKED and the cleaning time countdown will be displayed while the oven is cleaning OVEN COOLING will appear in ...

Страница 7: ...0 JENNAIR 1 800 536 6247 Broiler Pan Never cover insert with aluminum foil as this prevents the fat from draining to the pan below and Insert Place soapy cloth over insert and pan let soak to loosen soil Wash in warm soapy water Use scouring pad to remove stubborn soil Broiler pan and insert can be cleaned in dishwasher Burner Caps and Sealed Gas Burners Burner Grates Porcelain on Cast Iron Clock ...

Страница 8: ... cleaner can be used if sprayed on a cloth first Do not use abrasive materials such as scouring pads steel wool or powdered cleaners as they will scratch glass Oven Interior Follow instructionson page 5 6 to set a self clean cycle Oven Racks Stainless SteeJ select models e e e Clean with soapy water Remove stubborn soil with cleansing powder or soap filled scouring pad Rinse and dry Racks will per...

Страница 9: ...ts such as steel wool scouring pads or powdered cleansers as they may scratch the glass 2 Do not hit the glass with pots pans furniture toys or other objects 3 Do not close the oven door until the oven racks are in place Scratching hitting jarring or stressing the glass may weaken its structure causing an increased risk of breakage at a later date Be sure the range is leveled when installed If the...

Страница 10: ...ust be secured to the floor by sliding rear leveling leg into the anti tip bracket Electrical Connection Appliances which require electrical power are equipped with a three prong grounding plug which must be plugged directly into a properly grounded three hole 120 volt electrical outlet Always disconnect power to appliance before servicing The three prong grounding plug offers protection against s...

Страница 11: ...sure a pan is sitting on the grate above off ports e Baking results are not as expected or differ from previous oven Food is not broiling properly or smokes excessively Check the oven temperature selected Make sure oven is preheated when recipe or directions recommend preheat Make sure the oven vent has not been blocked See page 20 for location Check to make sure range is level Temperatures often ...

Страница 12: ...r a few uses Initiating a clean cycle will burn off the odors more quickly Turning on a ventilation fan will help remove the smoke and or odor Excessivefood soils on the oven bottom Use a self clean cycle The oven may detect a fault during programming or during operation If a fault is detected the message FAULT DETECTED PRESSPOWERTO CLEARor FAULT DETECTED PRESSENTERTO TRYAGAIN may appear Follow di...

Страница 13: ...n and turn the knob to the desired setting A clicking spark sound will be heard and the burner will light Important Each surface burner is equipped to provide automatic reignition if the flame should somehow get blown out Pilotless ignition Pilotless ignition eliminates the need for a constant standing pilot light Each surface burner has a spark ignitor Use care when cleaning around the surface bu...

Страница 14: ...er on High then inner burner on Low then both rings on High then both rings on Low Ring Burner select models Burner Grates The grates must be properly positioned before cooking When installingthe grates place the tab ends toward the center matching the straight bars Improper installation of the grates may result in chipping of the cooktop Do not operate the burners without a pan on the grate The g...

Страница 15: ...seto operate the Warming Drawer Useto turn the oven light on or off Cancels all operations except Timer Clock Favorites Setup and Warm Drawer Useto select options in display window next to display window on both sides Quickset Pads Quickset pads are located on each side of the display window and are used to select the desired function or option in the display window To select the option or functio...

Страница 16: ... times on the Quickset pads repeatedly until the desired time is entered OR 3 Press the number pads to enter the new desired time 4 Press Enter pad Canceling the Timer _ TIMER1 1 Press the TIMER 1 or TIMER 2 pad twice _ if both Timers are active If the desired Timer is already in the foreground press once for edit mode and twice to cancel the Timer If the desired Timer is not in the foreground fol...

Страница 17: ...ptions4 Select the amount of time you want to delay the start of cooking using the displayed times or the number pads Select the amount of time you want to cook using the displayed times or the number pads The display will show BAKE the temperature the delay time and the cook time countdown 6 When the delay time has expired the oven will begin heating COOK TIME the cook time countdown PREHEAT BAKE...

Страница 18: ...using the Rapid Preheat option For optimum baking and browning results Rapid Preheat is not recommended when baking on multiple racks 3 Select the oven temperature using the Quickset pads OR Enter the desired temperature using the number pads Press Enter pad to set The temperature can be set from 195 F to 550 F degrees in 5 increments If Auto Convect Conversion is turned off you can set 170 F Afte...

Страница 19: ...er pad to turn off Remove food from the drawer Warming Chart Convect Pastry Convect Pastry is designed to bake pastry items such as frozen pies turnovers cream puffs and puff pastry Use one two or three racks while using this feature 1 Pressthe Convect pad 2 Select CNVT PASTRY using the Quickset pads J 3 Select the oven temperature using the Quickset pads OR Enter the desired temperature using the...

Страница 20: ...wer broil temperature when broiling longer cooking foods The lower temperature allows food to cook to the well done stage without excessive browning Expect broil times to increase and browning to be slightly lighter if the appliance is installed on a 208 volt circuit Food should be turned halfway through broiling time Broil times may be longer when lower broiling temperatures are selected Beef bro...

Страница 21: ...K 4 Used for two rack baking and broiling PACK 3 Used for most baked goods on a i lat Flat _Flat Three rack Convection Cooking cookie sheet or jelly roll pan layer cakes fruit pies or frozen convenience foods RACK 2 Used for roasting small cuts of meat casseroles baking loaves of bread bundt cakes custard pies frozen pies or two rack baking RACK 1 Used for roasting large cuts of meat and poultry d...

Страница 22: ...ow CONVECT DELAY the selected function the preset temperature and the delay time countdown When the delay time has expired the cook time will be displayed and the oven will begin to preheat To set Delay Clean 1 Follow Delay steps 1 4 seebelow left 2 REMOVERACKS will show in the display Remove the racks from the oven and select CONTINUE Set LIGHT soil level by entering 200 using the number pads for...

Страница 23: ... your oven assures excellent roasting results every time 1 Insert the probe into the food item For meats the probe tip should be located in the center of the thickest part of the meat and not into the fat or touching a bone 2 Insert the probe plug into the receptacle located on the top right of the oven Be sure to insert plug into the receptacle all the way 3 Press More Options pad 7 8 Set the int...

Страница 24: ...rying without losing proper positioning 2 3 Important If the spacer is not placed correctly the convection fan will not operate Press Convect pad Convect Press the arrow to scroll 4 Select DRYING 5 Select a displayed temperature or enter a temperature with the number pads Temperatures can be set between 100 F and 200 F 6 DRYING and the temperature will be displayed PREHEAT will be displayed until ...

Страница 25: ... slices 12 16 hours 1 2 hours Tough to brittle Select rough skinned fruit Do not dry the peel of fruit marked color added Wash well Thinly peel the outer 1 16 to 1 8 of the peel Do not use the white bitter pith under the peel Tomatoes Plum Roma Halve remove seeds Place tomatoes 12 18 hours Tough to crisp skin side up on rack Prick skins Carrots 4 8 hours Tough to brittle Danvers Half Long imperato...

Страница 26: ...rton and wrapping 2 Place frozen food on rack in middle of oven 3 Thaw Serve 15 minutes for cakes and 30 minutes for pies 4 Removefrom oven 5 Slice into individual size servings and place on plates 6 Return plates to oven 7 Thaw Serve for 10to 30 minutes 1 Remove frozen food from container 2 Place on plate 3 Place plate on rack in middle of oven 4 Thaw Serve for 10to 30 minutes 1 Removefrozen food...

Страница 27: ...nter the name using the keypads For example to save lasagna press the _JKL pad three times for L Press the ABC pad once for A press the STLI pad once for S Continue until you ve finished the word 5 6 7 After each desired letter wait three seconds until an underline appears in the next space or press Enter pad before moving on the next letter Up to 14 letters including spaces can be used Select ENT...

Страница 28: ...tup pad 2 Select AUTO CONVECT 3 Select OFF 4 PressSetup pad to exit the Setup menu To reactivate Auto Convect Conversion 1 PressSetup pad 2 Select AUTO CONVECT 3 Select ON 4 PressSetup pad to exit the Setup menu Setup _ On Off Language The language of the screens in the display window can be set to English French or Spanish To change the display language from English 1 PressSetup pad On Off 2 Sele...

Страница 29: ...de The Bake temperature can be changed during an Active Sabbath Mode Simply press the Bake pad and then enter the desired temperature using the Quick set pads Pressing the CANCEL pad will cancel a Bake cycle however the control will stay in the Sabbath Mode The day of the week and AM PM must be set for Sabbath Mode to operate correctly To cancel Sabbath Mode Press and hold the Setup pad for five s...

Страница 30: ...OLUME 4 Select HIGH for the highest volume OR Select MEDIUM for medium volume OR Select LOW for the lowestvolume 5 Press the Setup pad to exit 12 H R Shutoff The oven will automatically turn off at the end of 12 hours if you accidentally leave it on To turn off this feature 1 Press Setup pad 2 Use the arrow to scroll 3 Select 12HR SHUTOFF 3 Select ON or OFF using the Quickset pads 4 Press the Setu...

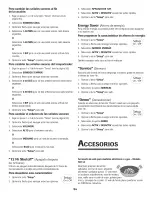
Страница 31: ...Wok Accessory Model A0142 Ideal for stir frying steaming braising and stewing Wok has nonstick finish wood handles cover steaming rack rice paddles and cooking tips Flat bottom wok can be used on ALL cartridges 3O ...

Страница 32: ...ts chips or other damage to the finish of your major appliance unless such damage results from defects in materials or workmanship and is reported to Jenn Air within 30 days from the date of purchase 6 Any food loss due to refrigerator or freezer product failures 7 Costs associated with the removal from your home of your major appliance for repairs This major appliance is designed to be repaired i...

Страница 33: ...ructions de s6curit6 importantes 33 36 Entretien et nettoyage 37 39 Entretien 40 41 D annage 42 43 Cuisson sur la surface 44 45 Cuisson au four 46 53 Options 5 4 58 R6glage favori 59 60 R6glage 60 62 Accessoi res 62 Garantie et service 63 Gufa de uso y cuidado 6 4 JENN AIR ...

Страница 34: ...t pas destines _ couvrir routes les situations et conditions 6ventuelles qui peuvent se presenter II faut faire preuve de bon sens de prudence et de soin Iors de rinstallation de rentretien ou du fonctionnement de rappareil Communiquez toujours avec le fabricant si vous ne comprenez pas un probl e ou une situation Reconnaissez les 6tiquettes paragraphes et syrnboles sur la s_curit_ Instructions g ...

Страница 35: ... tres inflammable itez d utiliser ou de remiser un flacon d a6rosol proximit6 de I appareil Pour 61iminer le besoin d atteindre quelque chose par dessus les brQleurs de surface il est pr6f6rable qu il n y ait aucane armoire de cuisine directement au dessus de I appareil S il y a une armoire vous ne devriezy remiser que des articles peu fr6quemment utilis6s et capables de r6sister _ la chaleur 6rai...

Страница 36: ... un ustensiie ou un composant de I appareil Laissez toujours refroidir un recipient d huile de friture chaude avantde tenter de le d lacer et le manipuler Ne laissez pas la graisse de cuisson ou autre materiau inflammable s accumuler dans ou pros de I appareil de la hotte ou du ventilateur Nettoyez fr uemment la hotte de la cuisiniere pour empecher la graisse de s accumuler sur la hotte ou sur le ...

Страница 37: ...andes et attendez le refroidissement de tous les composants avant de les toucher ou d entreprendre le nettoyage Travaillez prudemment afin d 6viter les br01ures par la vapeur si vous utilisez un chiffon ou une 6ponge humide pour nettoyer les renversements sur une surface chaude Certains produits de nettoyage peuvent g6n6rer des vapeurs nocives Iorsqu ils sont appliqu6s sur une surface chaude Netto...

Страница 38: ... du four 4 Pourempechertout dommage ne nettoyez pas et ne frottezpas lejoint qui se trouveautour de la porte du four Cejoint estcongu poureviter lespertesde chaleur pendantle cycle d autonettoyage 5 I_liminez les residusdegraisseou de produitsrenversessur la sole avantle nettoyage Ceciempechela formationde flammes ou de fumeedurant le nettoyage Essuyez les residussucreset acides commeles patatesdo...

Страница 39: ...hniques de nettoyage Les nomsde marquesont des marquesd os6esdes diff6rentslubricants Pourcornmariderdirectement composez le1 800 JENNAIR 1 800 536 6247 Lechefrite et sa grille Chapeaux de braleur et breleurs _ gaz scell6s Grilles de braleur En porcelainesur fonte Ne couvrez jamais la grille de papier d aluminium cela emp che la graisse de couler dunsla I chefrite Recouvrez la lechefriteet sa gril...

Страница 40: ...blanches Hublot et porte I_vitez d utilisertrop d eau car ellerisqueraitdes infiltrersousou derriereleverre causantainsidestachessur le hublot du four Lavez_ I eauet ausavon Rincez_ I eauclaireet s6chez Un nettoyantpourverrepeut 6tre utilis6si vousle pulv6risez Verre d abordsurun chiffon N utilisez pusdeproduitsabrasifscommelostampons_ r6curer la lained acierou los nettoyantsen poudrequi peuventra...

Страница 41: ... produitsnettoyantsabrasifscommeles tampons9 recurer en lained acier ou les produitsde nettoyage en poudrequi peuventrayer leverre 2 Ne heurtez pusleverre avecun ustensile un meuble unjouet ou tout autre objet 3 Ne fermez pusla portedu four avantd avoir replaceles grilles Toute degradationdu verre rayure choc tension etc peut affaiblir sastructure et augmenterle risquede bris 9 unedate ult_rieure ...

Страница 42: ...ri6e le propri6taire de I appareil a la responsabilit_ de faire remplacer la prise par une prise _ trois cavites correctement raise _ la terre D placement d un appareil gaz Les raccordsdesappareils_ gaz utilis6ssur cet appareilnesont pas con_uspourdes d6placementsfr6quents Une lois I appareilinstall6 NE le deplacez PASde fa_on r6p6t6epour lenettoyer ou le changerde place Sicet appareildolt 6tre d6...

Страница 43: ...ces o Losresultats de la cuisson differentde ceux du four precedent Verifiezquelatemperatureselectionneeestcorrecte Assurez vousquelefour estprechauffe quandcela est precisedans la recette Determinezsi I eventdu four estobstru Voyezson emplacement_ la page52 Assurez vousque la cuisiniereestd aplomb Les reglagesdetemperaturevarientsouvententre un four neuf et le four qu il remplace AvecI _gedesfour...

Страница 44: ... produittrop d humidit6 Ceciestnormalpour unecuisiniereneuveet disparaitapresquelquesutilisations Un autonettoyage 61iminera lesodeursplus rapidement La raiseen marched unventilateurd extractionaide_ enleverfum6eet odeur Salet6importantesur lasole Ex6cutez uneoperationd autonettoyage Lefour peut d6celerune anomalieIorsde la programmation ou du fonctionnement Encas d anomalie lemessageDEFAUT DETECT...

Страница 45: ...on identifiele brOleur _ desurface commande bouton Par le par ce exemple Front schema9 gauche identifiele brOleuravantdroit R_glage des commandes La puissance9 employerdependdu type et de la taille de rustensile utilis de veille Le dispositifd allumagenefait interveniraucuneflammede veille ChaquebrOleurde la table de cuissoncomporteun allumeur paretincelle Travaillez prudemmentlots du nettoyageaut...

Страница 46: ...e liqu_fi BrSleur deux anneau certains modeles La table de cuisson comporte un brOleur Sf deux anneaux situe au centre gauche Pour allumer ce brOleur appuyez sur le bouton et toumez le vers la gauche Tournez le bouton jusqu _ ce que vous _ ii obteniez le reglage desire Le brOleur s allumera scion la sequence suivante I anneau interieur est b High Ftleve I anneau interieur est b Low Bas puis les de...

Страница 47: ...additionnelles Pourprogrammer lecycled autonettoyage Pourafficherou modifierlesreglages ar defautde rusine Pourle reglagede latiroir de rechauffage Pourallumerou eteindrela lampe defour Annuletouteslesoperations saufla minuterie rhorloge les reglagesfavoris et tiroir de rechauffage Pourchoisirlesoptionsafficheessur laconsole 9 cotedela console sur lesdeuxc0t6s Touches rapides Lestouches rapidesson...

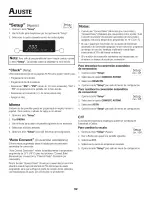
Страница 48: ...terie Modifier los sonneries de la minuterie Le signalsonore des MINUTERIE 1 et MINUTERIE 2 peut etre modifi Les optionsdisponiblessontdeux bips _ toutes los 30 secondes deux bips _toutes los60 secondesou un seul bip Le reglagepar defautest d unseul bip 1 Appuyezsur latouche Setup 2 S_lectionnezlafleche pour afficher SIGNAUXSONOR 3 SelectionnezSIGNAU SONOR Setup On Off 4 SelectionnezSIGNAUX MINUTE...

Страница 49: ...e CANCEL Remarqaes Si plus de 30secondess ecoulententre le momento_ vous appuyezsur unetouche et le momento_ vousappuyezsur une touche numerique I afficheurretournera9 I ecranprecedent Lefour chauffechaque foisqu unetemperature apparait I afficheur Pourmodifierlatemperaturedu four durant lacuisson appuyez sur latouche Bake et choisissezunetemperatureafficheeou utilisezlostouches numeriquespour ent...

Страница 50: ...numeriques Validez lereglageen appuyantsur latouche Eater Entrer Latemperaturepout etre programmeede 90_ 285 C 195 550 F par intervallesde 3 C 5 F Si la conversion automatiquepourconvectionestdesactivee latemperature pout etre reglee_ partir de 170 C 77 F Apres trois secondes le four se met_ prechauffer CUISSON CONVEC et PREHEAT Prechauffage apparaissent rafficheur avecla mention 100 ou la tempera...

Страница 51: ...iezverifierla cuissondes aliments Verifiezla cuisson_ I aided un thermometre_ viande Si la cuissonestterminee retirezles alimentsdu four et appuyezsur CANCEL Annuler pour eteindrele four 7 Sila cuissonn est pasterminee poursuivezle r0tissage Unefois letemps ecoule le four passeautomatiquementau mode de maintienau chaud pendant 1 heure puis s eteint Siles alimentssont retiresdu four _ _ avantque I ...

Страница 52: ...s pains pgtisserieset tartes aux fruits peuventetre rechauffes9 partir de latemperatureambiantesur le reglage High l Ieve N utiliser que des ustensilespouvantaller aufour Retirerlos alimentsdessachetsen plastiqueet los placer dans des ustensilesallant aufour Les assietteset platsdeservice peuventetre rechauffestout en prechauffantletiroir Recouvrirlesaliments d un couvercleou d unefeuille d alumin...

Страница 53: ... 4 abaissezla 4 4 4 4 4 4 grille et augmentezla dureede lacuisson Ventiiateur du four Un ventilateurde convectionpermetdefaire circulerrair chaud duns le four Iorsquela caracteristiquede convectionestselectionnee important Le ventilateurde convections arreteautomatiquement Iorsquevousouvrezla porte u Event du four L eventdu four estincorporeduns le systemedeventilation evacuationdescendantede la t...

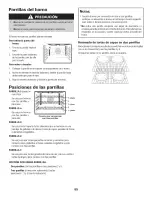
Страница 54: ...erla sole du four Caisson de g_teaux _ _tages sur deux grilles Pourdemeilleursr _sultats Iorsdelacuissondeg_teauxsurdeuxgrilles avecou sansconvection utilisezles positions2 et 5 Placezlesg_teauxsur la grille commeil estindiqu Positions des grilles POSITION 5 position la plus haute Utilisez cette position pour la cuisson sur deux grilles et la cuisson au gril POSITION 4 Utilisez cette position pour...

Страница 55: ...u demarragediffere voir _ gauche 2 lectionnez CUISS CONVEOT ROTISSCONVEOT ou PATISS CONVEOT 3 lectionnez latemperatureparmi cellosafficheesou utilisezlos touches numeriquespour entrer latemperaturede votrechoix 4 Selectionnezla duroc de cuissondesireeen utilisant losdurees afficheesou lostouches numeriques 5 Lamention DELAYapparait_ I afficheur lafonction choisie la temperaturepredefinieet le deco...

Страница 56: ...AINTIENCHAUDet latemperatures affichent 7 Lorsquevousaveztermin appuyezsur la touche CANCEL Annuler et retirezla nourriture ou los assiettesdu four CANCEL Pour rechauffer des petits pains Recouvrez les petits pains de papierd aluminium sansserrer puis placez lesau four More Appuyezsur More Options ODtJOnS SelectionnezMAINTIEN CHAUD Selectionnezlatemperature075 Rechauffezpendant 12_ 15 minutes Pour...

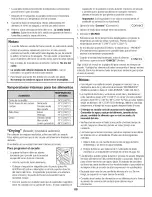
Страница 57: ...YDRATION 5 7 important Si I entrebgilleurn estpas correctementpositionn6 le ventilateurde convectionne fonctionnerapas Convect ii S61ectionnez unetemperature parmicellesaffich6esou entrezcelle de votrechoixen utilisant lostouches num6riques Vous pouvez choisir unetemperatureentre38 et 93 C 100et 200 F La mentionDESHYDRATION et latemperatures affichent PREHEAT Prechauffage s affichejusqu _ ce quela...

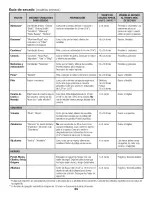
Страница 58: ...ce Pelez coupezen moitieset evidez Lavez pelezet enlevezlesyeux Coupez entranchesdansle sensde la Iongueuret enlevezle centre Coupeztransversalement entranchesde env 1cm 1 2 pc Lavezbien Enlevez I ecorceexternesur une aisseurde I_ 3 mm 1 16_ 1 8pc N utilisezpas la pelliculeblanchesous I ecorce Coupezen deux retirezles graines Placez lestomatespeauversle hautsur la grille Percezdestrousdans lapeau ...

Страница 59: ...ne grilleau milieudu four 3 Decongelezet servirpendant15minutespour les g_teauxet 30minutespourlestartes 4 Retirezdu four 5 Coupezen portionsindividuelleset d osezdansles assiettes 6 Remettezlesassiettesau four 7 Decongelezet servirpendant10_ 30minutes RetirezI alimentsurgeledu contenant D osezdansune assiette Placezrassiettesur unegrilleau milieudu four Decongelezet servirpendant10_ 30minutes Ret...

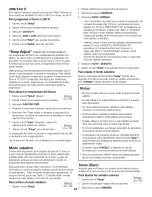
Страница 60: ...uvelle recette favorite Appuyezsur latouche Favorites JFavodtes Appuyezsur la flechepour faire defiler los choix SelectionnezCREERNOUVEAU9 raide de latouche 9gauche Entrezle nom _ I aidedestouches 5 6 Parexemple pour sauvegarderune lasagne appuyezsur la touche JKL troisfois pour la lettre _ L _ appuyezsur latouche ABC unefois pour la lettre _ A _ appuyezsur latouche STU unefoispour la lettre _ S_ ...

Страница 61: ...up pour quitter le menu de reglage Conversion autornatique pour convection Le four estregle_ rusine pour la conversionautomatiquepour convection Laconversionautomatiquepourconvectionreduit automatiquement latemperature regleede 25 pour loscaracteristiquesde Cuisson convectionet de P_tisserie_ convection Pourle R0tissage_ convection le regulateurvousavertit Iorsque 75 du tempsde r0tissages est ecou...

Страница 62: ...rer unetemperaturedecuisson pourvendredi _ 1 4het demeure en mode sabbatpendant33 heures La mentionMODESABBA ACTapparait_ I afficheurpendant90 minutes Sivous 61 desirezutiliser la fonction de cuissonau four ou decuisson et maintien durant le modesabbat vous devezlos programmer pendant los 90 minutes avantquele mode sabbat automatiquenesoit active La fonction MANUAL regle lefour pour le mode sabbat...

Страница 63: ...6teautomatiquementapres 12heuress il est accidentellementlaiss6en marche 62 Pour desactiver cette caract_ristique p 1 Appuyezsur latouche Setup Setup On Off 2 Appuyezsur lafleche pour faire defiler 1 6cran 3 S61ectionnez ARRETAUT 12 H 3 S61ectionnez MARCHEou ARRET_ raide destouches rapides 4 Appuyezsur latouche Setup pour quitter le menu Economie d _nergie Pour6conomiser1 6nergie I afficheurpeut 6...

Страница 64: ... autre dommage au fini du gros appareil menager moins que ces dommages soient dus des vices de materiaux ou de fabrication et soient signales Jenn Air dans les 30 jours suivant la date d achat 6 Toute perte d aliments due a une defaillance du refrigerateur ou du congelateur 7 Les coQts associes au transport du gros appareil menager du domicile pour reparation Ce gros appareil menager est con _u po...

Страница 65: ...ones importantes sobre seguridad 65 69 Cuidado y limpieza 69 72 Mantenimiento 72 73 LocalizaciOn y soluciOn de averias 74 75 CocciOn en la cubierta 76 77 CocciOn en el homo 78 85 Opciones 86 90 Favoritos 91 Aj uste 92 94 Accesorios 94 Garantia y servicio 01tima p_gina JENN AIR ...

Страница 66: ...emplazar cualquier pieza de su electrodom6stico a menos que se recomiende espec ficamente en esta gu a Todas las demos reparaciones deben ser hechas por un t6cnico calificado Siempre desenchufe el electrodom6stico antes de realizar reparaciones NSTRUCC I M RTANTES ES BRE URIDAD Las advertencias e instruccionesimportantessobre seguridad que aparecen en esta gu a no est_n destinadas a cubrir todas l...

Страница 67: ...al calory pueden set altamente inflamables Evite su use o su almacenamiento cerca de un electrodom6stico Para eliminar el riesgo de pasar sobre los quemadores superiores calientes no se deben guardar art culos en los armarios que est_n directamente sobre la estufa Si existen armarios sobre la cubierta los mismos s01odeben contener art culos que no se usen frecuentemente y que est6n seguros en un _...

Страница 68: ...sall_ del borde inferior del utensilio Una llama excesiva es peligrosa malgasta energ a y puede da_ar el electrodom_stico el utensilio o los armarios que se encuentran sobre la cubierta NUNCA deje alimentos cocin_ndose sin supervisi6n especialmente cuando utilice ajustes de temperatura altos o cuando fr a en aceite Los derrames pueden causar humo y los derrames de grasa se pueden encender Limpie l...

Страница 69: ...cuando utilice bolsas para hornear Solamente ciertos tipos de utensilios de vidrio vidrio cer_mico cer_imica o porcelanizados son convenientes para cocinar en la cubierta o en el homo sin que se quiebren debido al repentino cambio de temperatura Siga las instrucciones del fabricante del utensilio cuando use vidrio El rendimiento y funcionamiento seguro de este electrodom6stico se han comprobado us...

Страница 70: ...ntada pueden tambi6n ser perjudiciales Conserve estas instrucciones para referencia futura CU DADO Y L MP EZA Homo autolimpiante Elciclo de autolimpiezausatemperaturassuperioresa las temperaturasnormalesde cocciOnpara limpiar autom4ticamenteel interior delhorno Limpie el homo con frecuenciaremoviendolos derramesparaevitar humo excesivoy Ilamaradas No permitaquese acumuledemasiado sucio enel horno ...

Страница 71: ...e desplegar_nen pantalla 6 Despu _s deque la puerta se bloquee optima latecla Miore Options M_s opciones 7 SeleccioneDIFERIRusandolatecla r ida 8 Seleccionelacantidadde horasquedeseadiferir el inicio delciclo de autolimpieza 9 Eltiempo diferidoy eltiempo delimpiezaaparecer_nenlapantalla Despues de la autolimpieza Apreximadamente una hera despu_s del fin del cicle de limpieza el blequee se desengan...

Страница 72: ...ja Si quedaalgunasuciedad vuelvaa aplicar lacrerna cubra con unatoalla de papelh0rneday rernojedurante30 rninutos Vuelvaa restregar enjuaguey seque No lirnpieenel lavavajillasoen el horno autolirnpiante Paraactivarel bloqueode controlesparala lirnpieza yea lasecciOnBloqueode contro en la p ina 79 Lirnpiecon un paso rnojado Sequebien Sepuedenusarlirnpiadoresdevidriosi se rociaen unpaso prirnero NO ...

Страница 73: ... un pasosuave Enjuague y seque Las manchasdificiles puedenset quitadas con unaesponja Scotch Brite _multiusoh_medafrotandoafavordel grano Enjuague y seque Pararestaurarel lustrey sacarlas marcas vetas aplique StainlessSteelMagicSpray _ Decoloraci6n Usandounaesponjamojadao un paso suave limpiecon el limpiadorparaaceroinoxidable Cameo Stainless SteelCleaner _ Enjuagueinmediatamente y seque Parasacar...

Страница 74: ...mente puesto a tierra Luz del homo Paraasegurarsede instalarla bombilla de repuestocorrecta pida unabombilla deJenn Air Llameal 1 800 JENNAIR 1 800 536 6247 y pida la piezan0mero 74004458 bombilla de hal0geno Para reemplazar la bombilla del homo 1 Desconecteel suministroel6ctricoal electrodom6stico 2 Cuandoel homo est6fifo use la punta de susdedos para sostenerel bordede la cubiertade la bombilla ...

Страница 75: ...el quemader superior AsegOrese deque haya un utensiliosobre la rejilla se eleva de losorifieios Losresultades del herneade no sen losesperados o difieren de los obtenidoscon an homo nsado Elalimente no hierve adecuadamente e genera demasiado hnmo Verifique latemperaturaprogramadadel horno AsegOrese de precalentarel horno cuandola receta o las instruccionesIo recomienden Aseg _rese deque el respira...

Страница 76: ...fanuevay desaparecer_ despu _s devariosusos Un ciclo de autolimpiezanuevo quemar_ los oloresm_sr_pidamente Si enciendeunventiladorayudar_a eliminarel humoy u olor Haysuciedaddealimentosexcesiva en la parteinferiordel horno Useun ciclodeautolimpieza Elhornopuededetectarunafalla durantelaprogramaciOn o duranteelfuncionamiento Sise detectaunafalla puedeaparecerel mensajeFALLADETECTADA PILSE ENTER Y T...

Страница 77: ... quemadorsuperior _ _ _k f_ _ Siel quemadorsuperior no OBEOOS _ _ _ __ _ ___ _ encendedorest_ roto sucio mojado BASE DEL QUEMADOR Perillas de control de los elementos superiores Useestoscontrolesparaencenderlos quemadoressuperiores Una selecci0ninfinita de ajustesde calor estddisponible entre Low y High Sentirdun tope o ranuraen la posici0n High Lasperillas puedencolocarseen cualquierade estosajus...

Страница 78: ...lasiguiente quemadorinterior en High Alto luegoel quemadorinterior en Low Bajo luegoambosanillos en High y luegoambosanillos en Low Rejillas de los quemadores Las rejillasdebenestaren la posici0ncorrecta antesde la cocci0n Cuandoinstalelas rejillas coloque los extremoscon leng _etas hacia el centrode maneraque concuerdencon las barrasrectas La instalaci0ninadecuadade las rejillas puedecausarpicadu...

Страница 79: ... autolimpieza Useestafunci0nparavero cambiarlos ajustesdef_brica Useparalareglagede lagaveta calentadora Useparaencendero apagarlaluzdel horno AnulatodasInsfuncionesexceptoel temporizador el relojlas recetas favoritas losajustesy lagavetacalentadora Seusanparaseleccionar opciones en la pantalla juntoa lapantallaen ambos lados leclasr_pidas Lasteclas r idasest_n ubicadasa cada ladode la pantallay s...

Страница 80: ...dorepetidamente lasteclas r idas hastaque eltiempo deseadoquede programado O 3 Oprimalasteclas numericasparaprogramarel tiempo nuevo deseado 4 Oprimalatecla Enter Anulaci6a del temporizador _Tit_AFr2i _ _ Optimala tecla TIMER 1 o TIMER 2 dos veces On Off Si ambos temporizadores est_n activos Siel temporizadordeseadoya se encuentraen la pantalla optima la tecla unavezparaentrar en la funci de edici...

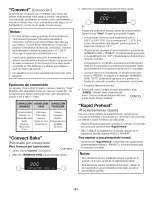
Страница 81: ...cla CANCEL Notas Sitranscurrenm_sdetreinta segundosaloprimir unateclay unatecla numeric la pantallavolver_al despliegueanterior Siempreque latemperaturaapareceen la pantalla el homo est_calentando Paracambiarlatemperatura del homo durante el procesode cocciOn optima la tecla Bake y seleccioneuna de las temperaturasdesplegadaso uselas teclas numericaspara programarlatemperaturadeseada Elhomo se apa...

Страница 82: ...teclas numOricas Optimalatecla Enter Aceptar paraguardarel ajuste Latemperaturadel horno puedeprogramarseentre91 C 195 F y 288 C 550 E en incrernentosde 1 C 5 E Si la convecciOn autom_ticaest_apagada puedeprogramarla temperaturadesde los 170 E DespuOs detres segundos el horno comenzar_a precalentarse HORNEADO CONVy PREHEAT Precalentamiento aparecer_n en la pantallajunto con 100 o latemperaturaactu...

Страница 83: ...el alimento Verifique la cocci0n del alimentousandoun termOmetrodecame Siel alimentoest_cocinado retfrelodel homo y optima latecla CANCEL Anular paraapagarel homo 7 Si el alimentono est_listo contin ie asando Una vezqueel tiempo programatic haacabado el homo autom_ticamentepasar_al modo KeepWarm Mantener caliente por unahoray luegose apagar Si el alimentoes retirado del homo antesde que la hornhay...

Страница 84: ...gaveta Lospanes pastelitosy paysde frutas puedenset calentados cuando est_natemperaturaambienteen el ajusteALTO Usesolamenteutensiliosresistentesal homo Retirelos alimentosde las bolsaspl_sticasy col0quelosen utensiliosresistentesal horno Losplatosde serviry los platosdecomida puedencalentarse cuando se est_precalentandolagaveta Cubra los alimentoscon unatapa o con papelde aluminio No useenvoltura...

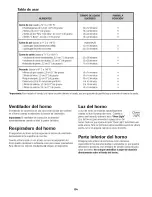
Страница 85: ... 4 4 4 4 4 4 4 parrilla bajay aumenteeltiempo de asado Ventilador del homo Elventiladorde convecciOn se usa parahacer circularaire caliente en el homo cuando seseleccionala funci0nde convecci0n Importante Elventiladorde convecci0nse detendr_ autom_ticamentecuandose abra la puertadel homo Respiradero del homo ElrespiraderoGelhomo est_incorporado al sistemadeventilaciOn descendenteen lasuperficie de...

Страница 86: ... o alimentoscongelados PARRILLA2 Seusa paraasarcortes peque_osde camey cacerolas para hornearpanes pastelitoso flanes pastelescongeladosy para hornearcon dos parrillas PARRILLA1 Seusa paraasarcortes grandesde camede res y de ave sufles o tortas de _ngely parahornearcon dos parrillas COCClON CONVARIAS PARRILLAS Dos parrillas Uselas parrillasen las posiciones2 y 5 Tres parrillas convecci6nsolamente ...

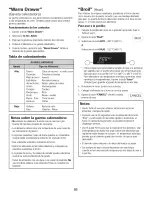
Страница 87: ... la izquierda 2 Seleccionela funci6n HORNEADO ASAR o PASTEI ES 3 Elijaunade las temperaturasdesplegadaso use Insteclas num6ricasparaprogramarlatemperatura 4 Elijaeltiempo de cocci6nde los tiempos desplegadoso use Ins teclas num6ricasparaprogramarel tiempode cocci6n 5 La pantallamostrar_ DELAY lafunci6n seleccionada la temperatura programaday el conteoregresivodel tiempodiferido Cuandoeltiempo dife...

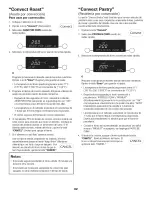
Страница 88: ...as puesel cambio r ido de temperaturapuedehacerque se rompan ocausarfisuras Notas Losalimentosdebenestarcalientescuandose colocanen el homo Paraobtener la mejorcalidad de los alimentos los mismosdeben mantenersecalientesdurante no robsde 1hera Paraevitarque los alimentosse sequen c0bralosligeramentecon papelde aluminioo con unatapa de vidrio Meat Probe Sonda para came modelos selectos Elusede la s...

Страница 89: ...ecta Importante Si el espaciadorno se colocacorrectamente el ventiladorde convecciOn no funcionar Optimalatecla Cenvect ConvecciOn Convect Oprimala flechapara navegarentre las opciones SeleccioneSECADO 88 Seleccioneuna de Instemperaturasdesplegadaso programela temperatura usandolasteclas num6ricas Puedeprogramar temperaturasentre 38 C 100 F y 93 C 200 F 6 Enel indicadoraparecer_SECADO y latemperat...

Страница 90: ...entes Frutasquerequ_eren unantioxidanteparaevitarladecoloraci0n y laperdidade los nutrientes Consultelos metodosespecificosenlas notasde la pdgina88 Lafunci0ndeapagadoautomdticodespuesde 12horasnofuncionardduranteelsecado 89 2 a 5 horas Frdgiles y desmenuzables Frdgiles y desmenuzables Albahaca Perejil Menta Cilantro Salvia Or6gano Cortelas hojas7 62cm 3 a 10 16cm 4 desdeeltope de la plantajusto d...

Страница 91: ...tocongeladoen la parrillacentraldel homo UselafunciOnde descongelar servirdurante 15 minutos paratortasy 30 minutospara pasteles Retireel alimentodel homo Corteen porcionesindividualesy coloqueen platos Vuelva a colocarlos platosenel homo Usela funciOndedescongelar servirde 10a 30 minutos Retireel alimentocongeladodel envase Coloquela porciOnen el plato Coloqueel plato en la parrillacentral del ho...

Страница 92: ...r lasagna optima latecla JKL tres veces parala letra L optima latecla ABC unavezpara la letra A optima latecla STU unavezpara laletra S ContinOe asi hastaque hayaterminadola palabra Despu _s de programarcada letra esperetres segundoshasta queaparezcauna lineaen elsiguienteespaciou optima latecla Enter antesde pasara lasiguiente letra Sepuedenusar hasta1 4letrasincluyendolos espacios Seleccionetecl...

Страница 93: ... el control le advertir_cuando hayatranscurrido el75 del tiempo deasado programadoparaqueverifique el gradode cocciOnde los alimentos Lastemperaturasde asadopot convecci0nno se reducir_n Notas Cuandouse ConvectBake Horneadopor convecci0n y ConvectPastry Pastelerfapot convecci0n con la opcidn Auto ConvectConversion ConversiOn autom_ticade convecci0n apagada reduzcalatemperatura programadaen 15 C 25...

Страница 94: ...ake cuando comienzael mode sab_tico dicha funci6nser_ anulada Para activar el mode sab_tico Setu_ 1 Optima latecla Setup On Off 93 2 Optimala flechapara navegarentre Insopciones 3 Seleccionela opci6n SABATICO 4 SeleccioneAUTO o MANUAL Auto Autom_tico le pedir_que programelatemperaturade horneadoel viernesa las 2 00p m y permanecer_en mode sab_tico per33 horns MODOSABATACTse despliegaen la pantalla...

Страница 95: ...nergia la pantallapuedeset configuradaparaapagarse si no est_en uso Para programar la caracteristica de ahorro de energfa 1 Oprimala tecla Setup 2 Optimala flecha paranavegarentre Insopciones On Off 3 SeleccioneAHORROENERGIA 4 SeleccioneAOTIVo DESACTIVusandoInsteclas r_pidas 5 Oprimala tecla Setup parasalir Optimacualquier tecla paraactivarel indicador Service Servicio Esta_readel control del homo...

Страница 96: ... principal a menos que el mismo sea debido a defectos en los materiales o la mano de obra y se le informe a Whirlpool en un lapso de 30 d as a partir de la fecha de compra 6 Cualquier p6rdida de comida debido a fallas del refrigerador o del congelador 7 Costos relativos a la remoci6n de su electrodomestico principal desde su hogar para obtener reparaciones Este electrodom6stico principal estA dise...

Отзывы: