10
F
RESH
F
OOD
F
EATURES
Note
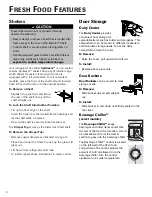
• Cold air diverted into the Beverage Chiller™ can
decrease the main refrigerator temperature.
Refrigerator control may need to be adjusted.
To Install Beverage Chiller™:
• Reverse above procedure.
To Remove Beverage Chiller™:
• First remove the pick off shelf to
the left of the Beverage Chiller™.
• Firmly hold each side of beverage
chiller, lift up and away from door
liner.
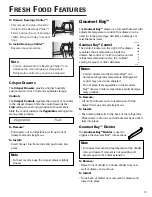
Crisper Drawers
The
Crisper Drawers
provide a higher humidity
environment for fresh fruit and vegetable storage.
Controls
The
Crisper Controls
regulate the amount of humidity
in the crisper drawer. Slide the control towards the
Fruit
setting when storing produce with outer skins.
Slide the control towards the
Vegetables
setting when
storing leafy produce.
Note
• For best results, keep the crisper drawers tightly
closed.
To Remove:
• Pull drawer out to full extension. Tilt up front of
drawer and pull straight out.
To Install:
• Insert drawer into frame rails and push back into
place.
Gourmet Bay™
The
Gourmet Bay™
drawer is a full-width drawer with
adjustable temperature control. This drawer can be
used for large party trays, deli items, beverages or
miscellaneous items.
Gourmet Bay™ Control
The control, located on the right of the drawer,
regulates the air temperature inside the
drawer. Set control to “cold” to provide normal
refrigerator temperature. Use the “coldest”
setting for meats or other deli items.
Coldest
Cold
To Remove:
• Lift lid. Pull drawer out to full extension. Tilt the
drawer front up and pull straight out.
To Install:
• Push metal glide rails to the back of the refrigerator.
Place drawer onto rails and slide drawer back until it
falls into place.
Notes
• Cold air directed to the Gourmet Bay™ can
decrease refrigerator temperature. Refrigerator
control may need to be adjusted.
• Do not place leafy vegetables in the Gourmet
Bay™ drawer. Colder temperatures could damage
leafy produce.
Gourmet Bay™ Divider
The
Gourmet Bay™ Divider
is used to
organize the Gourmet Bay™ into sections.
Note
• For easiest removal and replacement of the divider,
remove drawer. If removal is not possible, pull
drawer open to it’s fullest extension.
To Remove:
• Raise front of divider to unhook divider from rear
wall of drawer, and pull out.
To Install:
• Hook back of divider over rear wall of drawer and
lower into place.
Содержание JBR2086HES
Страница 56: ...55 REMARQUES ...
Страница 57: ...56 REMARQUES ...
Страница 86: ...85 NOTAS ...
Страница 87: ...86 NOTAS ...


